background image

9


REVERSE THE DOOR SWING  


FOR BUITL-UNDER SERIES


Remarks:  

  The instruction is based on a unit with right door hinge installed already. 

  To reserve the door from right hinge to left hinge, you need to get ready 2 new spare parts: an 

upper left hinge

, and a 

bottom left hinge

  All removed parts must be saved to do the door reinstallation, except those remarked with 

“Disused”. 


1

st

 step    

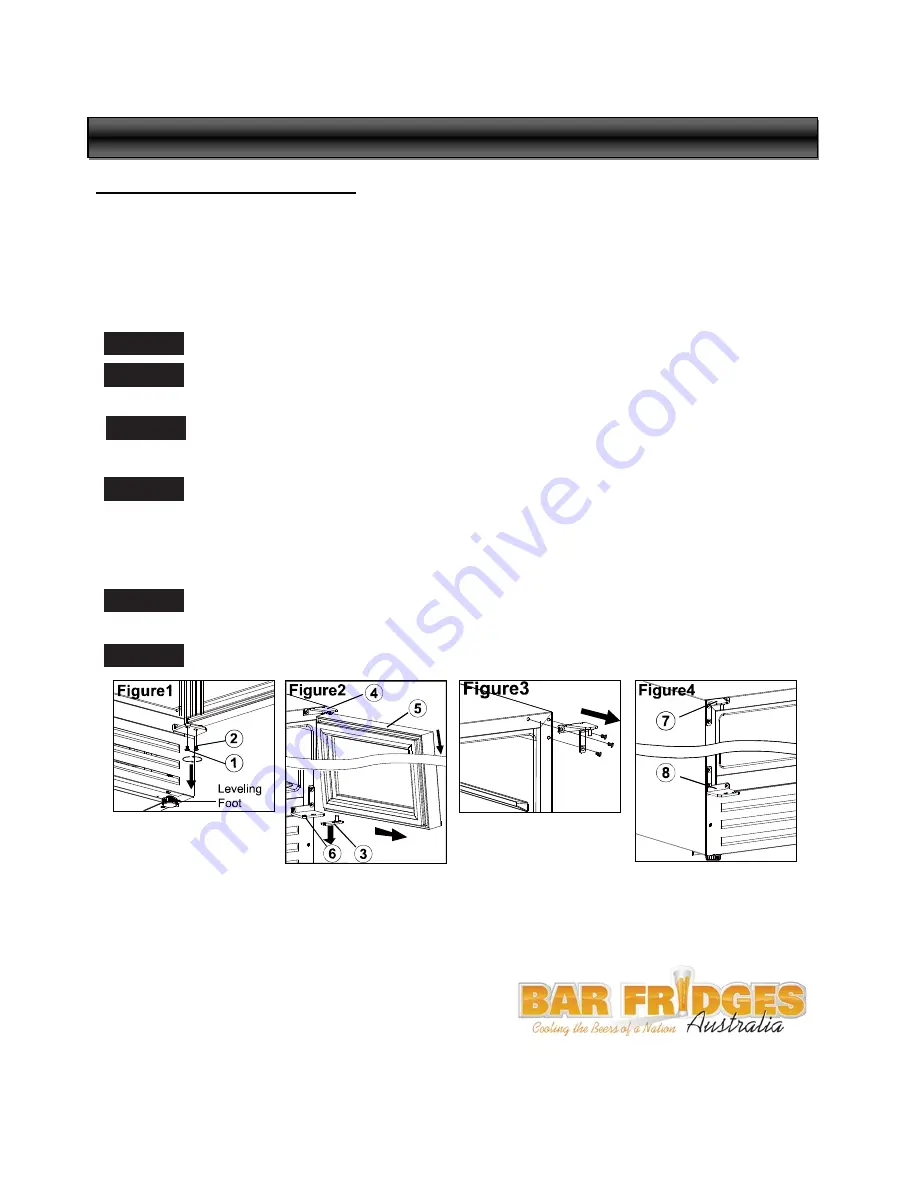
–Open the door, and loosen the 2 screws.  See 

Figure 1. 

2

nd

 step

   – Carefully remove the door from the upper right hinge and prevent it from 

scratching. Take out the support rod from the door hinge hole. See 

Figure 2

3

rd

 step

   – Pull out the 6 decorating plastic bolts covering the reserved hinge screw holes at the front 

left corner of the cabinet.  


4

th

 step

   – Unscrew the upper right hinge 

4 (Disused) and bottom left hinge 

6  (Disused) from 

the cabinet. See 

Figure 3

.   

Install the upper left hinge


7 and bottom left hinge

8  to the left side of the cabinet. 

Make sure the screws are tightened. See 

Figure 4

5

th

 step   


– Put upside down the door and install it to the left hinges by following the opposite 

steps of taking down of the door as described above. 

6

th

 step

    – Cover the hinge screw holes on the right side with the 6 decorating plastic bolts. 


WARRANTY

: Call Bar Fridges Australia on  

1300 170640 8:30>7pm Mon-Fri, 9>12 Sat.  
Or simply logon to the website, at warranty link on top 
menu page. 

You must have proof of purchase document.


www.bar-fridges-australia.com.au 


Summary of Contents for SK100B

Page 1: ...installation instructions of the appliances Please read it carefully and keep handy for easy reference CONTENTS IMPORTANT SAFETY INFORMATION P 1 STRUCTURE AND INSTALLATION DRAWING P 2 ACCESSORY INSTALLATION BEFORE OPERATING P 5 OPERATING THE REFRIGERATOR P 6 CARE AND MAINTENANCE P 9 TROUBLESHOOTING P 10 REVERSE THE DOOR SWING P 12 ...

Page 2: ...iod Ensure when moving appliance to take care and not damage or drop To ensure proper ventilation for the appliance the front of the unit must be completely unobstructed Locate the unit away from direct sunlight and sources of heat stove heater etc The fuse or circuit breaker size should be app 10 amps It is important for the appliance to be leveled in order to work properly You may adjust the app...

Page 3: ...3 SK100W or SK100B building into cabinetry under bench SK150W or SK150B building into cabinetry under bench ...

Page 4: ... an optional function If your Wine Cooler has such function a key should be attached inside the packing of this Manual Insert the key into the lock and turn it counter clockwise to unlock the door To lock it please follow the reversed operation Please save the key well OPERATION WORKING CLIMATE The appliance is designed for operating from SN to T climate see below climate class chart It is recomme...

Page 5: ...m falling See the right figure To prevent damaging the door gasket make sure to have the door opened fully all the way before pulling the shelves out Please store wine in sealed bottles Should the wine cooler be left empty for long periods it is suggested that the appliance is unplugged and after careful cleaning leave the door ajar to allow air to circulate inside the cabinet in order to avoid po...

Page 6: ...cond Press for 3 second ON OFF UP Turn up the parameters list Increase the value of parameter Switch on off SET MUTE Mute the buzzer Select the parameter Save parameter value temporarily Show PS start setting parameters Save parameter value permanently LIGHT DOWN Turn on off light Turn down the parameter list Decrease the value of parameter How to set the temperature 1 Press the set for three seco...

Page 7: ...If the power is going to be off for a longer period of time you need to take the proper steps to protect your contents MOVING THE WINE COOLER Remove all items Securely tape down all loose items shelves inside your appliance Turn the adjustable leg up to the base to avoid damage Tape the door shut Be sure the appliance stays secure in the upright position during transportation Also protect outside ...

Page 8: ...ently The door is not closed completely The temperature control is not set correctly The door gasket does not seal properly The lighting does not work Not plugged in The circuit breaker tripped or a blown fuse The lighting is turned off Too much vibration Check to assure that the appliance is level Check to assure no parts inside the cabinet or in the compressor chamber are loose The unit seems to...

Page 9: ... decorating plastic bolts covering the reserved hinge screw holes at the front left corner of the cabinet 4th step Unscrew the upper right hinge 4 Disused and bottom left hinge 6 Disused from the cabinet See Figure 3 Install the upper left hinge 7 and bottom left hinge 8 to the left side of the cabinet Make sure the screws are tightened See Figure 4 5th step Put upside down the door and install it...

Reviews: