background image

English  


12 

EN 

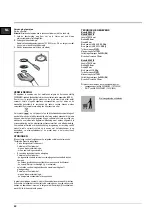
The hood can look different to that illustrated in the drawings in this 
booklet. The instructions for use, maintenance and installation, however, 
remain the same.   


It is important to conserve this booklet for consultation at any moment. In 
the case of sale, cession or move, make sure it is together with the product.   

Read the instructions carefully: there is important information about 
installation, use and safety.  

Do not carry out electrical or mechanical variations on the product or on the 
discharge conduits. 


GENERAL SAFETY 

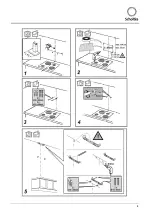
The minimum distance between the supporting surface for the cooking 
equipment on the hob and the lowest part of the range hood must be not less 
than 50cm from electric cookers and 65cm from gas or mixed cookers. 
If the instructions for installation for the gas hob specify a greater distance, this 
must be adhered to. 
Expansion wall plugs are provided to secure the hood to most types of 
walls/ceilings. However, a qualified technician must verify suitability of the 
materials in accordance with the type of wall/ceiling. The wall/ceiling must be 
strong enough to take the weight of the hood. 

Do not tile, grout or silicone this 

appliance to the wall. Surface mounting only. 
WARNING!

 Do not connect the appliance to the mains until the installation is 

fully complete.  
Before any cleaning or maintenance operation, disconnect hood from the mains 
by removing the plug or disconnecting the mains electrical supply.  
Always wear work gloves for all installation and maintenance operations. 
The appliance is not intended for use by children or persons with impaired 
physical, sensorial or mental faculties, or if lacking in experience or know-how, 
unless they are under supervision or have been trained in the use of the 
appliance by a person responsible for their safety. 
Children should be monitored to ensure that they do not play with the appliance. 
This appliance is designed to be operated by adults.  Children should not be 
allowed to tamper with the controls or play with the appliance.Never use the 
hood without effectively mounted grating! 
The hood must NEVER be used as a support surface unless specifically 
indicated. 
The premises where the appliance is installed must be sufficiently ventilated, 
when the kitchen hood is used together with other gas combustion devices or 
other fuels.  
The suctioned air must not be conveyed into a conduit used for the disposal of 
the fumes generated by appliances that combust gases or other fuels. 
The flaming of foods beneath the hood itself is severely prohibited. 
The use of exposed flames is detrimental to the filters and may cause a fire risk, 
and must therefore be avoided in all circumstances.  
Any frying must be done with care in order to make sure that the oil does  not 
overheat and burst into flames. 
With regards to the technical and safety measures to be adopted for fume 
discharging it is important to closely follow the regulations provided by the 
authorised authorities. 
The hood must be regularly cleaned on both the inside and outside (AT LEAST 
ONCE A MONTH). 
This must be completed in accordance with the maintenance instructions 
provided in this manual). Failure to follow the instructions provided in this user 
guide regarding the cleaning of the hood and filters will lead to the risk of fires. 
Do not use or leave the hood without the lamp correctly mounted due to the 
possible risk of electric shocks. 
We will not accept any responsibility for any faults, damage or fires caused to the 
appliance as a result of the non-observance of the instructions included in this 
manual. 


ELECTRICAL CONNECTION 

The mains power supply must correspond to the rating indicated on the plate 
situated inside the hood. If provided with a plug connect the hood to a socket in 
compliance with current regulations and positioned in an accessible area. If it not 
fitted with a plug (direct mains connection) or if the plug is not located in an 
accessible area apply a double pole switch in accordance with standards which 
assures the complete disconnection of the mains under conditions relating to 
over-current category III, in accordance with installation instructions. 

Warning! 

Before re-connecting the hood circuit to the mains supply and 

checking the efficient function, always check that the mains cable is correctly 
assembled. 


Replacing the power cable 

The hood is provided with a special power cable ; if the cable is damaged, 
request a new one from Technical Service. 


AIR VENT 

(for the suction versions) 

Connect the hood and discharge holes on the walls with a diameter equivalent to 
the air outlet (connection flange). 
Using the tubes and discharge holes on walls with smaller dimensions will cause 
a diminution of the suction performance and a drastic increase in noise. 

Any responsibility in the matter is therefore declined.  

Use a duct of the minimum indispensible length. 

Use a duct with as few elbows as possible (maximum elbow angle: 90°). 

Avoid drastic changes in the duct cross-section. 

Use a duct with an as smooth as possible inside. 

The duct must be made of certified material. 

!


The company declines any responsibility whenever these regulations are 
not respected. 


FILTERING OR DUCTING ? 

!


Your cooker hood is ready to be used in suction version. 


To use the hood in filtering version the special ACCESSORY KIT must be 
installed. 


Check on the first pages of this manual if the ACCESSORY KIT is furnished 
or must be bought separately. 


Note:

 If furnished, in certain cases, the additional activated carbon filtering 

system may be installed on the hood. 


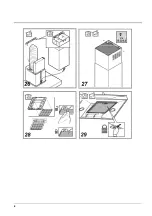
Information about the conversion of the hood from suction version to filtering 
version is present in this manual. 


  Ducting version 

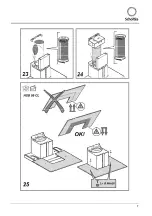
In this case the fumes are conveyed outside by means of a special pipe 
connected with the connection ring located on top of the hood. 

Attention

! The exhausting pipe is not supplied and must be purchased apart. 

Diameter of the exhausting pipe must be equal to that of the connection ring = 
150mm. 
In the horizontal runs the exhausting pipe must be slightly slanted (about 10°) 
and directed upwards to vent the air easily from the room to the outside. 
Attention! If the hood is supplied with active charcoal filter, then it must be 
removed. 


  Filter version 

One active charcoal filter is needed for this and can be obtained from your usual 
retailer.  
The filter removes the grease and smells from the extracted air before sending it 
back into the room through the upper outlet grid. 

Summary of Contents for HSB 99

Page 1: ...English 12 Français 15 NL IT RU Nederlands 18 Italiano 21 РУССКИЙ 24 HSB 99 CL HSB 99 IX HSD 69 IX Betriebsanleitung Instructions for use Mode d emploi Gebruiksaanwijzingen Istruzioni per l uso Инструкция по зксплуатации ...

Page 2: ...2 ...

Page 3: ...3 ...

Page 4: ...4 ...

Page 5: ...5 ...

Page 6: ...6 ...

Page 7: ...7 ...

Page 8: ...8 ...

Page 9: ...ses Handbuchs zu beachten Eine Nichtbeachtung der Vorschriften zur Reinigung der Haube sowie zur Auswechselung und Reinigung der Filter führt zu Brandgefahr Die Dunsthaube nie benutzen wenn die falschen Lampen montiert sind Es besteht das Risiko eines Stromschlages Es wird keinerlei Haftung übernommen für Fehler Schäden oder Brände des Gerätes die durch Nichteinhaltung der in diesem Handbuch aufge...

Page 10: ...wiederholen um die Aktivkohlefiltersättigungsanzeige zu deaktivieren Filtersättigungsanzeige wiederherstellen Nachdem der Filter gereinigt bzw ersetzt worden ist Taste 1 3 Sekunden gedrückt halten bis die Buchstabe F Fettfilter und oder die Buchstabe C aufhören zu blinken WARTUNG Hinweis Vor jeder Reinigung und Pflege ist die Dunstabzugshaube durch Ziehen des Netzsteckers oder Ausschalten der Sich...

Page 11: ...um weitere Informationen über Behandlung Verwertung und Wiederverwendung dieses Produkts zu erhalten BETRIEBSSTÖRUNGEN Wenn etwas nicht zu funktionieren scheint folgende Kontrollen durchführen bevor der Kundendienst gerufen wird Wenn die Abzugshaube nicht funktioniert Prüfen ob ein Stromausfall vorliegt eine Geschwindigkeit gewählt wurde Wenn die Leistung der Abzugshaube mangelhaft ist Prüfen ob d...

Page 12: ...nstructions provided in this manual Failure to follow the instructions provided in this user guide regarding the cleaning of the hood and filters will lead to the risk of fires Do not use or leave the hood without the lamp correctly mounted due to the possible risk of electric shocks We will not accept any responsibility for any faults damage or fires caused to the appliance as a result of the non...

Page 13: ...reset After clearing or replacing the filter press key 1 for 3 seconds until the letter F anti grease filter s and or the letter C stop s flashing MAINTENANCE ATTENTION Before performing any maintenance operation isolate the hood from the electrical supply by switching off at the connector and removing the connector fuse Or if the appliance has been connected through a plug and socket then the plu...

Page 14: ...r local authority MALFUNCTIONS If something appears not to be working properly do the following simple checks before calling Technical Service If the hood is not working Check that The power has not been disconnected A speed has been selected If the hood performs inefficiently Check that The motor speed selected is sufficient for the amount of smoke and vapours released The kitchen is sufficiently...

Page 15: ...ns ce manuel La non observation de ces normes de nettoyage de la hotte et du changement et nettoyage des filtres comporte des risques d incendie Ne pas utiliser ou laisser la hotte sans que les ampoules soient correctement placées pour éviter tout risque de choc électrique La société décline toute responsabilité pour d éventuels inconvénients dégâts ou incendies provoqués par l appareil et dérivés...

Page 16: ... filtre au charbon est activé Répéter l opération pour désactiver le signal Rétablissement de l indicateur de saturation Après avoir nettoyé ou remplacé le filtre appuyer sur la touche 1 pendant 3 secondes jusqu à ce que la lettre F filtre s anti graisses et ou la lettre C arrête nt de clignoter ENTRETIEN Attention Avant toute opération de nettoyage ou d entretien débrancher la hotte du circuit él...

Page 17: ...iété de collecte des déchets ou directement à votre revendeur ANOMALIES DE FONCTIONNEMENT En cas d anomalie de fonctionnement avant de faire appel au service d assistance effectuer les contrôles suivants Si la hotte ne fonctionne pas S assurer de l absence de coupure de courant qu une vitesse a été sélectionnée Si la hotte a un faible rendement S assurer que la vitesse du moteur sélectionnée est s...

Page 18: ...ervanging en reiniging van de filters kan brandgevaar veroorzaken Zorg altijd dat de lampjes in de kap aanwezig en goed gemonteerd zijn om het gevaar voor elektrische schokken te voorkomen Iedere aansprakelijkheid voor eventuele schade aan het apparaat of brand veroorzaakt door het niet in acht nemen van de aanwijzingen uit deze handleiding wordt afgewezen ELEKTRISCHE AANSLUITING De netspanning mo...

Page 19: ... dezelfde handeling om de indicatie uit te schakelen Reset verzadigingsindicatie Na het reinigen van het filter druk 3 seconden lang op knop 1 totdat de letter F vetfilter s en of de letter C niet meer knippert en ONDERHOUD Attentie Koppel voor ieder onderhoud eerst de wasemkap van het elektriciteitsnet af door de stekker weg te trekken of door de hoofdschakelaar van de woning uit te schakelen Sch...

Page 20: ... u het product heeft aangeschaft STORINGEN Bij een storing van de afzuigkap voer de volgende controles uit alvorens de Technische Dienst te raadplegen Als de afzuigkap niet functioneert Controleer of Controleer dat er geen stroomonderbreking is er een snelheid is geselecteerd Bij een laag rendement van de afzuigkap Controleer of Controleer dat de ingestelde snelheid volstaat voor de afgegeven hoev...

Page 21: ...orme di pulizia della cappa e della sostituzione e pulizia dei filtri comporta rischi di incendi Non utilizzare o lasciare la cappa priva di lampade correttamente montate per possibile rischio di scossa elettrica Si declina ogni responsabilità per eventuali inconvenienti danni o incendi provocati all apparecchio derivati dall inosservanza delle istruzioni riportate in questo manuale COLLEGAMENTO E...

Page 22: ...e della saturazione del filtro al carbone Ripetere l operazione per disattivare la segnalazione Ripristino dell indicatore di saturazione Dopo aver pulito o sostituito il filtro premere il tasto 1 per 3 secondi fino a che la lettera F filtro i antigrasso e o la lettera C smette ono di lampeggiare MANUTENZIONE Attenzione Prima di qualsiasi operazione di pulizia o manutenzione disinserire la cappa d...

Page 23: ... Servizio Assistenza effettuare i seguenti semplici controlli Se la cappa non funziona Verificare che non c è interruzione di corrente è stata selezionata una velocità Se la cappa ha un rendimento scarso Verificare che La velocità motore selezionata è sufficiente per la quantità di fumo e di vapori liberata La cucina è sufficientemente areata per permettere una presa d aria Il filtro carbone non è...

Page 24: ...и по замене и очистке фильтров может стать причиной пожара Не использовать или оставлять вытяжку без правильно установленных лампочек в связи с возможным риском удара электрическим током Мы снимаем с себя всякую ответственность за неполадки ущерб или сгорание прибора вследствие несоблюдения инструкций приведенных в данном руководстве ЭЛЕКТРИЧЕСКОЕ СОЕДИНЕНИЕ Напряжение сети должно соответствовать ...

Page 25: ...ючить сигнализацию Установка на ноль указателя насыщения После того как фильтр был помыт или заменен нажмите на кнопку 1 и держите ее нажатой 3 секунды до того момента пока буква F жировой фильтр и или буква С перестанут мигать ТЕХНИЧЕСКОЕ ОБСЛУЖИВАНИЕ Внимание Прежде чем выполнить любую операцию по чистке или техническому обслуживанию отсоедините вытяжку от электросети отсоединяя вилку или главны...

Page 26: ...РАБОТЕ Если что то не работает должным образом перед тем как обратиться в Службу по техническому обслуживанию выполните следующие простые проверки Если вытяжка не работает Проверить что бы не была прервана подача тока что бы была выбрана скорость Если вытяжка плохо работает Проверить что выбранная скорость двигателя достаточна для выработанного количества дыма и пара что кухня достаточно проветрен...

Page 27: ......

Page 28: ...LI3WIB 05 2009 ...

Reviews: