background image

22

GB

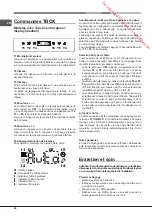
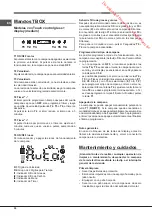
TBOX controls

Models with Touch control glass + display 
(medium)

T1 motor ON/OFF

When the button is pressed with the hood off, the fi rst speed 
is set. When the button is pressed during operation, the 
hood switches OFF.

T2 Speed –

When the button is pressed the hood switches to the 
previous speed. 

T3 Speed +

If the hood is set to speed 3, the intensive speed activates 
when this button is pressed 
The setting is limited by time; when it elapses the hood goes 
back to the speed set previously.

T4 Timer “–”

Set a time to turn 

OFF

 the hood with the timer; if the timer 

is set and the speed is subsequently changed by pressing 

T2

T3

 or 

T4

, the timer is deactivated.

Press 

T4

 to decrease the timer by 5 minutes.

T5 Timer “+”

When the button  is pressed for the fi rst time, the timer is set 
to 5 minutes; this value is increased by 5 additional minutes 
every time the button is pressed after that.

T6 lights ON/OFF

It turns the work lights of the hood on and off

D1:

 DGT Speed

D2:

 Assembly of 2 DGT Time

I1:

 Grease Filter Indicator 

I2:

 Carbon Filter Indicator 

I4:

 Menu Indicator

I5:

 Timer Indicator

Antigrease and odour fi lter signal

The antigrease (A) and/or odour (B) fi lters need cleaning/
replacing after a certain number of hours of use (the latter 
for fi ltering hoods only).
The indicator light 

I1

 on indicates that the antigrease fi lter 

is saturated, while the indicator light 

I2

 on indicates that the 

odour fi lter is saturated (for hoods in fi ltering mode only).
Press 

T5

 + 

T4

 for 3 seconds with the hood on to reset the 

counter. 

Hood type setting

The hood can be set to the ventilation (default) or fi ltering 
mode. To change the setting proceed as follows:
•  with the hood 

OFF

, the menu is accessed by pressing the 

T4

 e 

T5

 buttons for a prolonged time; this is signalled by 

a sound emitted by the hood and by the I4 icon lighting 
up and the writing 

C1-0

 appearing on the display;

•  use the buttons 

T4

 and 

T5

 to go through the menu. Use 

T4 to go through the various menu items (

C1

C2

C3

C4

, etc) and 

T5

 to select them (

0

1

 or 

0

1

2

);

•  to set the hood type, access the menu, select the item 

C6

 with 

T4

 and set the value 0 with 

T5

 to set the hood 

on ventilation mode or 1 for the fi ltering mode. Press 

T1


at the end.

Hood off

The hood can be turned off manually by pressing the 

T1

 button 

(

ON/OFF

). If the hood stays on in manual mode, it turns off 

automatically after a certain “safety” time. If the timer is set, 
the hood turns off automatically when the set time runs out.

General notes

If the display buttons become locked, unplug and plug 
in again the hood from the mains before contacting the 
Assistance Service.

Maintenance and care

Caution! Before cleaning or servicing the unit, 
disconnect it from the mains by pulling the power plug 
or disconnecting the main circuit breaker.

First cleaning

•  Remove the protective fi lm
•  Clean with a damp sponge and a little neutral soap
•  Rinse off with a damp cloth
•  Dry with a soft cloth; if the hood is stainless steel, dry 

along the metal's grain

Periodic cleaning

The hood must be cleaned frequently (at least as often as 
you service the grease fi lter), inside and out. Use a damp 
cloth and a neutral liquid detergent with lukewarm water.
Do not use abrasive or corrosive products.

Warning:

 Failure to observe the hood cleaning and fi lter 

cleaning/replacement instructions can result in fi res. Follow 
the instructions carefully. The manufacturer is not liable for 
any damage to the motor or fi res caused by incorrect care 
or failure to follow the above instructions.

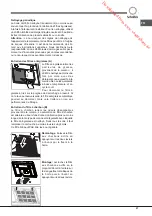
Servicing the grease fi lter (A)

A

The grease fi lter retains the 
particles of grease produced 
during cooking; it must be 
cleaned at least once a month 
w i t h   a   n o n - a g g r e s s i v e 
detergent, either by hand or 
with a low temperature, short 
dishwasher cycle.

T1 T2 T3

T4 T5 T6

D1

I1

D2

I5

I2

I4

Downloaded from www.vandenborre.be

Summary of Contents for SCHLB 9.8 LAI

Page 1: ...arnings 10 Assistance 16 Installation 22 TBOX controls 23 Maintenance and care 24 Troubleshooting 26 Sommaire Mode d emploi 1 Avertissements 11 Assistance 16 Installation 27 Commandes TBOX 28 Entretien et soin 30 Anomalies et remèdes 32 Sumario Manual de instrucciones 1 Advertencias 13 Asistencia 16 Instalación 33 Mandos TBOX 34 Mantenimiento y cuidados 35 Anomalías y soluciones 37 Índice Instruçõ...

Page 2: ...2 6x Ø 8 x 40 6x Ø 5 x 45 4x Ø 3 5 x 9 5 2x 1x ø 150 125mm ø 150mm 1x 2 3 4 5 1x D o w n l o a d e d f r o m w w w v a n d e n b o r r e b e ...

Page 3: ...3 32 cm min 1A Ø150mm Ø120mm Ø120 Ø150 Ø120mm Ø120 Ø150 Ø150mm 1B Ø150mm D o w n l o a d e d f r o m w w w v a n d e n b o r r e b e ...

Page 4: ...4 4 6 3 5 650 m m 550 m m x6 Ø 8 mm x6 x6 x2 5 m m 2 7 D o w n l o a d e d f r o m w w w v a n d e n b o r r e b e ...

Page 5: ...5 10 11 12 13 8 1 2 3 9 x2 x2 ø 120 ø 150 D o w n l o a d e d f r o m w w w v a n d e n b o r r e b e ...

Page 6: ...6 16 17 14 ø 3 5 x 9 5 x2 ø 150 15 D o w n l o a d e d f r o m w w w v a n d e n b o r r e b e ...

Page 7: ...7 A 19 18 D o w n l o a d e d f r o m w w w v a n d e n b o r r e b e ...

Page 8: ...e non è totalmente completata Prima di qualsiasi operazione di pulizia o manutenzione disinserire la cappa dalla rete elettrica togliendo la spina o staccando l interruttore generale dell abitazione Per tutte le operazioni di installazione e manutenzione utilizzare guanti da lavoro L apparecchio non è destinato all utilizzo da parte di bambini o persone con ridotte capacità fisiche sensoriali o me...

Page 9: ... to keep the manual with the product Read the instructions carefully they contain important installation user and safety information Do not tamper with the electrical or mechanical equipment of the product or its exhaust ducts General safety information The distance between the cookware support surface on top of the cooking appliance and the lowest part of the cooker hood must be at least 65 cm if...

Page 10: ...esult in fires Never use the hood without its bulbs properly installed electrocution hazard The manufacturer is not liable for any inconvenience damage or fire caused by the unit as a result of failure to observe the instructions given in this manual Caution The unit s accessible parts can get very hot when used with cooking equipment Avertissements Il est important de conserver ce manuel afin de ...

Page 11: ... ventilation suffisante lorsque la hotte est utilisée en même temps que d autres appareils à combustion utilisant du gaz ou d autres combustibles L air aspiré ne doit pas être acheminé dans un conduit utilisé pour l évacuation des fumées produites par d autres appareils de combustion utilisant du gaz ou d autres combustibles Veuillez respecter toutes les normes relatives à l évacuation de l air Il...

Page 12: ... especializado para comprobar la idoneidad de los materiales de acuerdo con el tipo de pared o techo que deberá ser suficientemente sólido para sostener el peso de la campana Atención No conectar el aparato a la red eléctrica hasta no terminar totalmente la instalación Antesderealizarcualquieroperaciónde limpieza o mantenimiento desconectar la campana de la red eléctrica mediante la clavija o el i...

Page 13: ...o de las instrucciones contenidas en este manual Atención Laspartesaccesiblespueden recalentarse considerablemente durante el uso de la placa de cocción Advertências É importante guardar este manual para poder consultá lo a qualquer momento Em caso de venda cessão ou transferência assegure se de que este permanece junto com o produto Leia atentamente as instruções contêm informações importantes so...

Page 14: ...ás ou outros combustíveis Respeitetodasasnormativasreferentes à descarga do ar É severamente proibido cozinhar alimentos em chama livre sob o exaustor a utilização de chamas livres danifica os filtros e pode provocar incêndios como tal deve ser evitada É aconselhável manter sob controlo constante a fritura de alimentos para evitar que o óleo aquecido entre em combustão Em relação às medidas técnic...

Page 15: ... si chiama È attivo 7 giorni su 7 sabato e domenica compresi e non lascia mai inascoltata una richiesta Assistance Never use the services of an unauthorised technician Please have the following information to hand The type of problem encountered The appliance model Mod The serial number S N The latter two pieces of information can be found on the data plate located on the appliance Assistance Ne j...

Page 16: ...de obra de los técnicos Desplazamiento a su domicilio de los técnicos Y NO PAGUE AVERIAS NUNCA MAS Servicio de asistencia técnica SAT Llame al 902 133 133 y nuestros técnicos intervendrán con rapidez y eficacia devolviendo el electrodoméstico a sus condiciones óptimas de funcionamiento En el SAT encontrará recambios accesorios y productos específicos para la limpieza y mantenimiento de su electrod...

Page 17: ...ità non sia destinata a questo scopo Attrezzare il locale con delle prese d aria per evitare che la cappa crei un pressione negativa nella stanza che non deve superare i 0 04 mbar L azienda declina ogni responsabilità qualora queste norme non vengano rispettate Filtrante o Aspirante La vostra cappa è pronta per essere utilizzata in versione aspirante Per utilizzare la cappa in versione filtrante v...

Page 18: ...e sul display l icona I4 e compare la scritta C1 0 il menù si può scorrere tramite i tasti T4 e T5 Attraverso T4 si scorrono le diverse voci del menù C1 C2 C3 C4 etc mentre attraverso T5 si selezionano le diverse voci del menù 0 1 o 0 1 2 per impostare il tipo di cappa accedere al menù selezionare tramite T4 la voce C6 e tramite T5 impostare il valore 0 se si desidera la cappa in modalità aspirant...

Page 19: ... filtro al carbone B Il filtro carbone trattiene gli odori sgradevoli derivanti dalla cottura La saturazione del filtro carbone si verifica dopo un uso più o meno prolungato a seconda del tipo di cucina e della regolarità della pulizia del filtro grassi In ogni caso è necessario sostituire la cartuccia al massimo ogni venti mesi Questo filtro NON può essere lavato o rigenerato Smontaggio Rimuovere...

Page 20: ...ente e la salute Il simbolo sul prodotto o sulla documentazione di accompagnamento indica che questo prodotto non deve essere trattato come rifiuto domestico ma deve essere consegnato presso l idoneo punto di raccolta per il riciclaggio di apparecchiature elettriche ed elettroniche Disfarsene seguendo le normative locali per lo smaltimento dei rifiuti Per ulteriori informazioni sul trattamento rec...

Page 21: ...pecifically intended for this purpose Equip the room with air intakes to prevent the hood creating suction pressure in the interior this must not exceed 0 04 mbar The manufacturer is not liable for any consequences of failure to observe these instructions Filter or ducted Your hood is supplied as a ducted unit If you wish to use it as a filter unit you must install the proper ACCESSORY KIT Note If...

Page 22: ...ing up and the writing C1 0 appearing on the display use the buttons T4 and T5 to go through the menu Use T4 to go through the various menu items C1 C2 C3 C4 etc and T5 to select them 0 1 or 0 1 2 to set the hood type access the menu select the item C6 with T4 and set the value 0 with T5 to set the hood on ventilation mode or 1 for the filtering mode Press T1 at the end Hood off The hood can be tu...

Page 23: ... depending on the type of cooking and how often the grease filter is cleaned The cartridge must be replaced at least once every twenty months This filter can NOT be washed or regenerated Disassembly Remove the activated carbon filter by pressing the two front levers which secure it to the hood Assembly Secure the activated carbon filter first in the back using the hood s metal tabs and then in the...

Page 24: ...ying documents indicates that the product may not be treated as domestic waste but must be handed over to a sorting centre for electrical and electronic waste Dispose of it in accordance with local waste disposal regulations For further information on the handling recovery and recycling of this product contact the local authority domestic waste disposal service or the reseller from whom you purcha...

Page 25: ...ement destinée à cela Équipez la pièce de prises d air afin d éviter que la hotte ne crée une pression négative dans la pièce la pression ne doit pas dépasser les 0 04 mbar L entreprise décline toute responsabilité en cas de non respect de ces normes Recyclage ou évacuation extérieure Votre hotte est prête à être installée en version à évacuation extérieure Pour utiliser la hotte en version recycl...

Page 26: ...er le compteur appuyer 3 secondes de suite sur T5 T4 hotte allumée Sélection du type de hotte Il est possible de sélectionner le fonctionnement de la hotte en mode évacuation par défaut ou recyclage Pour modifier la sélection procéder comme suit la hotte étant sur OFF appuyer longuement sur les touches T4 et T5 pour accéder au menu cet accès est signalé par un son émis par la hotte par l icône I4 ...

Page 27: ...rgents non agressifs à la main ou bien au lave vaisselle à basse température et en cycle court Pour démonter le filtre à graisses tirez sur la poignée de décrochage à ressort Si on le lave au lave vaisselle le filtre anti graisse métallique pourrait se décolorer mais cela n altère en rien ses performances de filtrage Entretien du filtre à charbon B Le filtre à charbon retient les odeurs désagréabl...

Page 28: ...ur la documentation qui l accompagne indique que ce produit ne doit pas être traité comme un déchet ménager mais qu il doit être déposé dans un point de collecte spécialisé dans le recyclage des appareils électriques et électroniques Veuillez respecter les normes locales en vigueur en matière d élimination des déchets Pour plus d informations sur le traitement la récupération et le recyclage de ce...

Page 29: ...de una cavidad de pared a no ser que ésta sea específica para este uso Equipar el local con tomas de aire para evitar que la campana cree una presión negativa en el ambiente que no debe superar los 0 04 mbar La empresa declina cualquier responsabilidad en caso de incumplimiento de estas reglas Filtrante o Aspirante La campana está lista para ser utilizada en versión aspirante Para utilizar la camp...

Page 30: ...os T5 T4 con la campana encendida Programación del tipo de campana Es posible programar el modo de funcionamiento de la campana como aspirante default o filtrante Para modificar la programación con la campana en OFF al mantener pulsadas las teclas T4 y T5 se accede al menú la campana emite un sonido y en el display se enciende el icono I4 y aparece la indicación C1 0 es posible desplazarse por el ...

Page 31: ...ebe limpiar al menos una vez al mes a mano o en el lavavajillas a baja temperatura y con ciclo corto utilizando detergentes no agresivos Desmontar el filtro de grasas tirando de la manilla de desenganche con muelle Al lavarlo en el lavavajillas el filtro de grasas metálico podría perder brillo pero su poder de filtración no varía Mantenimiento del filtro de carbón B El filtro de carbón retiene los...

Page 32: ... Es necesario entregarlo en un punto de recogida para el reciclado de aparatos eléctricos y electrónicos Elimínelo de conformidad con las normas locales sobre eliminación de desechos Para obtener información más detallada sobre el tratamiento la recuperación y el reciclado de este producto póngase en contacto con el ayuntamiento el servicio de eliminación de desechos urbanos o la tienda donde adqu...

Page 33: ...vidade não se destine a este fim Equipe o local com condutas de admissão para evitar que o exaustor crie uma pressão negativa na divisão que não deve superar os 0 04 mbar A empresa declina qualquer responsabilidade caso estas normas não sejam respeitadas Filtrante ou aspirante O exaustor está pronto para ser utilizado na versão aspirante Para utilizar o exaustor na versão filtrante deve instalar o...

Page 34: ...lidade de funcionamento do exaustor como aspirante predefinição ou filtrante Para modificar a configuração proceda da seguinte forma com o exaustor em OFF pressionando durante algum tempo as teclas T4 e T5 acede ao menu irá notar que o exaustor emite um som e acende se no ecrã o ícone I4 e surge a mensagem C1 0 pode percorrer o menu através das teclas T4 e T5 Com T4 percorre os vários elementos do...

Page 35: ... a lavagem na máquina de lavar louça o filtro de gorduras metálico pode perder a cor mas o desempenho de filtragem não sofre alterações Substituição do filtro de carvão B O filtro de carvão retém os cheiros desagradáveis derivados da cozedura Asaturação do filtro de carvão verifica se após um uso mais ou menos prolongado consoante o tipo de cozinha e a regularidade da limpeza do filtro de gorduras...

Page 36: ...u na documentação de acompanhamento significa que este produto não deve ser tratado como lixo doméstico e deve ser entregue junto do ponto de recolha para reciclagem de aparelhos eléctricos e electrónicos adequado Elimine o seguindo as normas locais para a eliminação de resíduos Para mais informações sobre o tratamento recuperação e reciclagem deste produto contacte o departamento local adequado o...

Reviews: