background image

SCHOTT 

Termofrost

®

SCHOTT 

Termofrost

®

Page 10

Schott provides different material to close the gap between the frames and the side walls. It can be different according
cabinet type and position of the side wall to the frame. The standard delivery consist of a PVC L-profiles (19x19x1mm) 
and/or a PVC plates (2000 x 100 x 2 mm). For special cases and bigger gaps on the sides Schott provides specific and
adapted material and a separate drawing

In case of the supply of PVC L-profile and PVC plate:
1- Install the PVC plate flush with the front of the frame to hide the profile 
and rivet it in the vertical bar of the frame.
2- Tape the L-profile in the angle between the PVC plate and the side wall

In case of the supply only PVC L-profile:
Tape the L-profile in the angle between the 
PVC plate and the side wall

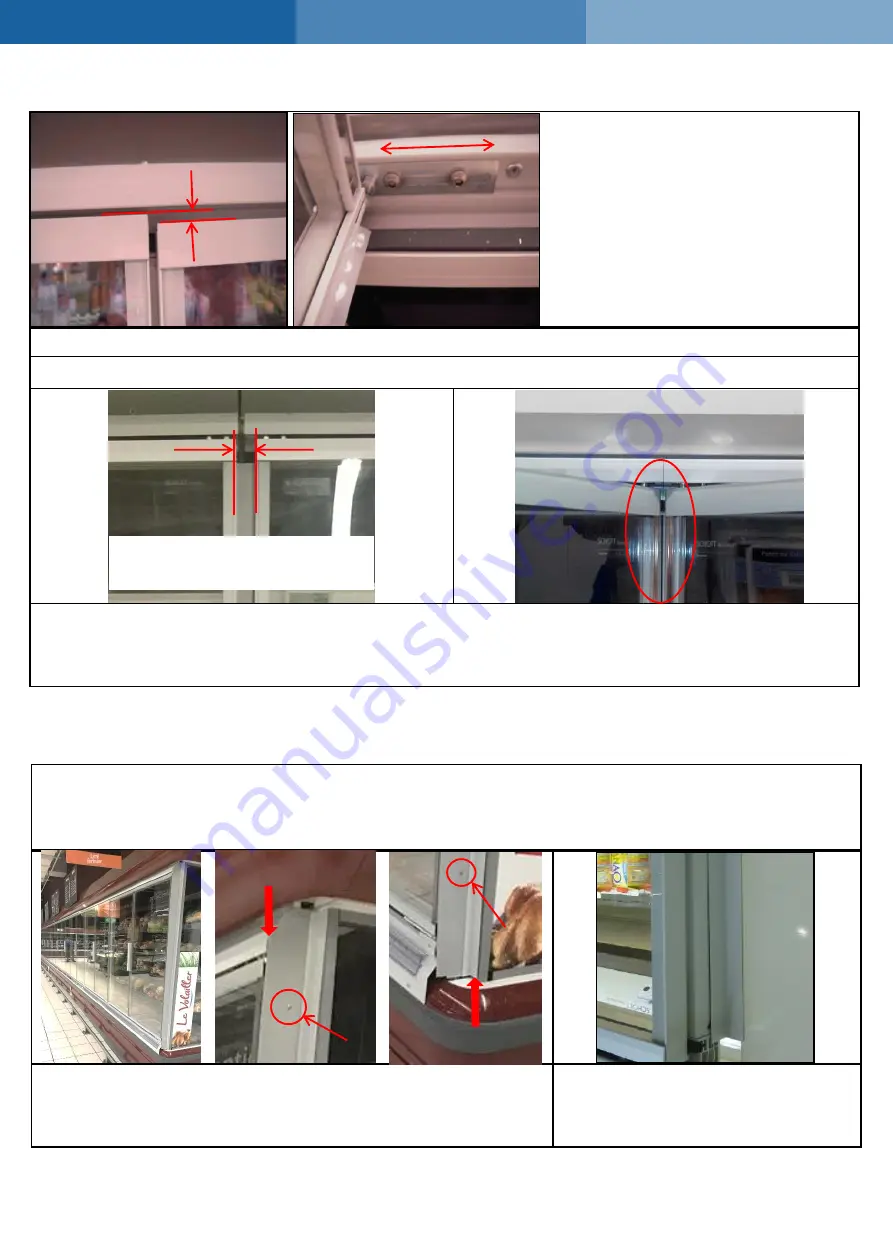
5. Installation | Fine adjusting of the doors

In order to adjust the doors finely, use the upper hinge plate by unscrewing the 2 screws and then moving the door

IMPORTANT NOTE FOR T.AGD3

First check that the distance between the doors on the hinge side is more than 16 mm. Then make sure that the glasses 
do not touch each other during opening at around 45

° of the two doors at the same time.

If the distance is less than 16 mm, don't open the doors at the risk of glasses touching each other and break,
please modify slightly the adjustment on the upper slider (see above)

Warning : minimum distance 
between the doors is 

16 mm 

5. Installation | Closing the cabinet on the sides using the delivered material

Summary of Contents for Termofrost AGD3

Page 1: ...SCHOTT Termofrost SCHOTT Termofrost Page 1 Installation manual SCHOTT Termofrost Retrofit AGD3 T AGD3 Picture of installation ideally taken from a real application ...

Page 2: ... OR PROPERTY SERIOUS PERSONAL INJURY OR DEATH THE SPECIFICATIONS AND INFORMATION REGARDING THE PRODUCTS IN THIS DOCUMENT ARE SUBJECT TO CHANGE WITHOUT NOTICE ALL STATEMENTS INFORMATION AND RECOMMENDATIONS IN THIS DOCUMENT ARE BELIEVED TO BE ACCURATE BUT ARE PRESENTED WITHOUT WARRANTY OF ANY KIND EXPRESS OR IMPLIED USERS MUST TAKE FULL RESPONSIBILITY FOR THEIR APPLICATION OF ANY PRODUCTS THE LIMITE...

Page 3: ...am that can be clipped around the bottom gasket Without this protection the metal spans will get stuck to the magnetic gasket and get rusty in the humid environment Electrical installation instructions Before installation maintenance or cleaning always first switch off or disconnect the power and follow appropriate safety procedures Installations and assembles must be carried out by a professional...

Page 4: ...ivets per line Self drilling screws Ø4 8x30 3 screws per system Self drilling screws Ø3 9x15 3 screws per system Riveter electrical if possible Drilling machine Water level with electronic display Angle grinder Metal saw Classical tool box with hammer cutter file etc Ladders the height of the cabinets is approx 2 20m Cleaning sponges and glass cleaner Hoover for cleaning the cabinets metal spans I...

Page 5: ...he lower side of the cabinet is in correct horizontal position Use a water level tool to verify Most of cabinets have feets which can be used to adjust the level and inclination Use tools like monkey wrenches or universal lock pliers and control again with water level Remove the upper cover In case night curtains are in place remove them If it doesn t interfere with the installation of the doors d...

Page 6: ...le to the cabinet console with the provided M6 screw There are different L consoles for different cabinets Important Remark Schott provides with all deliveries a sketch showing where the adapter is fixed to the cabinet Position the bottom adapters in level Distribute the gap between adapters and sidewalls identically on both side Fixing of the adapter from the front side using 3 alu rivets Ø4 8x25...

Page 7: ...ter of 1250 mm Use 3 rivets Alu Ø4 8x10 In case of fixation to the L console use screws and nuts M6 Fix the upper part of the frame to the adapter with 3 rivets in the existing holes previewed in the frame Use Alu Rivets Ø4 8x25 on the left and right and in the middle an Alu Rivet Ø4 8x10 Make sure that the adapter is in level to avoid deformation when riveting If this is not the case use a plasti...

Page 8: ...ith insert upper door hinge into the hinge plate bearing in top Door in open position has to be in 90 towards frame Unscrew the screw that is kept in the frame then turn the gravity plate and put the door in the foreseen hole Put the screw and washer back to secure the gravity system Use max force of 6N Important To assure the installation put the foreseen screw ...

Page 9: ...not close themselves pull the frame slightly out Important remark For a proper door closing the door must lean slightly inside the cabinet Assure this during the adjustment procedure If the doors are not aligned in the internal external direction push slightly one corner of the frame in and pull the other corner out Once the doors are adjusted and closing automatically via gravity fix the frame wi...

Page 10: ... between the PVC plate and the side wall In case of the supply only PVC L profile Tape the L profile in the angle between the PVC plate and the side wall 5 Installation Fine adjusting of the doors In order to adjust the doors finely use the upper hinge plate by unscrewing the 2 screws and then moving the door IMPORTANT NOTE FOR T AGD3 First check that the distance between the doors on the hinge si...

Page 11: ...s are adjusted properly in the frame and screws are tightened Adapters are properly fixed to the cabinet and no movement can be found between adapters and cabinets The adapters are properly fixed with the frames The sides of the cabinets are properly closed with the delivered finishing materials corners and plastic plates Distance between stop pin and hinge plate is min 3 mm to guarantee a proper ...

Page 12: ...such substances Plastic and rubber parts and magnetic sealings Clean the plastic rubber surfaces with a soft tissue or towel that was slightly moistened with water Do avoid organic solvents For Cleaning purposes do not use Razor blades or knives Cleaners which contain moisturizers abrasives strong acids or caustic substances e g Ajax Scotch Brite or similar cleaners 8 Troubleshooting and problem s...

Page 13: ...oor scrapes to the bottom horizontal and or door door scrapes to the vertical bar of the frame outside inside Height is bigger than it should Problem 3 door scrapes to the bottom horizontal frame Problem 1 door goes under the stop shims Problem 2 door scrapes to the vertical bar of the frame because of the bending Solution reposition the lower and upper adapters It is possible to use shims to adju...

Page 14: ...izontals is pressed together Door is squeezed and can not close properly Reposition the lower and upper adapters It is possible to use shims to adjust the level outside inside Height is smaller than it should Solution push the front of the adpater down so that it is in level and block the poistion with a rivet Solution shim Problem door doesn t close ...

Page 15: ...s for Frame KIT HINGEPLATE AGD3 TAGD3 COVER AGD3 TAGD3 P8355 PC FR LOWER L 1188 P8355 PC FR LOWER L 0594 5 GASKET AGD3 TAGD3 KIT P8360 GASKET L 1249 KIT P8360 GASKET L 0624 5 KIT AGD3 LOWER HINGE LEFT KIT AGD3 LOWER HINGE RIGHT KIT HANDLE ALUMINIUM AGD3 TAGD3 KIT DOOR AGD3 TAGD3 HINGE UPPER KIT TAGD3 LOWER HINGE LEFT KIT TAGD3 LOWER HINGE RIGHT GASKET AGD3 P8358 SILICONSEAL HAND L 2000 TO BE CUTTE...

Page 16: ...ber S N Frame label with type article number for frame and Serialnumber No Place for serial number and type for frame Place for serial number and type for door for AGD3 Place for serial number and type for door T AGD3 On upper profile in left opening On upper side of the door profile close to hingeside On bottom side of the door close to hinge side ...

Reviews: