background image

14

4. Accessories.

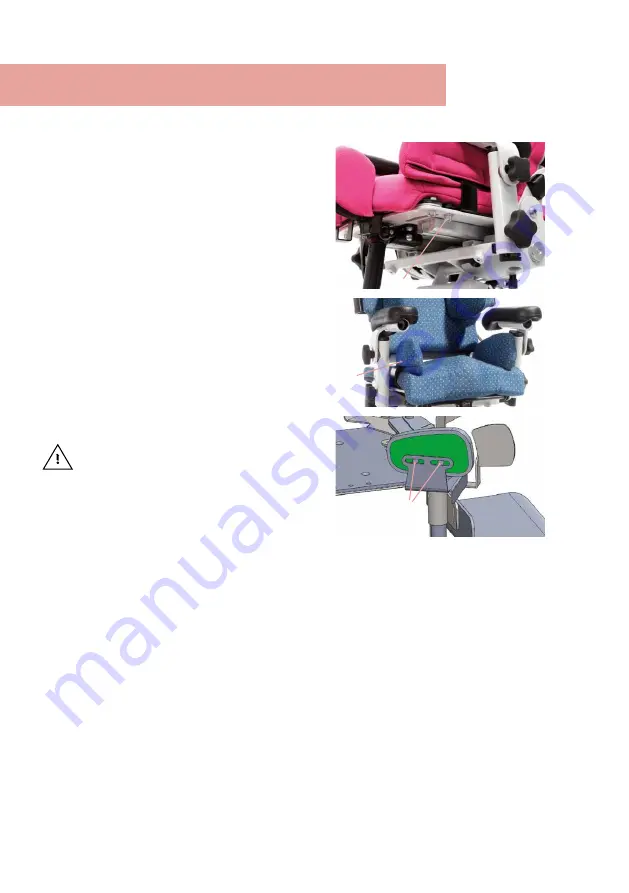
4.4 Thigh guide

The thigh guide pads are individually 
adjustable in width, depth and angle. 

In order to adjust the width, the depth 
and the angle, loosen the cylinder 
head screws with a hexagonal wrench 
(

A

) under the seat surface and bring 

the thigh guide into the required 
position.

To further adjust the depth, open the 
hook and eye tapes (

B

) and loosen the 

2 pan head screws with the hexago-
nal wrench (

C

). Bring the pad into the 

required position and retighten the 
screws. Close the hook and eye tapes 
again.

After each adjustment, please retighten 

all screw connections! 

A

B

C

Summary of Contents for madita-fun mini

Page 1: ...Instructions for use madita fun mini The therapy chair for primary care madita fun mini ...

Page 2: ...s for use carefully prior to initial commissioning of the product and to observe them Please note that gui delines and representations in these Instructions for use may deviate from your product due to differing equipment We reserve the right to make technical modifications Important information Ensure that these Instructions for use remain with the product Your schuchmann Team ...

Page 3: ...Product overview 08 3 Settings 09 3 1 Seat height 09 3 2 Seat angle 09 3 3 Seat depth 10 3 4 Back inclination 10 3 5 Back height 10 3 6 Back with integrated upper arm guide 10 3 7 Armrests 11 3 8 Foot support 11 3 9 Castors 12 4 Accessories 12 4 1 Headrest 12 4 2 Thorax pelotte pads with standard back 13 4 3 Thorax pelotte pads at the back with integrated upper arm guide 13 4 4 Thigh guide 14 4 5 ...

Page 4: ...ntee 21 8 Identification 22 8 1 EU Declaration of Conformity 22 8 2 Serial number date of manufacture 23 8 3 Product version 23 8 4 Issue of the document 23 8 5 Name and address of the manufacturer specialist dealer supplying the product 23 ...

Page 5: ...e and protect the environment to prevent environmental pollution and to improve the recycling of raw materials please note the disposal instructions in points 1 3 1 and 1 3 2 1 3 1 Packaging The packaging of the product should be kept for any future transport that might be required Should you have to return the product for repairs or in case of a guarantee claim please if possible use the original...

Page 6: ...risk class 1 and is designed for the primary care during early childhood and for use at home Individually adjustable seat dimensions and supporting pelotte pads allow a stable and upright sitting position Any other use or use over and above this purpose shall be considered not in accordance with the intended purpose 2 3 1 Indications The madita fun mini therapy chair is designed for children who c...

Page 7: ...fire or any other strong source of heat such as electric or gas heaters Only use accessories and spare parts made by Schuchmann otherwise you will endanger the user Only use the therapy chair if all components have been correctly mounted and adjusted Please ensure that none of the user s extremities are in the respective area when making adjustments of any kind to minimise the risk of injury Pleas...

Page 8: ... adjustable in height depth and angle Wooden therapy table Table support pad Harness mounting set for the seat area back area Chest shoulder strap Bib Groin harness T shaped Pelvic harness 4 point pelvic harness 2 7 Product overview The Fig below is intended to show you the designation of the most im portant components as well as the terms which you will find in these Inst ructions for use Headres...

Page 9: ...me opera ting the foot pedal The gas pressure spring serves merely to assist with ad justment of the height The foot pedal can be secured against inadvertent operation with the spring pin B loca ted on the inside of the foot pedal To do this turn the spring pin until it engages If necessary assist engage ment by moving the foot pedal gently The locking effect is cancelled by pul ling out the sprin...

Page 10: ...area of the setting adjustment mechanism in order to avoid possible injuries 3 5 Back height Loosen the screws C at the back of the the rapy chair and bring the back to the required height 3 6 Back with integrated upper arm guide The back with integrated upper arm guide is equipped in the standard series with a pad cover and small padded wedges approx 3 cm Using the padded wedges the lower torso a...

Page 11: ... the underside of the seat unit After each adjustment please retighten all screw connections 3 8 Foot support The foot support is adjustable in height and knee angle Loosen the screw D in order to adjust the height and bring the foot support into the requi red position To adjust the knee ang le release the quick release clamp E under the seat unit Bring the knee angle of the foot support into the ...

Page 12: ...prevent inad vertent rolling away on level surfaces 4 Accessories 4 1 Headrest The headrest is available in two ver sions In order to adjust the height of the first version please loosen the 2 cylinder head screws with a hexago nal wrench B and bring the headrest into the required position In order to adjust the second version in height depth and angle loosen the screws C and bring the headrest in...

Page 13: ...horax pelotte pads are available in normal and long versions with torso guide Both versions are individually adjustable in height and width Height adjustment Open the zips on the front side of the back pad and pull off the pad cover on the rear side of the back Then loo sen the 2 cylinder head screws with a hexagonal wrench B and bring the thorax pelotte pad to the required height Retighten the sc...

Page 14: ...s with a hexagonal wrench A under the seat surface and bring the thigh guide into the required position To further adjust the depth open the hook and eye tapes B and loosen the 2 pan head screws with the hexago nal wrench C Bring the pad into the required position and retighten the screws Close the hook and eye tapes again After each adjustment please retighten all screw connections A B C ...

Page 15: ...e clamp re sistance permits a visual inspection of the adjustment also in released con dition Then tighten the screws again 4 6 Inside leg guide To adjust the leg guides loosen the cylinder head screws with a hexa gonal wrench C on the underside of the seat plate This loosens the clutch plate clamp so that the inside leg guide can be adjusted in angle In order to adjust both legs to the same angle...

Page 16: ...armrests see Point 3 7 4 Accessories 5 Cleaning and servicing A C B 5 1 Cleaning and disinfecting 5 1 1 Cleaning Please clean all frame elements regularly with a spon ge or damp cloth making sure that water droplets are removed Please clean with a mild household deter gent for severer dirt Thorough drying of the cleaned areas is important All fabrics that cannot be removed can be wiped with a mois...

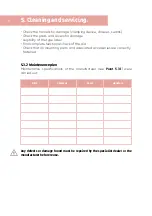
Page 17: ... 5 3 Maintenance For reasons of user safety and to retain product liability the product must be subjected to maintenance by a specialist dealer at least once a year see Point 8 5 The maintenance work carried out must be documented in the maintenance plan see Point 5 3 2 5 3 1 Maintenance specifications Basic cleaning according to manufacturer instructions see Point 5 1 1 If necessary disinfection ...

Page 18: ...Final complete functional check of the aid Check that all mounting parts and associated accessories are correctly fastened 5 3 2 Maintenance plan Maintenance specifications of the manufacturer see Point 5 3 1 were carried out Date Company Name signature Any defects or damage found must be repaired by the specialist dealer or the manufacturer before reuse ...

Page 19: ...ver and above this time period if it is in a safe condition The expected duration of use does not refer to wear parts such as for example wheels gas pressure springs The maintenance and evaluation of the condition and if applicable the potential for re use must be decided by the specialist dealer The product is suited for re use Prior to forwarding please follow the clea ning and disinfection inst...

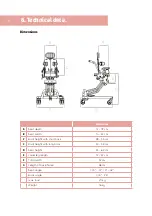
Page 20: ...2 19 cm B Seat width 14 22 cm C Back height with short back 28 33 cm C Back height with long back 30 35 cm D Seat height 25 62 cm E Lower leg length 12 22 cm F Total width 52 cm G Length of base frame 58 cm Seat angle 5 37 0 42 Back angle 5 25 max load 20 kg Weight 16 kg ...

Page 21: ...cts This begins with the delivery or handover of the goods Should a verifiable ma terial or manufacturing fault occur within this time period we shall after carriage paid return to us view the indicated damage and if applicable either repair or deliver a new product at our discretion ...

Page 22: ...en und Standards entspricht is are in conformity with the requirements of the below listed directives and standards Verordnung EU 2017 745 über Medizinprodukte vom 05 April 2017 Regulation EU 2017 745 on medical devices of 5 April 2017 DIN EN 12182 2012 Technische Hilfen für behinderte Menschen Technical aids for disabled persons DIN EN ISO 14971 2013 Medizinprodukte Anwendung des Risikomanagement...

Page 23: ...sue 11 2020 8 5 Name and address of the manufacturer specialist dealer supplying the product This product was manufactured by This product has been delivered by the following specialist dealer Schuchmann GmbH Co KG Rudolf Runge Str 3 49143 Bissendorf Germany Phone 49 0 5402 40 71 00 Fax 49 0 5402 40 71 109 info schuchmann de www schuchmann de Product name Item number Serial number schuchmann de in...

Page 24: ...schuchmann de GA 31 EN_1 1 ...

Reviews: