background image

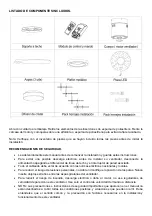
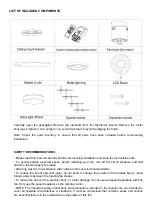
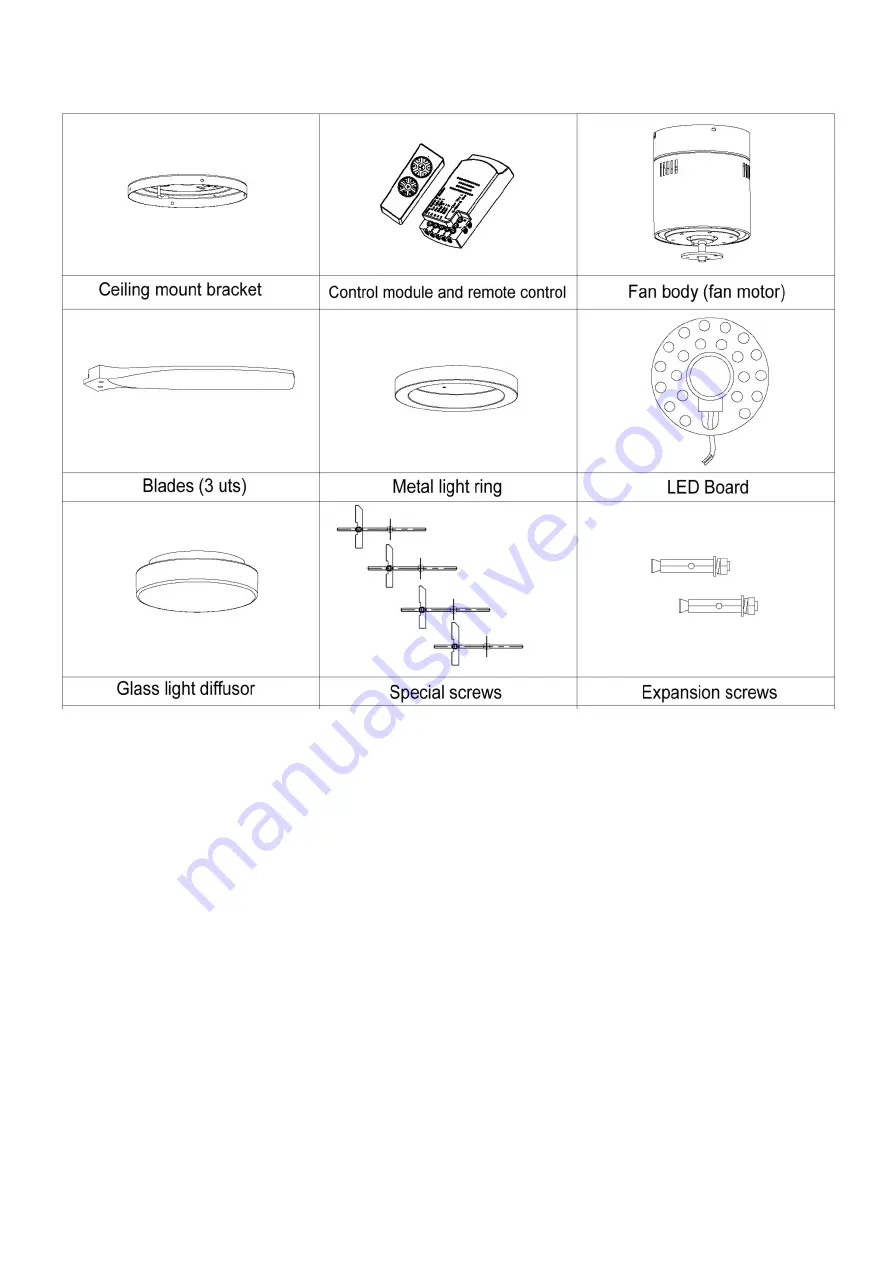
LIST OF INCLUDED COMPONENTS 


Carefully  open  the  packaging.  Remove  the  elements  from  the  Styrofoam  inserts.  Remove  the  motor 
housing and place it on a carpet or on some Styrofoam to avoid damaging the finish. 

Note:  Check  the  parts  inventory  to  ensure  that  all  parts  have  been  included  before  commencing 
installation. 


SAFETY RECOMMENDATIONS. 

• Please read this manual carefully before commencing installation and keep the instructions safe. 
•  To  avoid  possible  electrical  shock,  before  installing  your  fan,  turn  off  the  circuit  breakers  and  wall 
switch to the fan supply line leads.   
• All wiring must be in accordance with national and local electrical standards. 
• To reduce the risk of personal injury, do not bend or change the position of the blades. Never insert 
foreign objects between the rotating fan blades. 
• To reduce the risk of a fire, electric shock, or motor damage, do not use wall speed regulators with this 
fan. Only use the speed regulator on the remote control. 
• NOTE: The important safety instructions and precautions included in the manual are not intended to 
cover all possible circumstances or situations. It must be understood that common sense and caution 
are essential factors in the installation and operation of this fan. 


Summary of Contents for 329514

Page 1: ...SIROCO VENTILADOR DE TECHO 329514 GUÍA DE INSTALACIÓN Rev 03 21 ...

Page 2: ...de línea de techo y el interruptor de pared asociado Todo el cableado debe estar de acuerdo con las normas eléctricas nacionales y locales Para reducir el riesgo de lesiones personales no doble ni modifique la posición de las palas Nunca inserte objetos extraños entre las aspas giratorias del ventilador Para reducir el riesgo de incendio descarga eléctrica o daño al motor no use reguladores de vel...

Page 3: ...cación para colgar permita 2 3 metros libre desde suelo hasta las aspas y 76cm libres en la horizontal desde cualquier pared o elemento constructivo Asegúrese que el techo puede soportar el peso del ventilador Instalación del Soporte a techo INSTALACIÓN EN TECHO DE MADERA O ESCAYOLA INSTALACIÓN EN TECHO DE CEMENTO ...

Page 4: ... de c ador al sopo e las Aspas portes metá mponente y fijación a control al v módulo corriente al orte de tech s álicos de asp es del ve a techo de ventilador C módulo en ho pa y las asp entilador el ventilado Conecte los los conecto pas de mad r or cables del ores asigna dera media cuerpo sigu dos en el e nte los torn uiendo la gu squema illos propor uía de color rcionados r y ...

Page 5: ...laca LED a los cables que salen de la cara inferior del motor mediante la ficha de conexión rápida Después fijar la placa LED mediante sus imanes en el plafón metálico 7 Colocar el difusor de cristal Montar el difusor haciendo coincidir las ranuras del difusor con los suspensores del plafón y girar ...

Page 6: ...y tras el apagado prolongado se mantendrá en el siguiente encendido VENTILADOR 6 Velocidades Función VELOCIDAD VARIABLE Función INVERTER INVIERNO VERANO cambio de sentido de giro TEMPORIZADOR 1 hora 2 horas 4 horas 8 horas SCHULLER RECOMIENDA LA COLOCACIÓN DE PROTECTORES DE SOBRETENSIÓN PARA EVITAR LOS DAÑOS EN LOS COMPONENTES ELECTRÓNICOS DE LA LUMINARIA LED Disponibles en nuestro catálogo Para c...

Page 7: ...SIROCO CEILING FAN 329514 INSTALLATION GUIDE Rev 03 21 ...

Page 8: ...rcuit breakers and wall switch to the fan supply line leads All wiring must be in accordance with national and local electrical standards To reduce the risk of personal injury do not bend or change the position of the blades Never insert foreign objects between the rotating fan blades To reduce the risk of a fire electric shock or motor damage do not use wall speed regulators with this fan Only us...

Page 9: ... least 2 3 meters between the floor and the blades and that there is at least 76cm of horizontal distance between the fan and any wall or other obstruction Make sure the ceiling can support the weight of the fan Installation of the ceiling mount bracket INSTALLATION ON A WOODEN OR PLASTER CEILING INSTALLATION ON CEMENT CEILING ...

Page 10: ...cated on power cable the ceiling g the blade al blade sup n compo ol module dule to the fa n the module es to the mo bracket es pports and t nents and fixing an Connec e odule using the wooden fan to the ct cables fro the connec n blades us ceiling om the fan b ctors assign ing the scre body accord ned in the d ews provide ding to the c iagram ed colour guide e ...

Page 11: ...ct the LED Board to the cables from the lower end of the motor using the quick splice connector Then fix the LED board in place onto the metal ring by means of the magnets 5 Fitting the glass shade Fit the glass shade by aligning the grooves on the shade with the supports on the metal ring and rotate ...

Page 12: ... tone the colour will be auto saved and after a prolonged shutdown it will remain the next time the light is turned on FAN 6 Speed Fan VARIABLE SPEED function INVERTER function WINTER SUMMER change of direction of rotation TIMER 1 hour 2 hours 4 hours 8 hours SCHULLER RECOMMENDS TO PLACE SURGE PROTECTORS TO AVOID DAMAGES TO THE ELECTRONIC COMPONENTS OF THE LED LUMINAIRE Available in our catalogue ...

Reviews: