


23.
A
lw
24.
WA
use
25.
DO
fun
of
per
26.
C
on
27.
WA
the
whe
roo
28. SA
INSTA
A. Heater
B. Place t
installa
woode
C. The H
take a
D. Place
the Ch
E. The di
must b
F. Plug th
outlet.
G. Only o
ways use on a d
ARNING: T
o re
e this unit with
O NOT
attempt
ctions on this u
the unit con
rsonnel should
nnect to prope
ARNING: T
his
room temper
en they are oc
om on their own
AVE THESE INS
ALLATION INS
r must be insta
the heater on a
ation of the he
en beams or me
ook on the ce
weight 3 or 4 t
the Hook A ar
hain to adjust th
istance betwee
be over1.8M.
he Patio Heate
operate the hea
dry, level surfa
educe the risk o
any solid-state
to repair or ad
unit.
D
oing so w
ntains no use
perform all ser
rly grounded o
heater is not e
rature.
Do not
ccupied by per
n, unless const
STRUCTIONS
STRUCTIONS
alled by a qualif
a firm, level cei
eater on a stro
etal rails etc).
iling hanging t
times that of th
round the Ceilin
he height of the
en the bottom
er into a groun
ater when it is i
ace. Use on cei
of fire or electr
e speed control
djust any electr
will void your w
er serviceable
rvicing only.
utlets only.
equipped with
t
use this heat
rsons not capa
tant supervision
S.
fied electrician
ling surface; le
ng rigid suppo
he Patio Heate
he Patio Heater
ng Hook and c
e Patio Heater
of the Patio H
nded 220-240V
n the upright p
iling only.
ric shock,
DO N
device.
rical or mechan
warranty.
T
he in
e parts.
Q
ual
a device to co
ter in small ro
able of leaving
n is provided.
.
evel ceiling surf
ort (such as st
er must be ab
r itself.
clip on any Rin
to the Floor.
Heater to the F
V 50Hz 15A po
osition.
NOT
nical
nside
lified
ntrol
ooms
g the
face;
rong
le to
ng of
Floor
ower
•
•
•
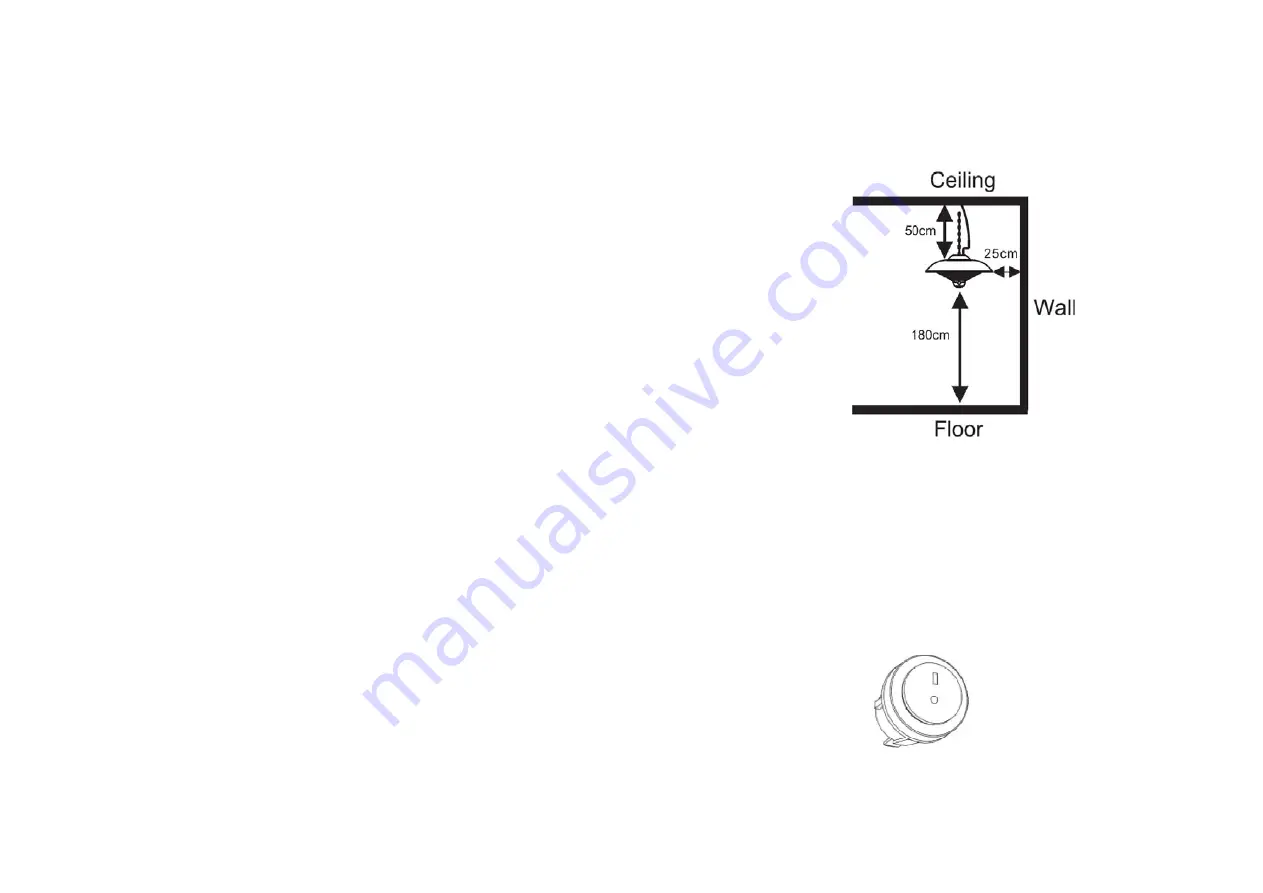
Minimum
25cm from the
50cm from the
Installation he
Operating Ins
Plug the Patio
Only operate
OurElectric Pa
The ON/OFF
heater.
Press the on/o
connected.
Required Dist
e side wall
e ceiling
eight above 180
struction:
o Heater into a
the heater whe
atio Heater is e
switch on the h
off switch on th
tances:
0cm
grounded 220
en it is in the up
equipped with t
heater is used t
he heater when
-240v 50Hz po
pright position.
three heat setti
to control the p
n the plug had
ower outlet
ings
power of the
been


