background image

WSI 100 / 125 / 150 / 200 / 250 / 300 


page 

9


Transport / Storage / Installation 


2.1 

 Transport and storage 


2.1.1  Dimensions 


Packing  

dimensions 

WSI 100 

WSI 125 

WSI 150 

WSI 200 

WSI 250 

WSI 300 

without socle  

 in mm 

960x800x1480 

960x970x1480 

960x970x1480 

1150x910x1665 

1150x1080x1665 

1150x1080x1665 

with socle 

 in mm 

960x800x1690 

960x970x1690 

960x970x1690 

1150x910x1900 

1150x1080x1900 

1150x1080x1900 


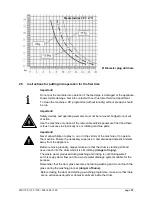
2.1.2  Fastening points for lifting devices 

The machines are delivered on pallets which can be transported by fork lift trucks. 
 

2.1.3  Storage conditions 

The machines are to be stored in a dry, frost-free place. 


2.2 

Instructions for unpacking 


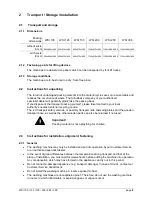
The return of undamaged packing material into the material cycle saves on raw materials and 
reduces the occurrence of waste. The Schulthess company or your authorised  
specialist dealer will generally gladly take the packing back. 
If you dispose of the transport packing yourself, please take it sorted to your local  
authority's nearest material recycling centre. 
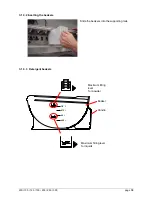
The red transport safety catches, or possibly transport rails, fastening plates and the wooden 
transport base, as well as the other wooden parts can also be returned if not used. 


Important!


Packing material is not a plaything for children. 


2.3 

Instructions for installation, alignment, fastening 


2.3.1  General 

  The washing machine may only be installed and put into operation by our Customer Service 

or an authorised specialist dealer. 

  In the event of great differences between the temperature during transport and that at the 

place of installation, you must wait for twelve hours before putting the machine into operation. 
Any condensation which may have formed in the appliance can dry out in this period. 

  Do not connect a damaged appliance (e.g. transport damage). In case of doubt,  contact our 

Customer Service department. 

  Do not install the washing machine in rooms exposed to frost. 

  The washing machines are not explosion proof. Therefore, do not use the washing machine 

in rooms in which inflammable or explosive gases or vapours occur. 

Summary of Contents for WSI 100

Page 1: ...Washing Machine Spirit Industrial WSI 100 125 150 200 250 300 Operating Instructions 300685J 01 11...

Page 2: ...WSI 100 125 150 200 250 300 page 2...

Page 3: ...ashing machine Please note in particular the chapter Safety If the prescribed maintenance works should be neglected or carried out incorrectly for obvious reasons we shall not be able to fulfil our gu...

Page 4: ...installation alignment fastening 9 2 3 1 General 9 2 3 2 Space requirement at the intended location 10 2 3 3 Requirement for the supporting surface 10 2 3 4 Ergonomics 10 2 3 5 Removing from the palle...

Page 5: ...ay 24 3 12 1 Standard programmes keyboard symbols 25 3 12 2 Commercial programmes 25 3 13 Special programmes 27 3 13 1 Load a Wash Card 27 3 13 2 Wet cleaning 27 3 14 Hints on washing textiles 27 3 14...

Page 6: ...tems of information 1 3 Use in accordance with the intended purpose 1 3 1 The machine s field of application The washing machines of the WSI 100 300 series are suitable exclusively for the washing or...

Page 7: ...to a new operator be sure to also hand over the whole document to the new owner 1 4 Emissions 1 4 1 The weighted continuous sound intensity level The continuous sound intensity level 70 dB A measured...

Page 8: ...y Only pull the plug do not pull the cable If the mains lead to this device becomes damaged it must be replaced with a special lead available from the manufacturer or the manufacturer s customer servi...

Page 9: ...ase take it sorted to your local authority s nearest material recycling centre The red transport safety catches or possibly transport rails fastening plates and the wooden transport base as well as th...

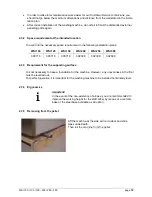
Page 10: ...I 125 WSI 150 WSI 200 WSI 250 WSI 300 300716 300718 300718 302308 302309 302309 2 3 3 Requirement for the supporting surface It is not necessary to have a foundation for the machine However any uneven...

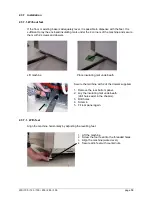
Page 11: ...your premises or return them to Schulthess and request them again when you need them The transport safety protection can be removed either a from the front or b from behind a Remove the lower front tr...

Page 12: ...2 screws and dowels Lift machine Place insulating mat underneath Secure the machine with 2 of the dowels supplied 1 Remove the rear bottom panel 2 Lay the insulating mat underneath drill holes exist i...

Page 13: ...structions and the installation plan These plans are impor tant for a correct electrical connection in accordance with regulations The machine must be connected only to the voltage and frequency state...

Page 14: ...me run a water pressure flow pressure of at least 3 bar maximum 10 bar is required The warm water temperature must not exceed max 90 degrees centigrade 2 4 3 Steam direct and indirect connection In th...

Page 15: ...r allow children to play in on or in the vicinity of the machine or to operate the machine Ensure the necessary supervision and also keep domestic animals away from the appliance Before removing laund...

Page 16: ...to operation when the door is shut While the machine is running the door cannot be opened At the end of the programme the display appears PROGRAM END THE DOOR CAN BE OPENED The door is automatically l...

Page 17: ...ther using powder or liqui detergents Always use all 5 beakers for dispensing the detergents Always close the flap In this way you will protect yourself from eye injuries Important If you use chlorine...

Page 18: ...50 300 page 18 3 1 3 2 Inserting the beakers Slide the beakers into the supporting rails 3 1 3 3 Detergent beakers 0 25 l 0 5 l 0 75 l 1 0 l Maximum filling level for powder Maximum filling level for...

Page 19: ...he drum Take care to have a correct dosage of detergent Overdosage leads to formation of too much foam low washing mechanism poor rinsing result Underdosage leads to greying of the laundry bad washing...

Page 20: ...n at the time of putting into operation the washing programmes are to be parameterised individually according to the type of fabric Consult your detergent supplier too Important Do not use recycled wa...

Page 21: ...3 1 6 Details on the type plate Machine number Product number Construction year rpm Voltage Mains frequency Heating power Kinetic energy of the drum Load Protection system Power current inspectorate...

Page 22: ...speed 9 Metering of additional detergent during operation 10 Pre set time 11 Open door 12 Start Stop button 13 Buttons for programming washing programmes 14 Cursor buttons for changing numerical value...

Page 23: ...ramme interruption The washing programme selected is started by pressing the Start Stop button 12 You can interrupt and restart a programme in progress by pressing Start Stop button once again 3 6 Eme...

Page 24: ...shing temperature The temperature selection is made by means of the cursor button 3 10 Programme abortion If a programme in progress is to be aborted prematurely the two buttons C and P are to be pres...

Page 25: ...with prew 1 3 5 55 40 Easy care with prew 1 3 5 50 3 12 2 Commercial programmes Hospital and home laundry Nr Display Process Beakers Time min 01 95 Blood and urine stained 2x Prer 1x Prew 1 3 5 123 02...

Page 26: ...express 3 5 43 16 95 Easy care express 3 5 54 17 60 Easy care express 3 5 40 18 40 Easy care express 3 5 35 19 1x rinse and spin 18 20 3x rinse and spin 31 21 Tank emptying 22 Tank cleaning programme...

Page 27: ...and additives suitable for wet cleaning may be used 3 14 Hints on washing textiles Please consult the care labels sewn into the textiles and the details given by the laundry manufacturers 3 14 1 Prepa...

Page 28: ...shut off cock customer s Turn on the main switch customer s Open the door Load the laundry piece by piece and loosely Close the door The appliance is ready for operation if a text appears in the text...

Page 29: ...rgency Off actuated or door open Cause Door not closed or locking bolt not locked into place or Emergency Off switch actuated Remedy Close door properly Press hard against the door handle or unlock Em...

Page 30: ...uency converter or door not properly locked Second locking bolt not engaged Remedy Close door properly press hard against the door handle or replace frequency converter When you notify our Customer Se...

Page 31: ...pairs can lead to serious accidents damage and operating disorders Important The drum has been manufactured from stainless special steel Ferriferous water or extraneous objects in the laundry to be wa...

Page 32: ...Machine part What must be done How often Detergent dispenser Non compliance with the maintenance instructions can lead to surface corrosion Remove the beakers and free the whole interior of the dispe...

Page 33: ...ose the tub outflow Insert filter again Slide tub in and fit cover again for hygienic reasons 2 days at the latest after the last use or if used daily 1x per week or in accordance with the company s o...

Page 34: ...iance incapable of operation before disposal Before disposing of the appliance the mains cable is to be cut off from the appliance and the door removed so that children at plan cannot become locked in...

Reviews: