background image

• 2 •

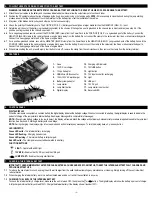
4.  FOLLOW THESE STEPS WHEN CONNECTING TO A BATTERY

WARNING! A SPARK NEAR THE BATTERY MAY CAUSE A BATTERY EXPLOSION. TO REDUCE THE RISK OF A SPARK NEAR THE BATTERY:

4.1 

Attach the output cables to the battery and chassis as indicated below. Never allow the output clamps to touch each other.

4.2 

Position the DC cables to reduce the risk of damage by the hood, door and moving or hot engine parts. NOTE: If it is necessary to close the hood during the jump starting 

process, ensure that the hood does not touch the metal part of the battery clips or cut the insulation of the cables.

4.3 

Stay clear of fan blades, belts, pulleys and other parts that can cause injury.

4.4 

Check the polarity of the battery posts. The POSITIVE (POS, P, +) battery post usually has a larger diameter than the NEGATIVE (NEG, N, -) post.

4.5 

Determine which post of the battery is grounded (connected) to the chassis. If the negative post is grounded to the chassis (as in most vehicles), see step 4.6. If the 

positive post is grounded to the chassis, see step 4.7.

4.6 

For a negative-grounded vehicle, connect the POSITIVE (RED) clamp from the Power Pack to the POSITIVE (POS, P, +) ungrounded post of the battery. Connect the 

NEGATIVE (BLACK) clamp to the vehicle chassis or engine block away from the battery. Do not connect the clamp to the carburetor, fuel lines or sheet-metal body parts. 

Connect to a heavy gauge metal part of the frame or engine block.

4.7 

For a positive-grounded vehicle, connect the NEGATIVE (BLACK) clamp from the Power Pack to the NEGATIVE (NEG, N, -) ungrounded post of the battery. Connect the 

POSITIVE (RED) clamp to the vehicle chassis or engine block away from the battery. Do not connect the clamp to the carburetor, fuel lines or sheet-metal body parts. 

Connect to a heavy gauge metal part of the frame or engine block.

4.8 

When disconnecting the unit, press the jump start button to turn off, remove the clamp from the vehicle chassis, then remove the clamp from the battery terminal.

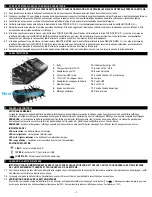
5.  FEATURES

13

14

15

16

17

8

9

10 11 12

1

2

3

4

5

6

7

1.  Case
2.  12V DC car charger
3.  12V port adaptor
4.  USB/Micro USB connector
5.  100V~120V AC wall charger
6.  Battery clamp adaptor
7.  Jump starter
8.  Jump Start button
9.  Digital display

10. Charging LED indicator
11.  12V/USB button
12. Light button
13. 12V Input socket for recharging
14. Light
15. USB port
16. 12V DC port
17. Jump starter input socket
18. Reversed LED

6.  CONTROL PANEL

DIGITAL DISPLAY

When the clamps are connected to a vehicle’s battery, the digital display indicates the battery’s voltage. When not connected to a battery, the digital display is used to indicate the 

percent of charge of the jump starter’s internal battery. See Display Messages for a complete list of messages. 

NOTE: If the vehicle’s battery voltage is too low to detect, the display will remain blank; the voltage will not display. A manual start procedure is required to enable the jump start 

function. See Section 8.2, Starting a Battery with Low Voltage.

NOTE: During charging, the display will go into sleep mode and will not display any messages. To turn the display back on, press any button.
LED INDICATOR

Green LED solid – The internal battery is charging.

Green LED flashing – Charging has aborted.

Green LED pulsing – The internal battery is fully charged.

Red LED solid

 – 

The clamps are connected backwards to a battery.

FUNCTION BUTTONS
 

  LIGHT – Operates the LED light


  12V/USB – Enables the 12V DC port and the USB port

  JUMP START – Enables the jump start function

7.  CHARGING THE INTERNAL BATTERY

IMPORTANT! CHARGE IMMEDIATELY AFTER PURCHASE, AFTER EACH USE AND EVERY 3-6 MONTHS, TO KEEP THE INTERNAL BATTERY FULLY CHARGED AND 

PROLONG BATTERY LIFE. 

7.1 

To reduce the risk of electric shock, unplug the unit’s wall charger from the outlet before attempting any maintenance or cleaning. Simply turning off the controls will not 

reduce this risk.

7.2 

When charging the internal battery, work in a well ventilated area and do not restrict the ventilation in any way.

7.3 

CHECKING THE LEVEL OF THE INTERNAL BATTERY

To check the internal battery’s charge level, make sure the unit is turned OFF, then press the   or 

 button. The digital display will show the battery’s percent of charge. 

A fully charged internal battery will read 100%. Charge the internal battery if the display shows it is under 100%.

18

Summary of Contents for SL1316I

Page 1: ...uit the battery or other electrical part that may cause an explosion 2 4 Do not permit the internal battery of the unit to freeze Never charge a frozen battery 2 5 To prevent sparking NEVER allow clamps to touch together or contact the same piece of metal 2 6 Consider having someone nearby to come to your aid when you work near a lead acid battery 2 7 Have plenty of fresh water soap and baking sod...

Page 2: ...harger 3 12V port adaptor 4 USB Micro USB connector 5 100V 120V AC wall charger 6 Battery clamp adaptor 7 Jump starter 8 Jump Start button 9 Digital display 10 Charging LED indicator 11 12V USB button 12 Light button 13 12V Input socket for recharging 14 Light 15 USB port 16 12V DC port 17 Jump starter input socket 18 Reversed LED 6 CONTROL PANEL DIGITAL DISPLAY When the clamps are connected to a ...

Page 3: ...splay shows JUMP START READY the jump starter is ready for use WARNING RISK OF EXPLOSION If you have connected the clamps backwards the red REVERSED LED will be lit solid Press the button to turn off the unit Reverse the connections Press the button to turn the unit back on 7 Crank the engine If the engine does not start within 5 8 seconds stop cranking and wait at least 1 minute before attempting...

Page 4: ...ttempting to jump start when 12V USB function is activated OFF The jump start button has been pressed twice BATTERY TOO HOT The internal temperature of the battery is too warm Allow battery to cool down before attempting another jump start JUMP START READY BATTERY COLD REDUCED PERFORMANCE The temperature of the internal battery is too low which reduces cranking performance JUMP START READY The jum...

Page 5: ...to jump start a few times to warm up the internal battery of the jump starter Beeping sound and display shows BATTERY LOW RECHARGE The internal battery was discharged when using the 12V USB function If battery is not recharged 12V USB will shut off after 10 minutes Recharge the internal battery The green LED is flashing and the display shows CHARGE ABORTED SEE MANUAL Charging has aborted The batte...

Page 6: ...u plomb Une batterie d accumulateurs au plomb peut produire un court circuit thermique assez fort pour souder une bague ou autre chose du même genre au métal causant de graves brûlures 2 3 Soyez extra prudent pour réduire le risque de laisser tomber un outil en métal sur la batterie Ça pourrait faire une étincelle ou produire un court circuit à la batterie ou à d autres parties électriques et pour...

Page 7: ... 4 Connecteur USB micro 5 100V 120V CA chargeur mural 6 Adaptateur de serrage de la batterie 7 Aide démarrage 8 Bouton pour démarrer 9 Affichage numérique 10 Indicateur de charge LED 11 Bouton de 12V USB 12 Bouton de lumière 13 Prise d entrée de 12V pour recharger 14 Lumière 15 Port de USB 16 Port 12V CC 17 Prise d entrée de démarrage 18 DEL d inversion 6 PANNEAU DE CONTRÔLE AFFICHAGE NUMÉRIQUE Lo...

Page 8: ...RISQUE D EXPLOSION Si vous avez connecté les pinces à l envers la DEL REVERSED s allumera en continu Appuyez sur la touche pour éteindre l appareil Inversez les connexions Appuyez sur la touche pour mettre l appareil en marche 7 Démarrez le moteur si le moteur ne démarre pas dans les 5 8 secondes s arrête de tourner et attendre au moins 1 minute avant de tenter de démarrer le véhicule a nouveau L ...

Page 9: ...u USB est surchargé BATTERY LOW RECHARGE Lorsque le mode vous utilisez le 12V USB la tension de la batterie a chuté 12V USB s éteindra au bout de 10 minutes Messages lors de l utilisation de démarreur de saut xx xV Pinces sont reliés à une batterie de voiture mais le bouton de démarrage de saut n a pas été actionnée CONNECT CLAMPS Appareil est sous tension mais ne détecte pas pinces de la batterie...

Page 10: ... Appuyez sur le bouton de démarrage pendant 5 secondes jusqu à ce que l affichage montre JUMP START READY Essayez de démarrer à plusieurs reprises S il n y parvient pas placez l appareil dans un endroit plus chaud pour un court laps de temps Faire vérifier la batterie L unité n allume pas mon appareil de 12V ou USB Le dispositif n est pas activé La batterie Interne n est pas chargée Allumez l appa...

Page 11: ...s de rechange 16 GARANTIE LIMITÉE Pour plus d informations sur notre garantie limitée d un an veuillez visiter schumacherelectric com ou appeler le 1 800 621 5485 pour demander une copie Aller sur schumacherelectric com pour enregistrer votre produit en ligne Schumacher est une marque de commerce déposée de Schumacher Electric Corporation ...

Reviews: