_________________________________________________________________________________________
schunk.com
XND.00033.002_B – 05/2022
25
3.1.2
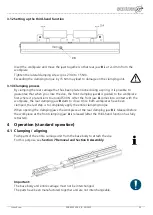
Setting up the third-hand function
Insert the workpiece and move the jaws together so that rear jaw
B
is at 2–4 mm from the
workpiece.
Tighten the lateral clamping screw (pos. 230) to 15 Nm.
Exceeding the clamping torque by 15 Nm may lead to damage on the clamping unit.
3.1.3
Clamping process
By clamping the rear carriage that has been pre-tensioned using a spring, it is possible to
guarantee that when you close the vice, the front clamping jaw
A
is guided to the workpiece
first where it pre-tensions to around 500 N. After the front jaw
A
comes into contact with the
workpiece, the rear clamping jaw
B
starts to close. Once both workpieces have been
clamped, the last step is to completely apply the entire clamping torque.
When opening the clamping jaws the workpiece at the rear clamping jaw
B
is released before
the workpiece at the front clamping jaw
A
is released (after the third-hand function has fully
retracted).
4
Operation (standard operation)
4.1
Clamping / aligning
Push parts of the entire carriage unit from the base body to attach the vice.
For this purpose, see
Section 7 Removal and Section 8 Assembly
.
Important:
The base body and entire carriage must not be interchanged.
The parts have been manufactured together and are not interchangeable.
A
B


