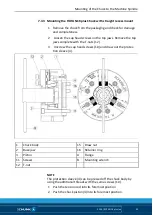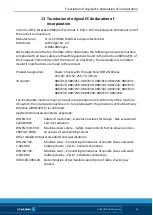
Mounting of the Chuck to the Machine Spindle
30
02.00|ROTA NCK plus |en
NOTICE
When mounting or removing the chuck, lift the chuck with a
crane by using an eyebolt (Illustr. B). Be sure to remove the eye
bolt from the chuck, before you start working or after you have
mounted the chuck onto the machine. The eye bolt is in all de-
liveries from chuck size 210 and up included.
1 Push the chuck onto the intermediate flange. During this, it
must be ensured that the through-holes for attaching the
chuck coincide with the threaded holes of the flange (figure
D).
2 Next, turn in the fastening screws and tighten them slightly.
3 Check the chuck for radial and axial run-out (figure E) and
align with slight blows with a hammer on the outer diameter if
necessary.
4 Next, screw the chuck tightly onto the chuck flange by means
of the fastening screws using a torque wrench.
During this, pay attention to the specified maximum tighten-
5 Next, check the radial and axial run-out again.

