Commissioning and maintenance
02.00|ROTA TP |en
49
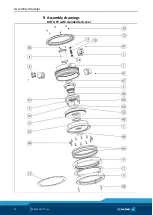
10 The piston (item 3) can be pulled out of the chuck body (item
1) as can the base jaws (item 2) from the base jaw guides by
pulling inwards through the piston bore of the chuck body.
The base jaws (2), the base jaw guides and the hardened re-
versible jaws are designated as 1, 2, and 3 so that the same
position and thus the same true running accuracy is achieved
during assembly. The hardened base jaws simply have 1, 2, or
3 notches for marking the T-slots.
11 Remove all O-rings of the chuck and the profile seals (item 66)
at the distributor ring. Wash all parts of the chuck with gaso-
line and blow out.
12 Check all O-rings and profile seals (item 66) for possible dam-
age and wear, replace them if necessary, and carefully rein-
stall them. Before the profile seals are inserted, it is recom-
mended that the profile seals (item 66) be rubbed with grease
by hand so that they remain elastic. There must be no visible
grease residue. When the profile seals (item 66) are reinsert-
ed, ensure that air passage openings do not align with the
pneumatic connections of the distributor ring.
13 The cylinder chamber of the chuck must be oiled. The jaw
guides in the chuck body, base jaws, and piston at the wedge
hooks are greased with LINO MAX grease.
Assembly
1 Insert the base jaws (item 2) in the guide shown, engage the
piston with O-rings (item 3) into the key teeth of the base jaws
and insert them as far as the end of the stroke.
NOTE
The piston wedge hook with the dot marking on the inside is
aligned using jaw guide 1.
2 Insert the O-ring (item 51) and the sealing disk with the O-ring
(item 5, 50) and tighten to the chuck body until firm and air-
tight using the 3 hexagon socket head screws (item 37) with
sealing rings (item 65).
3 Insert the guide bushing (item 4) from the front of the chuck
and secure with 3 hexagon socket head screws (item 36).
7.6


