background image


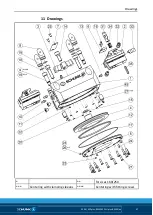
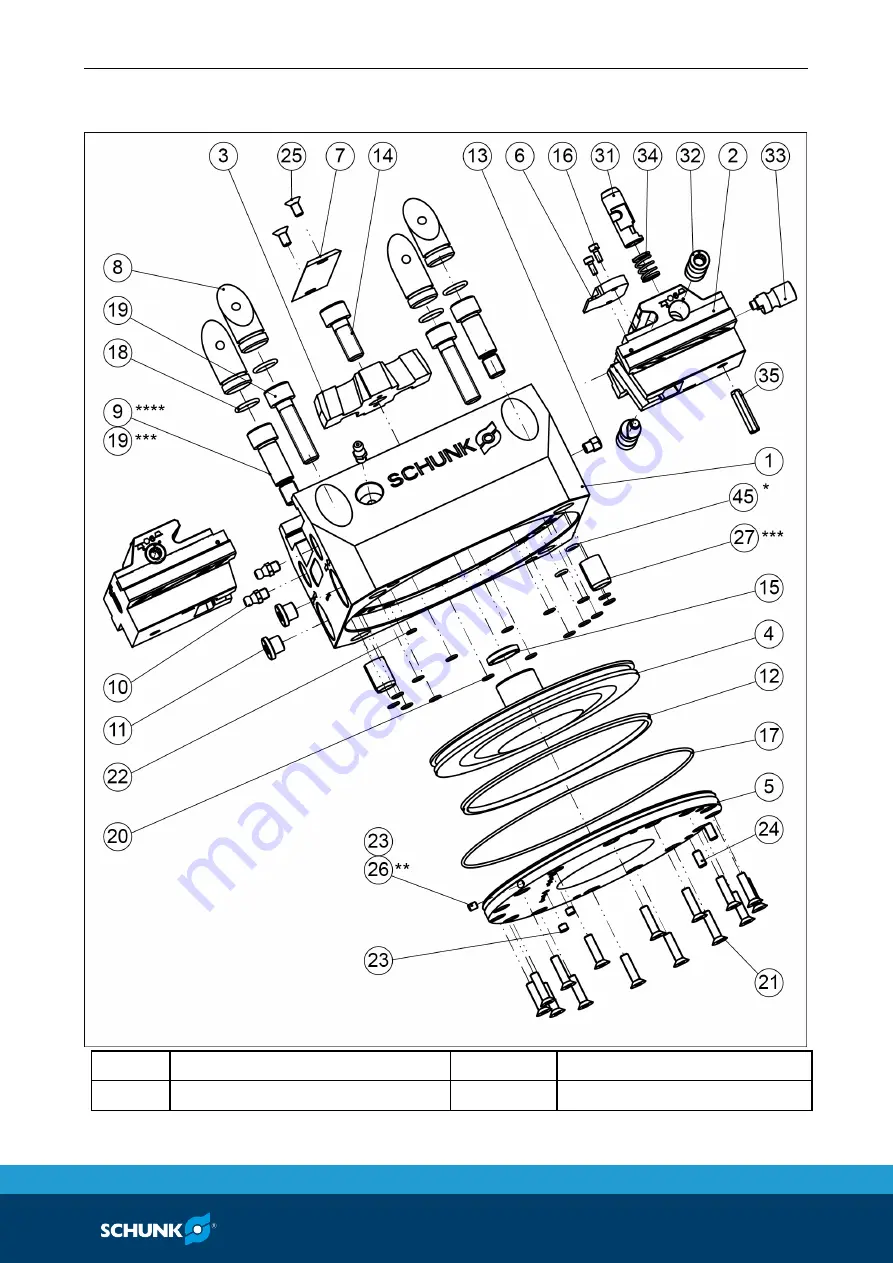
Drawings 


02.00|KSPplus-BWM KSP-LHplus-BWM |en 

47 


Drawings 


** 

for sizes 160/250 

*** 

Centering with clamping sleeves  **** 

Centering with fitting screws 


11 

Summary of Contents for TANDEM KSP-LHplus-BWM

Page 1: ...Translation of original operating manual TANDEM clamping block KSPplus BWM KSP LHplus BWM Assembly and Operating Manual Superior Clamping and Gripping ...

Page 2: ...tions for the purpose of technical improvement Document number 1151449 Version 02 00 28 11 2017 en H D SCHUNK GmbH Co All rights reserved Dear Customer thank you for trusting our products and our family owned company the leading technology supplier of robots and production machines Our team is always available to answer any questions on this product and other solutions Ask us questions and challen...

Page 3: ...ghtening torques for screws 16 7 Assembly Function 17 7 1 Assembling the clamping block on the machine table 17 7 2 Connecting the clamping block 18 7 3 Assembling the clamping block on the base plate 19 7 4 Functional description of quick change jaw system 20 7 4 1 Inserting the changing jaws 21 7 4 2 Removing the changing jaws from the quick change interface 24 7 4 3 Construction concept and dim...

Page 4: ...M KSP LHplus BWM en 10 Seal Kit and Parts List 39 10 1 Seal kit lists 39 10 2 Accessory packs 40 10 3 Parts lists 41 11 Drawings 47 12 Translation of original declaration of incorporation 49 13 Appendix on declaration of incorporation 50 ...

Page 5: ...party these instructions must also be passed on Illustrations in this manual are provided for basic understanding of the product and may differ from the actual product design We accept no liability for damage resulting from the failure to observe and comply with this operating manual Warnings To make risks clear the following signal words and symbols are used for safety notes DANGER Danger for per...

Page 6: ...RNING Warning about hand injuries WARNING Warning about hot surfaces Applicable documents General terms of business Catalog data sheet of the purchased product The documents marked with an asterisk can be downloaded on our homepage www schunk com 1 2 ...

Page 7: ...may only be used within the scope of its technical data 5 Page 14 The product is intended for industrial and industry oriented use Appropriate use of the product includes compliance with all instructions in this manual Not intended use The product is not being used as intended if for example It is used as lifting equipment as a press as a punching tool as a lathe chuck as a drill or as a cutting t...

Page 8: ...lock must never be exceeded The clamping block may only be used on machines and facili ties that fulfill the minimum requirements of the EC Machin ery Directive 2006 42 EC specifically they must have effec tive technical measures to protect against possible mechanical hazards WARNING Risk of injury from the workpiece being lost if the air pressure or oil pressure fails or is reduced or from an inc...

Page 9: ...nd accident prevention regulations when operating the clamping block especially when working with machine tools and other technical equipment CAUTION Risk of burns due to workpieces with high temperatures Wear protective gloves when removing the workpieces Automatic loading is preferred Product safety Follow the care and maintenance instructions Assembling the TANDEM clamping block Make sure the p...

Page 10: ...k at least once per shift for visible damage and defects Replace the chuck jaw mounting screws if there are signs of wear or damage Only use screws with a quality of 12 9 Maintenance instructions Clamping block reliability can only be guaranteed if the mainte nance instructions are precisely followed Using special chuck jaws Please observe the following rules when using special changing jaws The c...

Page 11: ...amping block must have read and understood the complete assembly and operating manual especially chapter 2 Basic safety notes The responsibility for operation maintenance and repair must be clearly specified Only allow persons to service or repair parts of the clamping block which are relevant to safety who can be considered to be a specialist as understood in the safety regulations Specify the op...

Page 12: ...y stopped and remain shut down until the fault has been located and remedied Only allow specialists to remedy faults Spare parts Only use original SCHUNK spare parts Environmental regulations The applicable environmental regulations must be observed for all maintenance and repair work The use of petroleum ether is prohibited It is extremely flam mable can build up an electrostatic charge and can f...

Page 13: ...workpiece and wear parts are not included in the warranty A cycle consists of a complete clamping process Open and Close Scope of Delivery KSP plus BWM or KSP LH plus BWM clamping block changing jaws reversible gripping inserts and clamping bars not included ACCESSORY PACK for contents see chapter accessory packs 10 2 Page 40 Accessories see catalog or data sheets when ordering separately Changing...

Page 14: ...ty mm 0 01 0 02 0 03 0 01 0 02 0 03 Repeat accuracy mm 0 02 0 02 0 02 0 02 0 02 0 02 max jaw height mm 35 55 70 35 55 70 Weight kg 4 11 6 34 5 4 11 7 34 6 Clamping force is the arithmetic sum of the individual forces occuring at the jaw distance H see catalog 1 2 Page 6 When using an ABP A base plate the maximum pressure must be limited to 7 bar After 100 consecutive strokes to end positions Dimen...

Page 15: ...ta 02 00 KSPplus BWM KSP LHplus BWM en 15 Dimension KSP plus BWM KSP LH plus BWM 100 160 250 N M8 M10 M12 O 15 18 20 P 4 4 5 Ø Q 10 f7 12 f7 14f7 Ø R 11 13 16 S 4 5 6 6 T 5 6 8 U 59 8 71 83 V 69 3 83 99 Dimensions ...

Page 16: ... M18 M20 M22 M24 Admissible torque MA Nm 4 2 7 5 13 28 50 88 120 160 200 290 400 500 Tightening torques to mount top jaws on the TANDEM clamping block screw quality 12 9 Screw size M4 M5 M6 M8 M10 M12 M14 M16 M20 M24 Tightening torques MA Nm 5 9 15 32 62 108 170 262 510 880 Tightening torques to mount the chuck piston onto the cylinder piston screw quality 12 9 Screw size M5 M8 M10 M12 Tightening ...

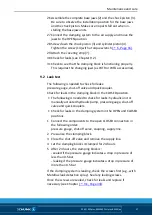
Page 17: ...always face downwards Surface X is parallel to the guideway of the base jaws 2 so the clamping block can be aligned on the machine table Assembling the clamping block Assembly with clamping sleeves Assemble the clamping block on the machine table together with clamping sleeves 27 and screws 19 Assembly with fitting screws There are two fittings in the housing 1 that along with the op tional fittin...

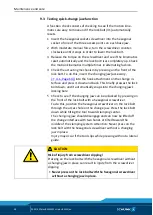
Page 18: ...ed by damaged pneumatic lines Always make sure the connections are tight and use appropriate protective covers to protect the pneumatic hoses or lines from hot chips Connecting the clamping block The clamping block has four air connections I II III IV Two connections for OPEN I and III and two connections for CLOSED II and IV Which of the two hydraulic connections has to be opened for actuation de...

Page 19: ...connections V for direct lubrication through the machine table These connections come sealed on delivery with set screws 24 Assembling the clamping block on the base plate If the two parts are delivered separately When assembling PLUS series TANDEM clamping blocks onto ABP h ABP a or SBP TANDEM base plates use the shorter mount ing screws included in the base plate accessory pack instead of the st...

Page 20: ...lamping block onto the base plate NOTE When joining make sure the air feed throughs for the clamping system and the base plate are precisely aligned Screw both parts together with the four screws 19 from the accessory pack Be sure to observe the tightening torques 6 Page 16 Remove the locking screws from the pneumatic connections on the base plate Connect the diaphragm pressure switch and set the ...

Page 21: ...ifted inward and removed The kinematics are automatically moved back into locking position by a spring mechanism The lock bolt also moves back out NOTE Be sure to only apply moderate force when turning the hexagonal screwdriver Do not strengthen the spring actuated jaw locks with additional force from the screwdriver Inserting the changing jaws A set of changing jaws consists of two individual jaw...

Page 22: ...Assembly Function 22 02 00 KSPplus BWM KSP LHplus BWM en Locking in place without tools ...

Page 23: ...down with a hexagonal screwdriver This is done by applying a one quarter counter clockwise turn at one of the side access points Once the jaw is inserted into the interface and positioned the locking kine matics return to their original position This locks the jaw firmly and securely onto the changing interface Semi automatic locking ...

Page 24: ...change interface The jaws can be removed in two ways 1 Two handed Unlock the jaws with a one quarter counter clockwise turn from the hexagonal screwdriver at one of the side access points At the same time lift the jaw diagonally from the center upward and out of the change interface Two handed 7 4 2 ...

Page 25: ...s BWM en 25 2 One handed Feed the hexagonal screwdriver through the hole in the changing jaw and unlock it directly from above The tool drives the lock bolt down and simultaneously can be used to tip the jaw out of the change interface One handed ...

Page 26: ...stem is only designed for external workpiece clamping Compatible changing jaws Changing jaw type WTR The WTR changing jaw is essentially a top jaw blank The clamping contour can be individually adjusted The jaw steps can be milled to a limited extent The clamping contour must be placed under clamping pressure Additionally a spacer with sufficient clamping stroke reserve must be clamped between the...

Page 27: ...e can be individually adjusted to the workpiece dimen sions with the WTG grid holes The various jaw steps combined with the grid hole distances allow virtually all workpiece dimen sions within the limited clamping range to be clamped Changing jaws WTR WTG WTR changing jaws Soft and undrilled Mounted to TANDEM KSP plus BWM standard stroke and long stroke with quick change interlocking Made out of h...

Page 28: ... 35 55 46 D 18 28 5 46 D1 6 7 5 9 5 E 12 15 20 T1 10 19 28 T2 14 23 32 Weight set 1 2 kg 5 2 kg 15 9 kg Sample workpiece clamping with WTR changing jaw WTG changing jaws Hard and drilled with bore hole grid as supporting jaw for SEI 6x reversible clamping inserts and STG clamping bars Mounted to TANDEM KSP BWM standard stroke and long stroke with quick change interlocking Made out of 16MnCr5 Bore ...

Page 29: ...ID no 0402311 0402312 0402313 compatible for sizes KSP LH plus 100 BWM KSP LH plus 160 BWM KSP LH plus 250 BWM A 47 76 118 B 55 90 140 C 25 36 46 D 18 28 5 46 Ø D1 6 7 5 9 5 Ø D2 10 15 20 L1 30 56 96 L2 9 16 21 L3 22 35 51 L4 35 54 81 L5 29 44 73 M M6 M8 M10 T1 1 3 4 T2 11 16 21 Weight Set 0 8 kg 3 0 kg 9 2 kg ...

Page 30: ... and clamping bars come with mounting screws Only use the included mounting screws at the specified torque when assembling 6 Page 16 WTG changing jaw accessories Designation SEI 100 M6 SEI 160 M8 SEI 250 M10 ID no 0402317 0402318 0402319 compatible for sizes WTG 100 WTG 160 WTG 250 A 18 28 34 B 18 28 34 C 8 13 16 Ø D 10 15 20 M M6 M8 M10 L1 7 5 11 13 L2 7 5 11 13 T1 2 8 3 3 ...

Page 31: ...250 M10 T2 5 6 9 T3 2 3 4 T4 10 15 19 Designation STG 100 STG 160 STG 250 ID no 0402314 0402315 0402316 compatible for sizes WTG 100 WTG 160 WTG 250 A 20 26 36 B 55 90 140 C 11 4 16 19 Ø D 10 15 20 E 8 11 16 L1 4 5 6 8 L2 7 9 12 L3 9 5 12 16 L4 30 56 96 T1 2 8 3 3 T2 5 6 6 6 T3 8 4 9 12 T4 2 3 4 ...

Page 32: ...ance unit perform maintenance Place oiler closer to clamping system Set required oil level Chuck piston screw broken overload Send clamping system to SCHUNK for repairs or Disassemble clamping system and repair with original SCHUNK replacement parts 9 1 Page 34 Piston rod or piston rod screw broken overload Send clamping system to SCHUNK for repairs or Disassemble clamping system and repair with o...

Page 33: ... base and changing jaws Set changing jaw firmly into change interface by pulling backward Clamping block does not make a complete stroke Possible cause Solution s Chips or dirt between covering strip and base jaws Unscrew the covering strip 7 and remove chips and dirt Drop of clamping force Possible cause Solution s Clamping block not tightly sealed Check connection and seal screws and reseal or r...

Page 34: ... on the load but at least once a month or every 10 000 clampings lubricate the guides on the two frontal or the two lateral lubricating nipples with LINOMAX 200 or equivalent lubricant For this purpose the chuck jaws should be in opened position For this purpose the chuck jaws should be in opened position Replace the base jaws and chuck piston at least every three months or more often if necessary...

Page 35: ... 1 7 Loosen the screws 9 19 and remove the clamping system from the base plate or machine table Air may escape at this point 8 To remove the chuck piston 3 for size 100 BMW screw one M10x 25 screw in the center bore for size 160 BMW screw one M12x 25 screw in the center bore for size 250 BMW screw two M6x 25 screws in the lateral threaded holes 9 Pull the base jaws 2 out of the housing 1 The base ...

Page 36: ... grease 16 Carefully install the new seals without damaging them 17 Grease the sliding surfaces of the cylinder and piston with Renolit HLT 2 or equivalent grease 18 Place the cylinder piston 4 into the cylinder Make sure the cylinder piston 4 is level and not tilted 19 Gently press the quad ring 12 inward from all sides so that it goes more easily over the edge of the housing 1 20 Press the cylin...

Page 37: ...Check for leaks in the clamping block in the CLOSED position The following is needed to check for leaks hydraulic unit or manually actuated hydraulic pump pressure gauge shut off valve and quick couplers Check for leaks in the clamping system in the OPEN and CLOSED positions 1 Connect the components to the open CLOSED connection in the following order pressure gauge shut off valve coupling supply ...

Page 38: ...d press it down and back This briefly presses the lock bolt down and it automatically snaps into the changing jaw s locking bore 5 Check to see if the changing jaw can be unlocked by pressing on the front of the lock bolt with a hexagonal screwdriver To do this position the hexagonal screwdriver on the lock bolt through the access hole on the change jaw Press the lock bolt down while tilting the t...

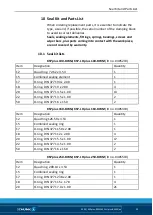
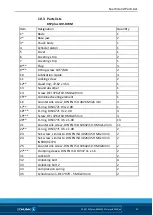
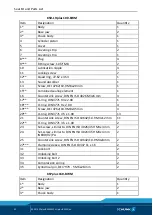
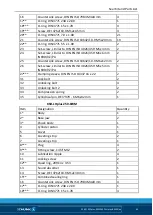
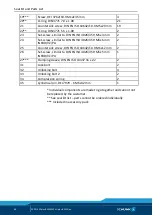
Page 39: ... 1 15 Combined sealing element 1 17 O ring DIN 3771 93 x 2 00 1 18 O ring DIN 3771 9 x 2 00 4 20 O ring DIN 3771 4 5 x 1 00 13 22 O ring DIN 3771 3 5 x 1 00 2 50 O ring DIN 3771 6 x 1 50 2 KSPplus 160 BWM KSP LH plus 160 BWM ID no 0405319 Item Designation Quantity 12 Quad ring 126 59 x 3 53 1 15 Combined sealing ring 1 17 O ring DIN 3771 150 x 2 00 1 18 O ring DIN 3771 12 x 2 00 4 20 O ring DIN 37...

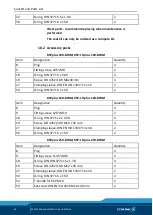
Page 40: ...sleeve DIN EN ISO 13337 11 x 16 2 50 O ring DIN 3771 6 x 1 50 2 KSPplus 160 BWM KSP LH plus 160 BWM Item Designation Quantity 8 Plug 4 9 Fitting screw 12f7 M10 2 18 O ring DIN 3771 12 x 2 00 4 19 Screw DEI 4762 10 9 M10 x 35 mm 4 27 Clamping sleeve DIN EN ISO 13337 13 x 18 2 50 O ring DIN 3771 6 x 1 50 2 KSPplus 250 BWM KSP LH plus 250 BWM Item Designation Quantity 8 Plug 4 9 Fitting screw 114f7 M...

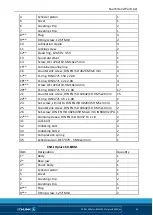
Page 41: ... 1 16 Countersink screw DIN EN ISO 4026 M3x6 mm 4 17 O ring DIN 3771 93 x 2 00 1 18 O ring DIN 3771 9 x 2 00 4 19 Screw DEI 4762 10 9 M8x35 mm 4 20 O ring DIN 3771 4 5 x 1 00 13 21 Countersink screw DIN EN ISO 10642 10 9 M4x12 mm 11 22 O ring DIN 3771 3 5 x 1 00 2 23 Set screw similar to DIN EN ISO 4026 45H M3x3 mm 2 24 Set screw similar to DIN EN ISO 4026 45H M4x4 mm IN6RD VZ PA 2 25 Countersink ...

Page 42: ...3x6 mm 4 17 O ring DIN 3771 93 x 2 00 1 18 O ring DIN 3771 9 x 2 00 4 19 Screw DEI 4762 10 9 M8x35 mm 4 20 O ring DIN 3771 4 5 x 1 00 13 21 Countersink screw DIN EN ISO 10642 10 9 M4x12 mm 11 22 O ring DIN 3771 3 5 x 1 00 2 23 Set screw similar to DIN EN ISO 4026 45H M3x3 mm 2 24 Set screw similar to DIN EN ISO 4026 45H M4x4 mm IN6RD VZ PA 2 25 Countersink screw DIN EN ISO 10642 10 9 M4x8 mm 2 27 ...

Page 43: ...0 9 M10x40 mm 4 20 O ring DIN 3771 5 5 x 1 00 17 21 Countersink screw DIN EN ISO 10642 10 9 M5x20 mm 15 22 O ring DIN 3771 4 5 x 1 00 2 23 Set screw similar to DIN EN ISO 4026 45H M5x4 mm 4 25 Countersink screw DIN EN ISO 10642 10 9 M5x10 mm 2 26 Set screw DIN EN ISO 4026 45H M4x4 mm IN6RD VZ PA 1 27 Clamping sleeve DIN EN ISO 13337 13 x 18 2 31 Lock bolt 2 32 Unlocking bolt 4 33 Unlocking bolt 2 ...

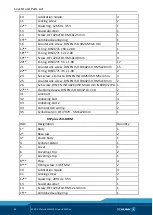
Page 44: ...1 00 2 23 Set screw similar to DIN EN ISO 4026 45H M5x4 mm 4 25 Countersink screw DIN EN ISO 10642 10 9 M5x10 mm 2 26 Set screw DIN EN ISO 4026 45H M4x4 mm IN6RD VZ PA 1 27 Clamping sleeve DIN EN ISO 13337 13 x 18 2 31 Lock bolt 2 32 Unlocking bolt 4 33 Unlocking bolt 2 2 34 Compression spring 2 35 Cylindrical pin DEI 7979 5 M6x28 mm 1 KSPplus 250 BWM Item Designation Quantity 1 Body 1 2 Base jaw ...

Page 45: ...6x12 mm 2 26 Set screw similar to DIN EN ISO 4026 45H M5x5 mm IN6RD VZ PA 1 27 Clamping sleeve DIN EN ISO 13337 16 x 22 2 31 Lock bolt 2 32 Unlocking bolt 4 33 Unlocking bolt 2 2 34 Compression spring 2 35 Cylindrical pin DEI 7979 6 M6x32 mm 1 KSH LHplus 250 BWM Item Designation Quantity 1 Body 1 2 Base jaw 2 3 Chuck body 1 4 Cylinder piston 1 5 Cover 1 6 Covering strip 2 7 Covering strip 1 8 Plug...

Page 46: ...IN EN ISO 4026 45H M6x6 mm IN6RD VZ PA 2 25 Countersink screw DIN EN ISO 10642 10 9 M6x12 mm 2 26 Set screw similar to DIN EN ISO 4026 45H M5x5 mm IN6RD VZ PA 1 27 Clamping sleeve DIN EN ISO 13337 16 x 22 2 31 Lock bolt 2 32 Unlocking bolt 4 33 Unlocking bolt 2 2 34 Compression spring 2 35 Cylindrical pin DEI 7979 6 M6x32 mm 1 Individual components are made to go together and cannot not be replace...

Page 47: ...Drawings 02 00 KSPplus BWM KSP LHplus BWM en 47 Drawings for sizes 160 250 Centering with clamping sleeves Centering with fitting screws 11 ...

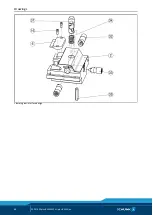
Page 48: ...Drawings 48 02 00 KSPplus BWM KSP LHplus BWM en Clamping jaw interface design ...

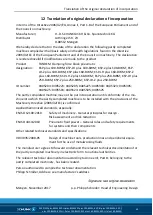
Page 49: ...50 BWM KSP LH Z plus 250 BWM ID number 0405203 0405223 0405205 0405225 0405303 0405323 0405305 0405325 0405503 0405523 0405505 0405525 The partly completed machine may not be put into operation until conformity of the ma chine into which the partly completed machine is to be installed with the provisions of the Machinery Directive 2006 42 EC is confirmed Applied harmonized standards especially EN ...

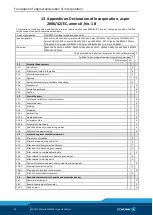
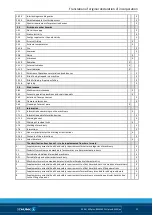
Page 50: ... 3 Materials and products X 1 1 4 Lighting X 1 1 5 Design of machinery to facilitate its handling X 1 1 6 Ergonomics X 1 1 7 Operating positions X 1 1 8 Seating X 1 2 Control Systems 1 2 1 Safety and reliability of control systems X 1 2 2 Control devices X 1 2 3 Starting X 1 2 4 Stopping X 1 2 4 1 Normal stop X 1 2 4 2 Operational stop X 1 2 4 3 Emergency stop X 1 2 4 4 Assembly of machinery X 1 2...

Page 51: ... machinery X 1 7 1 1 Information and information devices X 1 7 1 2 Warning devices X 1 7 2 Warning of residual risks X 1 7 3 Marking of machinery X 1 7 4 Instructions X 1 7 4 1 General principles for the drafting of instructions X 1 7 4 2 Contents of the instructions X 1 7 4 3 Sales literature X The classification from Annex 1 is to be supplemented from here forward 2 Supplementary essential healt...

Reviews: