Maintenance and care
48
01.00|KSP3-IM, KSP3-LH-IM |en
Assembly
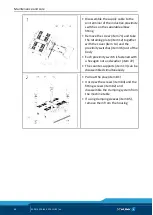
Assembly is done in the reverse order of disassembly. In doing so,
observe the following:
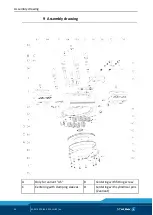
• Pay attention to the mounting position of the base jaws (item 2)
and the chuck piston (item 3)
• Observe the tightening torques for the screws
• After completion of the assembly, carry out a leak test and a
• For variants with clamping force maintenance (AS), mount the
cylinder piston using an assembly device
Leak test
The following components are required to check for leaks:
Pressure gauge, shut-off valve, supply line and quick coupling.
• Check for tightness in the clamping system in the OPEN and
CLOSED positions
1 Connect the components to the open CLOSED connection in
the following order:
Pressure gauge - shut-off valve - quick coupling - supply line
2 Pressurize the clamping force block
3 Close the shut-off valve and remove the supply line
4 Let the clamping force block sit clamped for 24 hours
5 After 24 hours, the clamping force block is
– sealed, if the pressure gauge indicates a drop in pressure of
less than 0.5 bar
– leaking if the pressure gauge indicates a drop in pressure of
more than 0.5 bar
If the clamping system is leaking, check the fittings first (e.g. with
Metaflux leak detection spray). Seal any leaking fittings.
Once the fittings are sealed, check the seals for leaks and replace if
7.3.2


