USER GUIDE
1 8
REM O T E C O N T RO L
A . B u t t o n f u n c t i o n s
1 . Up / Do w n m o v e m e n t
When the button is pressed, the TV bracket moves up to the position closest to the ceiling.
Upon pressing the button, the TV bracket will move down to the position with the maximum tilt angle
(default 75°).
Press the button to stop the movement. (Remove all obstacles from the movement area).
2 . M e m o r y s e t t i n g
Press and hold the
or
button for 1 second and you will hear a beep indicating that the current
position has been stored in memory. The
or
buttons can always be used to store another position.
3 . M e m o r y r e c a l l
Press the
or
button and the TV bracket will automatically move to the position stored under the
or
button.
4 . Re s e t
If the TV bracket cannot be set to the highest position (0 degrees to ceiling) or lowest position (maximum
tilt), unplug the power cord and plug it back in. Then press and hold the button for 5 seconds.
The TV bracket will return to the highest position, i.e. the system has reset successfully.
5 . Se t t i n g t h e t i l t r a n g e f o r s l o p i n g c e i l i n g s
The TV bracket can be adjusted from 0° to 75° as standard. Please set the tilt range when using the TV bracket on a
sloping ceiling.
P r e p a r i n g :
Reset the system (see the instructions under A. Button functions - 4. Reset).
St e p 1 :
Press the , and buttons and set the correct position.
St e p 2 :
Press and hold the
button until the unit beeps once.
Repeat this step 5 times. The unit will emit a long beep to indicate successful setting.
N o t e :
Steps 1 and 2 must be completed within 2 minutes or the unit will not be set.
N o t e :
The remote control requires two AAA batteries (
n o t i n c l u d e d
).
B . M a n u a l m o d e
If you manually raise the TV ceiling bracket to any position (except the minimum position against the ceiling), it will
automatically return to the minimum position against the ceiling.
C . C o d i n g o f t h e c o n t r o l u n i t a n d r e m o t e c o n t r o l s
St e p 1 :
With the bracket switched on, press
the small button on the control unit with a
thin tool as shown. The device will beep to
indicate that the control unit is ready for en-
coding.
St e p 2 :
Press the
button on the remote
control and the control unit will beep repeat-
edly for about 10 seconds, indicating that
the remote control is being programmed.
The process will be completed automatically
until no beep is heard.
N o t e :
The TV bracket can be paired with up
to 20 remote controls. To delete all remote controls, press and hold the code setting button for 5 seconds and then re-
lease it. The device will beep twice to confirm successful deletion, otherwise deletion is not done.
Summary of Contents for 4004005035971
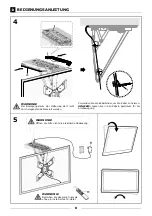
Page 7: ...BEDIENUNGSANLEITUNG 7 3 ACHTUNG Ziehen Sie die Schrauben NIC H T zu fest an ...
Page 15: ...USER GUIDE 1 5 2 Remove the lower screws from the VESA plate and save them for later use ...
Page 16: ...USER GUIDE 1 6 3 CAUTION Do N O T overtighten the screws ...
Page 25: ...MODE D EMPLOI 2 5 3 ATTENTION N e s e r r e z p a s t r o p les vis ...
Page 34: ...MA N U A LE IS T R U Z ION I 3 4 3 ATTENZIONE N ON S T R IN G ER E T R OPPO le viti ...
Page 43: ...BEDIENINGSH ANDLEIDING 4 3 3 OPGELET Draai de schroeven NIET te vast aan ...


