background image

GP-M40J-CX-08A 

4001/2-J, 4N11/2-J Manual 

    RD: April 2006 

R.L. 08A 

KH 

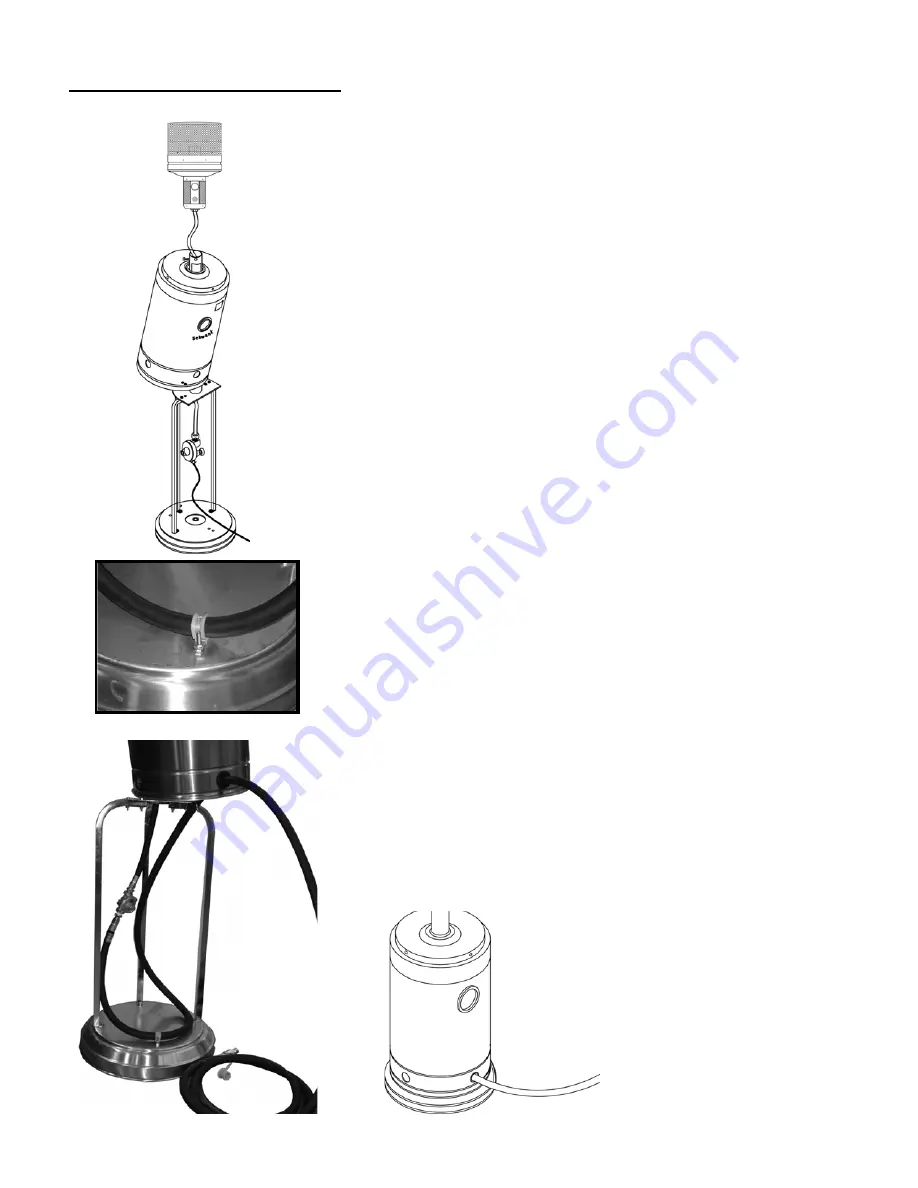
ASSEMBLY..... CONTINUED 

Slide cylinder cover over post and let rest in upper position.  
 
For 

LP

 connection:  

Slide gas hose up the post with LP regulator at bottom (regulator will 
be inside tank cover) 

Attach hose securely to burner   

Allow burner to rest in post  

Connect hose to gas cylinder. 

Lift burner and leak test all connections 

Fasten burner securely in place with four 1/2” machine screws 

Attach assembled reflector (see next page) 

 
For 

NG

 connection:  

Attach 45” hose securely to burner 

Slide hose down through inside of post 

Attach burner to post with two 1/2” machine screws - finger tight only 
(burner will need to be lifted later to leak test gas hose connection) 

Install outlet side of 5” wc gas regulator onto hose using 1/2” pipe 
thread to flared fitting adapter 

Install 1/2” male pipe thread of 18 ft rubber gas hose into gas regulator 
inlet side. 

Remove finger tight nut from #10 bolt extending from top side of base 

Using hose clamp provided, secure rubber gas hose to the #10 bolt 
extending from top side of base 

Leave sufficient “slack in hose above the clamp to allow for lifting 
of the burner for leak testing 

Install female quick connect provided to gas supply and connect 
heater to the gas supply 

Lift burner and leak test all gas connections 

Secure burner with four 1/2” machine screws 

Install heavy duty grommet in one of the lower holes in the tank cover 

Disconnect gas hose from supply and feed gas hose through the 
heavy duty grommet 

Fill counterweight container (supplied) with sand or water and place 
on cylinder base 

Slide tank cover down into place - carefully slide hose out though 
grommet while tank cover descends 

Attach assembled reflector—see next page for instruction 

Page 9 

Summary of Contents for 4001-J SERIES

Page 1: ...er appliance If you smell Gas Extinguish any open flames Don t touch electrical switches Call your Gas supplier immediately FIELD CONVERTIBILITY The conversion shall be carried out in accordance with...

Page 2: ...form without prior written consent from the manufacturer Unauthorized use or distribution of this publication is strictly prohibited Schwank InfraSave 5285 Bradco Boulevard Mississauga Ontario L4W 2A6...

Page 3: ...EQUIREMENTS PROPANE 6 3 4 SPECIFICATIONS 4001 2 4401 2 PROPANE MODELS 6 4 MAIN COMPONENTS FOR ASSEMBLY 7 5 ASSEMBLY INSTRUCTIONS 8 5 1 CONNECTION AND TESTING 11 TOPIC PAGE NUMBER 6 SAFE LOCATION FOR H...

Page 4: ...GP M40J CX 08A 4001 2 J 4N11 2 J Manual RD April 2006 R L 08A KH...

Page 5: ...below the burner The gas supply is fed up through the inside of the pole using flexible gas hose These installation and operating instruc tions are intended only for the patio heater Series 4001 2 J...

Page 6: ...ied and licensed technician or your gas supplier Only those parts recommended by the Manufacturer should be used Substitution will void the warranty Do not use the heater until all connections have be...

Page 7: ...0 w c is required to maintain correct burner input The pressure regulator and hose assembly supplied with the appliance MUST be used Any replacement pressure regulator and hose must conform to standar...

Page 8: ...401 2 J 44N1 2 J Main Burner Head assembly unit 34 housing and Base Post Support Brackets 3 each 46 gas supply line Aluminum Reflector 5 pc Sectional 4 ea M6 x 20mm Bolts for Burner Assembly Upper Pos...

Page 9: ...s to base L brackets using four 8 x 3 4 bolts and nuts Note Bolt heads face the wheel Position wheel brackets with curve up Align pairs of holes in each end of L brackets to those in op posite sides o...

Page 10: ...ing 1 2 pipe thread to flared fitting adapter Install 1 2 male pipe thread of 18 ft rubber gas hose into gas regulator inlet side Remove finger tight nut from 10 bolt extending from top side of base U...

Page 11: ...semble the four outer reflector sections using 1 4 washers and wing nuts on only the outer studs Assemble the centre piece to the outer ring using wing nuts Secure reflector to burner with wing nuts 5...

Page 12: ...ll If the leak cannot be repaired permanently close the cylinder valve completely and contact a qualified and licensed gas technician After successful leak test ensure that the burner assembly and all...

Page 13: ...l heater on a levelled solid and stable surface Do not install in an explosive environment Keep away from areas where gas vapours are present or inflammable liquids are stored or used In case of stron...

Page 14: ...wise TO TURN OFF 1 Turn the knob clockwise until it stops 2 Depress knob and turn fully clockwise to shut of the gas supply completely Warning A 5 minute complete shut off period is required before th...

Page 15: ...sure is low or regulator is defective Replace empty LPG gas cylinder or defec tive regulator Check gas pressure NG Gas inlet hose is kinked or bent Spider or insect cocoon Check straighten out hose fo...

Page 16: ...ylinder indoors Store gas cylinder in a well ventilated area For more compact storage and to avoid damage the reflector may be removed 8 2 PREVENTATIVE CARE AND MAINTENANCE The burner area is likely t...

Page 17: ...rantydoes not cover heating products improperlyinstalled misused exposed to or damaged by neg ligence accident corrosive or contaminating atmosphere water excessive thermal shock impact abrasion norma...

Reviews: