background image

Page 10

 INSTALLATION

Page 10

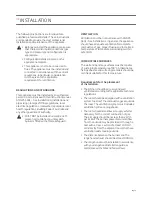
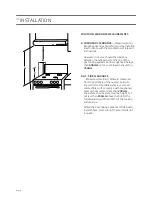
MINIMUM CLEARANCE MEASUREMENTS

A� OVERHEAD CLEARANCE — (Measurement A) 

Rangehoods and exhaust fans must be installed 

in accordance with the manufacturer’s relevant 

instructions.  


However, in no case should the clearance 

between the highest part of the hob of the 

gas cooking appliance and a rangehood be less 

than 600mm or, for an overhead exhaust fan, 

750mm.

B & C� SIDE CLEARANCE  

— (Measurements B & C) Where B, measured 

from the periphery of the nearest burner to 

any vertical combustible surface, or vertical 

combustible surface covered with toughened 

glass or sheet metal, is less than 200mm

the surface shall be protected to a height C of 

not less than 150mm above the hob for the 

full dimension (width or depth) of the cooking 

surface area.  


Where the gas cooking appliance is fitted with 

a ‘splashback’, protection of the rear wall is not 

required.

C

B

A

Summary of Contents for INGG60B

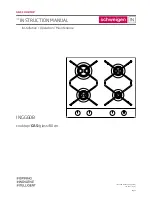
Page 1: ...Page 1 Page 1 INSTRUCTION MANUAL Installation Operation Maintenance cooktop GAS glass 60cm INGG60B GAS COOKTOP INGG60B PGINGp4 0ZpZtAB 10 2017 V2 0...

Page 2: ...sal Gas ULPG 12 Natural Gas 12 Installing the Gas Cooktop 14 Adapt the Cooktop to a Particular Type of Gas 15 Table of Burner Injector Characteristics 15 Adjust the Valves for a Reduced Flow 15 Adjust...

Page 3: ...can refer to it at any time IMPORTANT The appliance should only be operated when you have read and understood this manual thoroughly The appliance can be only used for the purpose for which it was de...

Page 4: ...onto the hotplate Locate pan centrally over the burner so that it is stable and does not overhang the appliance This appliance must be installed in accordance with the applicable regulations and used...

Page 5: ...must be replaced by the manufacturer its service agent or a qualified person in order to avoid a hazard Cooking with this appliance results in the emission of heat and moisture in the room in which i...

Page 6: ...ot uncover the pan too often a watched pot never boils Turn off the appliance in time and use the residual heat For long cooking times turn off heating zones 5 to 10 minutes before finishing cooking T...

Page 7: ...hand it over to waste collection centre collecting used electrical and electronic goods The collectors including local collection points shops and local authority departments provide recycling schemes...

Page 8: ...tion Model Natural Gas Universal LPG 4 Burner INGG60B 30 8 MJ h 30 2 MJ h Test Point Pressure Natural Gas 1 0 kPa Universal LPG 2 75 kPa Burner Configuration Natural Gas Burner Main Injector By Pass m...

Page 9: ...accordance with AS NZS 5601 Gas Installations In general the appliance should have adequate ventilation for complete combustion of gas proper flueing and to maintain temperature of immediate surroundi...

Page 10: ...than 600mm or for an overhead exhaust fan 750mm B C SIDE CLEARANCE Measurements B C Where B measured from the periphery of the nearest burner to any vertical combustible surface or vertical combustibl...

Page 11: ...ck the operation of igniters and flame failure cut off device In the event of faulty operation remove the dials make adjustments by inserting a washer washers on the valve pin Once adjusted protect th...

Page 12: ...e burners burners operating at maximum The appliance is set up to operate with the gas specified on the gas type label placed on the back of the appliance When the type of gas available does not corre...

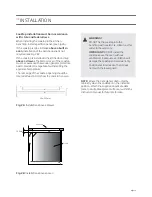
Page 13: ...he rear edge of the cooktop opening should be located at least 60 mm from the rear kitchen wall Min 130mm Fig 2A Installation above a drawer 130mm Oven Cooktop Fig 2B Installation above an oven WARNIN...

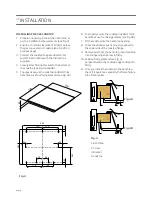
Page 14: ...see Fig 4A and 4B 5 To properly secure the cooktop on 38mm thick benchtops use four fixing brackets see Fig 4A 6 To properly secure the cooktop on 28mm thick benchtops use four fixing brackets see Fi...

Page 15: ...riate nozzle according to the table Economic flame Gently loosen the adjusting screw and adjust the flame Slightly tighten the adjusting screw check the flame stability and size ADAPT THE COOKTOP TO A...

Page 16: ...not go out or jump on the nozzle However if it does re adjust the valves WARNINGS FOR THE SAFETY OF THE GLASS TOP SYMBOLS TO SCALE DO NOT place anything e g flame tamer asbestos mat between pan and p...

Page 17: ...RE Make sure that the diameter of the bottom of the pot is always slightly larger than the crown of the burner flame and the pot itself is covered with a lid It is recommended that the pot diameter is...

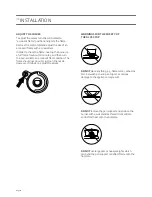
Page 18: ...me failure device will cut off gas supply within about 60 seconds You can open and control the gas supply to the burners using dials with flame failure cut off device ADJUST FLAME Flame from a properl...

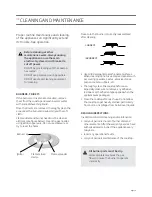
Page 19: ...to ream the holes Make sure that burner is correctly reassembled after cleaning CORRECT INCORRECT Use mild detergents to wash enamel surfaces When cleaning do not use abrasive cleaners such as scouri...

Page 20: ...he following information The purchase date The appliance model number and type e g Gas Cooktop The serial number or batch number located on the sticker under the cooktop on the cover of the User Manua...

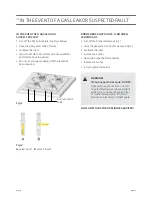
Page 21: ...ontrol Dials Fig 1 Fig 2 A valve open B valve closed BURNER DOES NOT IGNITE I CAN SMELL LEAKING GAS turn off the burner dials see Fig 1 close the gas system shut off valve see Fig 2 ventilate the room...

Page 22: ...ting the burner Burner dial released too soon Hold the dial down for longer in a large flame position DISCLAIMER Under our policy of continuous product development product specifications may change wi...

Page 23: ...Page 23 Page 23 Page 23 NOTES Page 23...

Page 24: ...ictoria 3170 Sales 1300 881 693 Email sales schweigen com au All Service Warranty Technical Enquiries Ph 1300 829 066 Lines Open Weekdays 9AM 5 30PM AEST Fax 1300 881 639 Email service schweigen com a...

Reviews: