background image

Welcome

Welcome

Thank you for purchasing your  

new Schweigen X rangehood.

To get the maximum output from this unit,  

please read through this guide before installation 

and use.

This guide contains important information on  

the use and maintenance of the unit, as well  

as important safety notes. This will ensure  

your personal safety and the lasting value  

of your rangehood.

We trust that you will enjoy your new  

Schweigen X rangehood.

PLEASE ALWAYS RETAIN YOUR PROOF  

OF PURCHASE TO AID IN ANY WARRANTY 

QUERIES.

If you are unable to locate your warranty card, one 

is available to download from our website  

www.schweigen.com.au

.

This appliance and its packaging are produced  

by processes that minimise waste and respect  

the environment.

Please help us to continue our effort to protect 

the environment by using the appliance efficiently 

and dispose of the packaging in a responsible 

manner.

Yo u r   S t a t e   R e g u l a t o r y   A u t h o r i t y

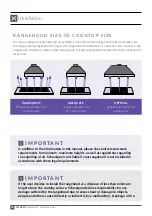
Different Australian states have varying legislative requirements for the installation  

of rangehood ducting. Some will insist on ducting being vented externally (i.e. not  

in to the ceiling cavity); others will not. It is imperative that you check with your  

state building authority and/or private certifier to confirm their position.

MSQX90  

Rangehood & Installation Guide

3

Summary of Contents for MSQX90

Page 1: ...hood Installation Guide Under our policy of continuous product development product specifications may change without notice Please refer to the online version of the manual for the latest updates and specifications ...

Page 2: ...oktop Size 14 Rangehood Installation Height 15 Recommended Installation Height For Induction Cooktop 15 Mounting System 16 Mounting Position 16 Installation Instructions 17 Un installation Instructions 20 Optional Back Outlet Configuration 22 Ducting 23 Ducting Advice 25 Roof Cowls 26 CONDENSATION INFORMATION 27 Cooking with Induction Cooktops 27 TROUBLESHOOTING 28 Troubleshooting 28 Service 29 SP...

Page 3: ...d one is available to download from our website www schweigen com au This appliance and its packaging are produced by processes that minimise waste and respect the environment Please help us to continue our effort to protect the environment by using the appliance efficiently and dispose of the packaging in a responsible manner Yo u r S t a t e Re g u l a t o r y A u t h o r i t y Different Austral...

Page 4: ...This appliance is not intended for use by person s including children with reduced physical sensory or mental capabilities or lack of experience and or knowledge unless the person has been given supervision or instruction concerning the use of the appliance by a person responsible for their safety Children should be supervised to ensure that they do not play with the appliance it is not a toy 9 Ex...

Page 5: ...ectrical work required to install this rangehood should be carried out by a qualified Electrician 9 This appliance must be connected to an electricity supply with a ground connection 10 The electrical technical data can be found inside the rangehood after removing the grease filters 11 The flexible power cable supplied is already connected internally and emerges from the rangehood near the air out...

Page 6: ...hotels motels and other residential environments excluding commercial kitchens Bed and breakfast type environments This rangehood is not designed for outdoor or alfresco installation E L E C T R I C A L C O R D Ensure the power supply cord is not exposed to heat chemicals or sharp objects If the power supply cord is damaged it must be replaced by the manufacturer MSQX90 Rangehood Installation Guid...

Page 7: ...ehood to your cabinet maker to ensure the correct fit prior to installation 885mm approx 305mm approx Dimensions may be subject to change Description 1 2 3 4 5 6 R A N G E H O O D 1 Square to round outlet 2 Power cord 3 Rangehood body 4 LED strip lights 5 Mesh filters 6 Baffles optional 7 Remote Control 7 OPTIONAL MSQX90 Rangehood Installation Guide 7 ...

Page 8: ...y changes the speed to maximum or minimum speed 4 Turns the lights on or off 5 10 minute timer S P E E D C O N T R O L This undermount is equipped with a 5 speed touch control Speed control usage suggestions Low speed for simmering Medium speed for light cooking High speed for heavy frying cooking To activate the shutdown timer on the Touch Button Control Panel When the rangehood is in operation a...

Page 9: ...iquid soap to not contain granules that could scratch the surface First apply the solution to a soft cloth and then rub the cloth over the rangehood It is important to follow the direction of the surface with the cloth refer to figure on left Do not pour any liquid directly on to the rangehood The cloth must have no buttons zips or fasteners that could scratch the surface Chemical solvents aggress...

Page 10: ...ters and baffles can be washed by hand or in the dishwasher Washing by hand Immerse the filter in hot water and a suitable detergent and when clean rinse with plenty of hot water Dishwasher Put the filter in the dishwasher and select a short program at low to mid temperature Please make sure the filters are completely dry before placing them back in position and using the rangehood MESH FILTERS To...

Page 11: ...time after being switched off Never attempt to replace the LED by yourself always refer to a qualified Service Technician R E P L A C I N G T H E L E D L I G H T STEP 1 Remove filters from rangehood STEP 3 From inside the cavity push down on the light until it pops out STEP 2 Unscrew and remove the internal panel STEP 4 Unclip the cord by pushing in the side clips and pulling the cord 11 MSQX90 Ra...

Page 12: ...8 Fit the filters back into the rangehood STEP 6 Push the light into the light cavity until it clicks into place STEP 7 Screw the side panel back in place STEP 5 Clip the new light cord in MSQX90 Rangehood Installation Guide 12 ...

Page 13: ...close to the front of the cabinetry as possible This will increase extraction efficiency as there will be greater coverage of the cooktop surface area As the diagram below shows if deeper overhead cabinetry is built and the rangehood is installed to the front of the cabinetry a greater amount of air is extracted Please see the next page for Schweigen s recommended height for best performance 600mm...

Page 14: ...ood larger than cooking zone I M P O R TA N T In addition to the information in this manual please check all relevant state requirements for minimum maximum heights as well as regulations regarding the expelling of air Schweigen is not liable if your rangehood is not installed in accordance with these legal requirements I M P O R TA N T If the user decides to install the rangehood at a distance of...

Page 15: ...se the extraction performance Note If the instructions for the gas cooktop specify a greater distance this must be taken into account I M P O R TA N T Measurements are from the top of the trivets to the lowest part of the rangehood including the button controls R E C O M M E N D E D I N S TA L L AT I O N H E I G H T F O R I N D U C T I O N C O O K TO P To help avoid condensation particular to cook...

Page 16: ...e bracket to the rangehood Screw C adjusts the level of the rangehood to the cabinetry base Screw D extends the spring bracket to secure the rangehood to the cabinetry M O U N T I N G P O S I T I O N The rangehood can be installed either Proud or Flush mounted The diagrams below show how the cabinetry will need to be constructed for each option It is best to send the rangehood to your cabinet make...

Page 17: ...way In case of damaged parts contact your retailer and do not proceed with installation FRONT VIEW TOP VIEW BOTTOM VIEW SIDE VIEW SIDE VIEW FRONT VIEW TOP VIEW BOTTOM VIEW SIDE VIEW SIDE VIEW Mounting frame STEP 2 Secure mounting frame to inside of cabinet STEP 1 Insert mounting frame into cabinet The support will only be needed in certain circumstances NOTE The mounting frame is not included The ...

Page 18: ...d hold the rangehood in position Ensure the rangehood is installed in the correct direction by ensuring the buttons lights are at the front STEP 3 Turn screw D anti clockwise to extend the outer spring bracket D STEP 5 Remove all filters From inside the rangehood loosen screws A B for the spring brackets by turning anti clockwise Do not remove screws A B MSQX90 Rangehood Installation Guide 18 ...

Page 19: ... Attach square to round outlet to top of rangehood N O T E If there is no access to the top of the rangehood after it is installed into the cabinet cavity step 9 can be done prior to inserting into the cabinet cavity N O T E Remove all plastic protection on the rangehood and filters before use MSQX90 Rangehood Installation Guide 19 ...

Page 20: ...g frame F STEP 3 Tighten screws A B to fix bracket A B STEP 2 Remove all filters From inside the rangehood loosen screws A B until the rangehood comes down to its lowest position A B STEP 4 Turn screw D clockwise to take spring bracket back while lifting the rangehood up D MSQX90 Rangehood Installation Guide 20 ...

Page 21: ...Installation STEP 5 Pull out the rangehood MSQX90 Rangehood Installation Guide 21 ...

Page 22: ...en the wall and rangehood The repositioning must be done prior to the rangehood being installed into the cabinetry STEP 1 Unscrew and remove the back panel cover STEP 2 Unscrew the outlet panel cover Do not unscrew the motor from the cover STEP 3 Disconnect the motor from the plug connector pictured STEP 4 Carefully lift the outlet panel cover and motor out from the rangehood I M P O R TA N T Neve...

Page 23: ...5 Rotate 180º and carefully insert back into the rangehood via the back opening Ensure that the motor support is facing upwards as shown Once in position screw to secure in place STEP 7 Screw the panel cover to cover the top outlet opening MSQX90 Rangehood Installation Guide 23 ...

Page 24: ...with sharp corners create turbulence This reduces the size and efficiency of the ducting lowers extraction and can cause excessive noise 2 Sweeping curves and taut ducting reduces resistance and turbulence The airflow and extraction will be more efficient and stronger MSQX90 Rangehood Installation Guide 24 ...

Page 25: ...city Keep the curves or bends to a minimum If they do exist try to keep the angles as open as possible Straight ducting is the most effective installation Never fit reductions next to curves or bends They must always be in straight sections and as far as possible from the rangehood You should not have more than two bends in the installation RECOMMENDED AVOID MSQX90 Rangehood Installation Guide 25 ...

Page 26: ...gehood using a ring clamp Please DO NOT rip the ducting 4 Main Power Lead plug Maximum 4 metres of ducting for best result N O T E The Rangehood does not include the roof seal kit ducting cable ties ring clamp or the support straps The general power outlet for the rangehood should be located in an easy to access area R O O F C O W L S MSQX90 Rangehood Installation Guide 26 ...

Page 27: ...o the rangehood Speed of food and liquid heating Filter size larger canopy preferred Quality of pots or cookware you are using high quality recommended HOW TO REDUCE THE POSSIBILITY OF CONDENSATION FORMING Ensure the rangehood is installed by a qualified professional carefully following the installation guide Turn on the rangehood 5 10 minutes prior to cooking and leave on for 5 10 minutes after c...

Page 28: ...ic network should be between 220 240V rangehood should be connected to grounded plug and turned on Check motor switch Please ensure that there is power to the rangehood and the rangehood is switched on Check light switch Light switch should be at the on position Check filter Filter should be washed regularly see filter cleaning Check lights LED should be firm Check outlet Outlet should be open Che...

Page 29: ...ber or batch number this number is on a sticker inside the rangehood A copy of the purchase receipt without a receipt your service request cannot be processed FA U LT Y I N S TA L L AT I O N It is not the responsibility of Schweigen to rectify any incorrect installations A service call out fee will be charged for any Schweigen technician that attends a call where it is found that the fault is due ...

Page 30: ...ight 24kg Motor Voltage 240V 50Hz Motor Power 265W 1 1A Motor Speed 1750 r min L E D L I G H T S P E C I F I C AT I O N S Description LED linear light Q type LED light strip Rated wattage of the intended lamp 2W Max wattage of a potential replacement lamp 2W Nominal dimensions 120mm L x 33mm W Q type ILCOS Code DSL 2 S 120 33 Rated voltage 12V DC MSQX90 Rangehood Installation Guide 30 ...

Page 31: ...cy of continuous product development product specifications may change without notice Prospective purchasers should check with the retailer to ensure this publication correctly describes the products being offered for sale All information supplied is to be used for general reference purposes only and is on the understanding that Schweigen will not be liable for any loss liability or damage of what...

Page 32: ... 5 Lake Drive Dingley Village Victoria 3172 Phone 1300 881 693 Email sales schweigen com au New Zealand 5 Tolich Place Henderson Auckland 0610 Phone 0800 200 510 Email info parex emerson com Distributed by Schweigen Pty Ltd 53 124 141 322 Revision 4 18 03 2022 ...

Reviews: