background image

4.31

Date Code 20080213

Instruction Manual

SEL-351A Relay

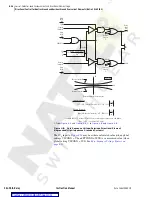
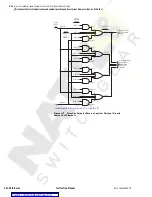
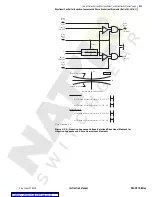
Loss-of-Potential, Load Encroachment, and Directional Element Logic

Directional Control for Negative-Sequence and Phase Overcurrent Elements (Not in SEL-351A-1)

Note that 

Figure 4.6

 has extra internal enable 32QGE, which is used in the 

directional element logic that controls the neutral-ground and residual-ground 
overcurrent elements (see 

Figure 4.4

).

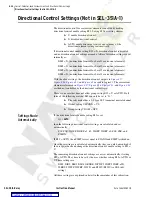
The settings involved with internal enable 32QE in 

Figure 4.6

 (e.g., settings 

a2, k2) are explained in 

Directional Control Settings (Not in SEL-351A-1) on 

page 4.38

.

Directional Elements

Refer to 

Figure 4.19

Figure 4.20

, and 

Figure 4.21

.

If enable setting ELOP = Y or Y1 and a loss-of-potential condition occurs 
(Relay Word bit LOP asserts), the negative-sequence voltage-polarized and 
positive-sequence voltage-polarized directional elements are disabled (see 

Figure 4.6

 and 

Figure 4.21

).

Refer to 

Figure 4.1

 and accompanying text for more information on loss-of-

potential.

Note in 

Figure 4.19

 and 

Figure 4.21

, that the assertion of internal enable 

32QE (for the negative-sequence voltage-polarized directional element) 
disables the positive-sequence voltage-polarized directional element. The 
negative-sequence voltage-polarized directional element has priority over the 
positive-sequence voltage-polarized directional elements in controlling the 
phase overcurrent elements. The negative-sequence voltage-polarized 
directional element operates for unbalanced faults while the positive-sequence 
voltage-polarized directional element operates for three-phase faults.

Note also in 

Figure 4.21

 that the assertion of ZLOAD disables the positive-

sequence voltage-polarized directional element. ZLOAD asserts when the 
relay is operating in a user-defined load region (see 

Figure 4.2

).

Directional Element 
Routing

Refer to 

Figure 4.19

 an

Figure 4.22

.

The directional element outputs are routed to the forward (Relay Word bits 
32QF and 32PF) and reverse (Relay Word bits 32QR and 32PR) logic points 
and then on to the direction forward/reverse logic in 

Figure 4.23

 an

Figure 4.24

.

Loss-of-Potential

Note if 

both

 the following are true:

Enable setting ELOP = Y

A loss-of-potential condition occurs (Relay Word bit LOP 
asserts)

then the forward logic points (Relay Word bits 32QF and 32PF) assert to 
logical 1, thus, enabling the negative-sequence and phase overcurrent 
elements that are set direction forward (with settings DIR1 = F, DIR2 = F, 
etc.). These direction-forward overcurrent elements effectively become 
nondirectional and provide overcurrent protection during a loss-of-potential 
condition.

As detailed previously (in 

Figure 4.6

 and 

Figure 4.21

), voltage-based 

directional elements are disabled during a loss-of-potential condition. Thus, 
the overcurrent elements controlled by these voltage-based directional 
elements are also disabled. But this disable condition is overridden for the 
overcurrent elements set direction forward if setting ELOP = Y.

Courtesy of NationalSwitchgear.com

Summary of Contents for SEL-351A

Page 1: ...20080213 SEL 351A 1 Relay Distribution Protection System Instruction Manual PM351A 01 NB Courtesy of NationalSwitchgear com ...

Page 2: ...les instructions du fabricant ATTENTION Au risque de causer des dommages à l équipement ne jamais appliquer un signal de tension supérieur à 9 V crête à crête à l interface de test de bas niveau J10 ATTENTION Cet appareil est expédié avec des mots de passe par défaut A l installation les mots de passe par défaut devront être changés pour des mots de passe confidentiels Dans le cas contraire un acc...

Page 3: ...ents 3 49 Section 4 Loss of Potential Load Encroachment and Directional Element Logic Loss of Potential Logic Not in the SEL 351A 1 4 1 Load Encroachment Logic Not in SEL 351A 1 4 4 Directional Control for Neutral Ground and Residual Ground Overcurrent Elements Not in SEL 351A 1 4 9 Directional Control for Negative Sequence and Phase Overcurrent Elements Not in SEL 351A 1 4 30 Directional Control ...

Page 4: ...A Settings Sheets SEL 351A 1 Settings Sheets Section 10 Serial Port Communications and Commands Overview 10 1 Port Connector and Communications Cables 10 2 Communications Protocol 10 6 Serial Port Automatic Messages 10 9 Serial Port Access Levels 10 10 Command Summary 10 12 Command Explanations 10 14 SEL 351A Command Summary Section 11 Front Panel Interface Only on Models With LCD Overview 11 1 Fr...

Page 5: ...uence Overcurrent Elements Setting Negative Sequence Definite Time Overcurrent Elements F 1 Setting Negative Sequence Time Overcurrent Elements F 2 Coordinating Negative Sequence Overcurrent Elements F 3 Other Negative Sequence Overcurrent Element References F 8 Appendix G Setting SELOGIC Control Equations Overview G 1 Relay Word Bits G 2 SELOGIC Control Equations G 4 Processing Order and Processi...

Page 6: ...CSELERATOR QuickSet SEL 5030 Software Overview K 1 ACSELERATOR QuickSet System Requirements K 2 Installation K 3 Starting ACSELERATOR QuickSet K 4 Appendix L SEL Synchrophasors Overview L 1 Introduction L 2 Synchrophasor Measurement L 3 External Equipment Compensation L 4 Protocol Operation L 5 Settings L 8 Synchrophasor Relay Word Bits L 11 View Synchrophasors by Using the MET PM Command L 12 Com...

Page 7: ...oice Ground Directional Element Logic 4 12 Table 4 3 Ground Directional Element Availability by Voltage Connection Settings 4 13 Table 4 4 Overcurrent Elements Controlled by Level Direction Settings DIR1 DIR4 Corresponding Overcurrent Element Figure Numbers in Parentheses 4 39 Table 4 5 Affect of Global Settings VSCONN and PTCONN on Petersen Coil Directional Elements 4 55 Table 5 1 SEL 351A Front ...

Page 8: ...by the Relay 13 5 Table 13 2 Resultant Scale Factors for Input Module 13 6 Table 13 3 Relay Self Tests 13 9 Table A 1 SEL 351A Firmware Revision History A 1 Table A 2 SEL 351A 1 Firmware Revision History A 5 Table A 3 Instruction Manual Revision History A 7 Table B 1 Troubleshooting New Firmware Upload B 14 Table D 1 Binary Message List D 2 Table D 2 ASCII Configuration Message List D 2 Table D 3 ...

Page 9: ... Unsolicited Fast Message Enable Packet L 6 Table L 3 Unsolicited Fast Message Disable Packet L 6 Table L 4 Permissible Message Periods Requested by Enable Message L 7 Table L 5 SEL 351A Global Settings for Synchrophasors L 8 Table L 6 SEL 351A Serial Port Settings for Synchrophasors L 8 Table L 7 Time Synchronization Relay Word Bits L 11 Table L 8 SEL Fast Message Voltage and Current Selections B...

Page 10: ...This page intentionally left blank Courtesy of NationalSwitchgear com ...

Page 11: ...urrent Protection and Reclosing for a Transmission Line Current Polarization Source Connected to Channel IN Wye Connected PTs 2 23 Figure 2 16 SEL 351A Provides Overcurrent Protection for a Delta Wye Transformer Bank Wye Connected PTs 2 24 Figure 2 17 SEL 351A Provides Overcurrent Protection for a Transformer Bank With a Tertiary Winding Wye Connected PTs 2 25 Figure 2 18 SEL 351A Provides Overcur...

Page 12: ... 32 Figure 3 24 Phase to Phase Voltage Elements Delta Connected PTs 3 33 Figure 3 25 Sequence Voltage Elements Delta Connected PTs 3 33 Figure 3 26 Channel VS Voltage Elements Wye or Delta Connected PTs 3 34 Figure 3 27 Synchronism Check Voltage Window and Slip Frequency Elements 3 38 Figure 3 28 Synchronism Check Elements 3 39 Figure 3 29 Angle Difference Between VP and VS Compensated by Breaker ...

Page 13: ...g Open Interval Time Out 6 5 Figure 6 3 Reclose Supervision Limit Timer Operation Refer to Bottom of Figure 6 2 6 6 Figure 6 4 SEL 351A Relays Installed at Both Ends of a Transmission Line in a High Speed Reclose Scheme 6 9 Figure 6 5 Reclosing Relay States and General Operation 6 13 Figure 6 6 Reclosing Sequence From Reset to Lockout With Example Settings 6 16 Figure 6 7 Reclose Blocking for Isla...

Page 14: ...minutes 8 21 Figure 8 12 Voltage VS Applied to Series RC Circuit 8 22 Figure 8 13 Demand Current Logic Outputs 8 25 Figure 8 14 Raise Pickup of Residual Ground Time Overcurrent Element for Unbalance Current 8 25 Figure 9 1 U S Moderately Inverse Curve U1 9 6 Figure 9 2 U S Inverse Curve U2 9 7 Figure 9 3 U S Very Inverse Curve U3 9 8 Figure 9 4 U S Extremely Inverse Curve U4 9 9 Figure 9 5 U S Sho...

Page 15: ...New Firmware to the Relay B 13 Figure B 16 Preparing HyperTerminal for ID Command Display B 17 Figure B 17 Establishing an FTP Connection B 20 Figure B 18 Alternate Method of Establishing an FTP Connection B 21 Figure B 19 Read Open File B 21 Figure B 20 Page Cannot Be Displayed Window B 22 Figure F 1 Minimum Response Time Added to a Negative Sequence Time Overcurrent Element 51QT F 2 Figure F 2 D...

Page 16: ...This page intentionally left blank Courtesy of NationalSwitchgear com ...

Page 17: ...esidual ground and negative sequence time overcurrent elements phase neutral ground residual ground and negative sequence voltage elements single phase phase to phase etc synchronism check elements and frequency elements Section 4 Loss of Potential Load Encroachment and Directional Element Logic Describes the operation of loss of potential logic and its effect on directional elements load encroach...

Page 18: ...the SEL 351A ships within a standard relay shipment SEL 351A Command Summary Briefly describes the serial port commands that are described in detail in Section 10 Serial Port Communications and Commands Section 11 Front Panel Interface Only on Models With LCD Describes the front panel operation of pushbuttons and their correspondence to serial port commands local control switches local bit outputs...

Page 19: ...n purposes only the firmware identification information or settings values included in these examples may not necessarily match those in the current version of your SEL 351A Typographic Conventions Example Description STATUS Commands typed at a command line interface on a PC Enter Single keystroke on a PC keyboard Ctrl D Multiple combination keystroke on a PC keyboard Start Settings PC software di...

Page 20: ...tentially hazardous situation that if not avoided may result in minor or moderate injury or equipment damage CAUTION Indicates a potentially hazardous situation that if not avoided could result in death or serious injury WARNING Indicates an imminently hazardous situation that if not avoided will result in death or serious injury DANGER Courtesy of NationalSwitchgear com ...

Page 21: ...cifications Overview This section includes the following overviews of the SEL 351A Relay SEL 351A Models on page 1 2 Applications on page 1 6 Hardware Connection Features on page 1 7 Communications Connections on page 1 9 Specifications on page 1 10 Courtesy of NationalSwitchgear com ...

Page 22: ...ystal Display LCD Reference 0351A00H 2U 19 horizontal rack mount 6 8 screw terminal block optional Figure 1 2 Figure 2 2 Figure 2 3 Figure 7 1 Figure 7 26 0351A003 0351A005a 2U horizontal panel mount 6 8 screw terminal block optional Figure 1 2 Figure 2 2 Figure 2 4 Figure 7 1 Figure 7 26 0351A004 0351A006a 2U vertical panel mount 6 8 screw terminal block not available Figure 1 2 Figure 2 5 Figure...

Page 23: ...Sheet 1 of 2 SEL 351 SEL 351A SEL 351A 1 Chassis Available with several chassis and I O options Only available in a 2U 19 chassis rack or panel mount with 8 output contacts and 6 optoisolated inputs Features Certain models are available with optional firmware for Voltage Sag Swell Interrupt Report and or Power Element Firmware option with MIRRORED BITS avail able Wire Alike terminal markings for S...

Page 24: ... 50A1 50B1 and 50C1 elements operate on the adaptive current algorithm However if 50P1P 35 A then the 50P1 50A1 50B1 and 50C1 elements operate on the output of a cosine filter algorithm No other overcurrent elements use the adaptive current algorithm Based on the level of a harmonic distortion index the adaptive current is either the output of the cosine filter or the output of the bipolar peak de...

Page 25: ...ynchronism check or general purpose voltage input or via VSCONN 3V0 to accept a broken delta residual voltage connection to be used in the zero sequence voltage polarized ground directional elements See Potential Transformer Inputs for details on the broken delta connection and other relay elements that are affected by setting VSCONN 3V0 The connection type setting wye or delta does not affect the...

Page 26: ...ng q Line Recloser Installations Core Balance Current Transformer N N Trip ABC ABC Distribution Bus Fast Bus Trip Scheme The SEL 351R Recloser Control is a similar product to the SEL 351A The SEL 351R is powered by 120 Vac and is ideally suited for applications outside the substation Utility Distribution Feeder Protection and Reclosing r Industrial Distribution Feeder Protection t 52 Trip and Clos...

Page 27: ...el IN current input options Voltage Inputs VA VB VC Firmware revisions numbered R105 or higher can be configured via global setting PTCONN to accept either wye line to neutral or delta line to line voltages using the open delta connection The relay rear panel markings and the internal connections of terminals Z09 Z12 are not changed See Potential Transformer Inputs on page 2 13 for details on the ...

Page 28: ... A22 A21 A20 A19 A18 A17 Z06 Z08 Z07 Z01 Z05 Z04 Z03 Z02 Z26 Z25 Z14 Z13 Z12 Z11 Z10 Z09 IA IB IC IN VA VB VC N VS NS PROGRAMMABLE OPTOISOLATED INPUTS CURRENT INPUTS VOLTAGE INPUTS Z27 POWER SUPPLY BATTERY MONITOR CHASSIS GROUND A16 A13 A14 A15 A11 A12 A05 A08 A10 A09 A06 A07 A03 A04 A02 A01 OUT101 OUT102 OUT103 OUT104 OUT105 OUT106 eOUT107 ALARM PROGRAMMABLE OUTPUT CONTACTS 1 2 3 4 5 ISOLATED DB9...

Page 29: ...t to the SEL communications processor once and communicate with any connected SEL relay Data And Time Synchronization Connections Local Connections EIA 485 Connections Port F Port F Port 2 Port 2 Front Panel Rear Panel Front Panel SEL 2032 SEL 351 Relay 1 Optical Cable Connection Metallic Cable Connection Port 1 Port 1 Computer Port 1 Fiber Optic Cable C273AFZ or C273AFD SEL 2810 Port 2 Port 2 Met...

Page 30: ...ac 50 60 Hz Burden 25 W 24 48 Vdc Range 18 60 Vdc Burden 25 W Control Outputs Standard Make 30 A Carry 6 A continuous carry at 70 C 4 A continuous carry at 85 C 1s Rating 50 A MOV Protection 270 Vac 360 Vdc 40 J Pickup Time 5 ms Breaking Capacity 10000 operations 24 V 0 75 A L R 40 ms 48 V 0 50 A L R 40 ms 125 V 0 30 A L R 40 ms 250 V 0 20 A L R 40 ms Cyclic Capacity 2 5 cycles second 24 V 0 75 A ...

Page 31: ...1 89 GHz Radiated EMI ENV 50140 1994 IEC 60255 22 3 2000 IEC 61000 4 3 1998 10 V m IEEE C37 90 2 1995 35 V m 1 MHz Burst Disturbance EC 60255 22 1 1988 2500 V common and differential mode Surge Withstand IEC 60255 22 1 1998 2 5 kV peak common mode 2 5 kV peak differential mode IEEE C37 90 1 1989 3 0 kV oscillatory 5 0 kV fast transient Vibration and Shock Tests Shock and Bump IEC 60255 21 2 1988 E...

Page 32: ... for 12 5 300 00 V Transient Overreach 5 Under Overfrequency Elements 81 Frequency 40 1 65 00 Hz 0 01 Hz steps Time Delays 2 00 16 000 00 cycles 0 25 cycle steps Timer Accuracy 0 25 cycle 0 1 Steady State plus Transient Overshoot 0 01 Hz Undervoltage Frequency Element Block Range 25 00 300 00 V SELOGIC Control Equation Variable Timers Pickup Ranges 0 00 999 999 00 cycles 0 25 cycle steps reclosing...

Page 33: ...of 40 C the additional error for currents IA IB and IC is 0 0002 C 2 40 C 20 C 2 0 08 Synchrophasor Accuracy Specification is with respect to MET PM command and SEL Fast Message Synchrophasor Protocol Voltages 33 5 300 V 45 65 Hz Magnitudes 2 Angles 1 Currents 0 50 1 25 A 45 65 Hz 5 A nominal 0 10 0 25 A 45 65 Hz 1 A nominal Magnitudes 4 Angles 1 5 at 25 C 2 0 over the full temperature range Curre...

Page 34: ...This page intentionally left blank Courtesy of NationalSwitchgear com ...

Page 35: ...r installation using the mounting and connection information in this section Options include rack or panel mounting and terminal block or plug in connector Connectorized wiring This section also includes information on configuring the relay for your application Courtesy of NationalSwitchgear com ...

Page 36: ...so offer the SEL 351A in a panel mount version for a clean look Panel mount relays have sculpted front panel molding that covers all installation holes See Figure 2 1 Cut your panel and drill mounting holes according to the dimensions in Figure 2 1 Insert the relay into the cutout aligning four relay mounting studs on the rear of the relay front panel with the drilled holes in your panel and use n...

Page 37: ...2 3 Date Code 20080213 Instruction Manual SEL 351A Relay Installation Relay Mounting Figure 2 1 SEL 351A Dimensions for Rack Mount and Panel Mount Models Courtesy of NationalSwitchgear com ...

Page 38: ...ure 2 6 represent examples of different relay configurations All units can be ordered with either conventional terminal blocks or plug in connectors For model options view the SEL 351A Model Option Tables on our website or contact your local SEL sales representative Figure 2 3 Figure 2 5 show the various front panel configurations available for the SEL 351A Courtesy of NationalSwitchgear com ...

Page 39: ...c PIN PIN 5 9 5 9 PORT 2 EIA 232 PORT 2 EIA 232 PIN PIN 1 1 9 9 8 8 SERIAL SERIAL PORT 3 PORT 3 U U IN IN D D A A E E M M PORT 2 PORT 2 SERIAL SERIAL A24 A24 24 24 A27 A27 A28 A28 A25 A25 A26 A26 3 3 RX RX POWER POWER RX RX SHIELD SHIELD 4 4 5 5 28 28 27 27 25 25 26 26 TX TX TX TX EIA 485 EIA 485 1 1 2 2 PIN PIN 1 1 A15 A15 A17 A17 A18 A18 A16 A16 A19 A19 A20 A20 A22 A22 A23 A23 A21 A21 19 19 23 2...

Page 40: ...M SEL 351A SEL 351A TEST TEST LAMP LAMP RESET RESET TARGET TARGET 196 0131 196 0131 13091a 13091a SCHWEITZER ENGINEERING LABORATORIES SCHWEITZER ENGINEERING LABORATORIES DISTRIBUTION PROTECTION SYSTEM DISTRIBUTION PROTECTION SYSTEM INST INST FAULT TYPE FAULT TYPE SERIAL SERIAL PORT F PORT F 9 9 1 1 A A B B C C TRIP TRIP EN EN 50 50 RS RS G G N N COMM COMM SOTF SOTF 79 79 CY CY LO LO 51 51 81 81 LA...

Page 41: ... SEL 351A TEST TEST LAMP LAMP RESET RESET TARGET TARGET 196 0131 196 0131 i3093a i3093a SCHWEITZER ENGINEERING LABORATORIES SCHWEITZER ENGINEERING LABORATORIES DISTRIBUTION PROTECTION SYSTEM DISTRIBUTION PROTECTION SYSTEM PORT F PORT F SERIAL SERIAL 9 9 1 1 B B A A C C G G N N RS RS FAULT TYPE FAULT TYPE EN EN COMM COMM TRIP TRIP INST INST SOTF SOTF 50 50 GROUP GROUP LAMP LAMP SELECT SELECT CANCEL...

Page 42: ...tallation Front Panel and Rear Panel Connection Diagrams Figure 2 5 SEL 351A Front Panel Drawing Vertical Panel Mount Relay Model 0351A0x41 and Rear Panel Drawing Vertical Relay Conventional Terminal Blocks Model 0351A0041 Top Courtesy of NationalSwitchgear com ...

Page 43: ...1 1 2 2 3 3 CTS CTS RTS RTS N C N C GND GND N C N C TXD TXD RXD RXD 196 0133 196 0133 PORT 1 EIA 485 PORT 1 EIA 485 TX TX 1 1 2 2 RX RX 3 3 9 9 SHIELD SHIELD 5 5 RX RX 4 4 1 1 9 9 1 1 i3495b i3495b 25 25 A25 A25 OUT103 OUT103 A06 A06 OUT102 OUT102 OUT101 OUT101 Z02 Z02 29 29 Z01 Z01 30 30 31 31 Z03 Z03 32 32 Z04 Z04 D A N G E R D A N G E R 3 3 A03 A03 1 1 A01 A01 IA IA A02 A02 2 2 A04 A04 4 4 IB I...

Page 44: ...n connectors for output contacts OUT101 ALARM 2 6 position female plug in connectors for optoisolated inputs IN101 IN106 1 8 position female plug in connectors for EIA 485 IRIG B Serial PORT 1 These connectors accept wire size AWG 24 to 12 Strip the wires 0 31 inches 8 mm and install with a small slotted tip screwdriver Secure each 8 position connector to the relay chassis with the screws located ...

Page 45: ...ew Terminal Blocks IN104 IN106 IN101 IN103 A23 A27 A28 A25 A26 A24 A22 A20 A21 A18 A19 A17 OUT105 ALARM OUT101 OUT104 A13 A15 A16 A14 A11 A12 A10 A06 A08 A09 A07 A05 A03 A04 Model 0351xY A01 A02 Circuit Board Mounted Connectors male Tools Phillips or slotted tip screwdriver Parts All screws are size 6 32 Locking screws can be requested from the factory Courtesy of NationalSwitchgear com ...

Page 46: ... listed on the serial number sticker on the relay rear panel Models 0351Ax0 Connect control voltage to the POWER terminals Note the polarity indicators on terminals Z25 and Z26 Control power passes through these terminals to a fuse and to the switching power supply The control power circuitry is isolated from the relay chassis ground Refer to Section 1 Introduction and Specifications for power sup...

Page 47: ...ction of the neutral current input rating is often determined by the desired ground directional element see Table 4 1 and accompanying note Models 0351Ax0 Note the polarity dots above terminals Z01 Z03 Z05 and Z07 Refer to Figure 2 12 Figure 2 25 for typical CT wiring examples Refer to the serial number sticker on the relay rear panel for the nominal current ratings 5 A or 1 A for the phase IA IB ...

Page 48: ...put VA N Additionally voltage input VS NS measures frequency on the other side of an open breaker for synchronism check applications See subsections Synchronism Check Elements Not in SEL 351A 1 on page 3 36 and Frequency Elements on page 3 49 Delta Connected Voltages Global setting PTCONN DELTA SEL 351A relays with firmware revision R105 or higher can be configured via Global setting PTCONN DELTA ...

Page 49: ...0 zero sequence voltage signal connected to voltage input VS NS This signal is usually derived from PTs connected wye primary broken delta secondary VS VA VB VC 3V0 This signal is passed to certain relay functions that require zero sequence voltage such as zero sequence voltage polarized ground directional elements or Wattmetric and incremental conductance elements for Petersen Coil grounded syste...

Page 50: ...Wye Connected PTs To verify the correct polarity on voltage input VS NS perform the following test on the primary side of one of the PTs connected in broken delta secondary refer to Figure 2 8 and observe the resultant voltage phase angle differences Open circuit the primary side of the PT connected to power system phase A With the resultant collapse of secondary voltage VA VA 0 in the broken delt...

Page 51: ...en the secondary wires from the broken delta secondary in Figure 2 8 need to be swapped in connection to voltage input VS NS Figure 2 9 Resultant Voltage VS from the Collapse of Voltage VA in the Broken Delta Secondary Compared to the Wye Connected Power System Voltages Open Delta Connected PT Example Figure 2 10 Broken Delta Secondary Connection to Voltage Input VS Open Delta Connected PTs NOTE 3...

Page 52: ... degrees Figure 2 11 Resultant Voltage VS from the Collapse of Voltage VA in the Broken Delta Secondary Compared to the Open Delta Connected Power System Voltages Serial Ports Refer to Table 10 1 for information on the serial ports available on the different SEL 351A models All ports are independent you can communicate to any combination simultaneously Serial PORT 1 on all the SEL 351A models is a...

Page 53: ... 2032 SEL 2030 or SEL 2020 Communications Processor listed in Table 2 1 as well as the SEL 2407 and the SEL 2401 Satellite Synchronized Clocks The IRIG B time signal can be input to either PORT 1 or PORT 2 but not both A demodulated IRIG B time code can be input into serial PORT 2 by connecting serial PORT 2 of the SEL 351A to an SEL 2032 SEL 2030 or SEL 2020 Communications Processor using Cable C...

Page 54: ... Channel IN does not need to be connected Channel IN provides current IN for the neutral ground overcurrent elements Separate from Channel IN the residual ground overcurrent elements operate from the internally derived residual current IG IG 3I0 IA IB IC But in this residual connection example the neutral ground and residual ground overcurrent elements operate the same because IN IG Figure 2 12 SE...

Page 55: ...ent IN for the neutral ground overcurrent elements Separate from Channel IN the residual ground overcurrent elements operate from the internally derived residual current IG IG 3I0 IA IB IC But in this residual connection example the neutral ground and residual ground overcurrent elements operate the same because IN IG Although automatic reclosing is probably not needed in this example output conta...

Page 56: ...Channel IN the residual ground overcurrent elements operate from the internally derived residual current IG IG 3I0 IA IB IC But in this residual connection example the neutral ground and residual ground overcurrent elements operate the same because IN IG Figure 2 14 SEL 351A Provides Directional Overcurrent Protection and Reclosing for a Transmission Line Wye Connected PTs TC Trip Coil 52A Trip Ci...

Page 57: ...d overcurrent elements Separate from Channel IN the residual ground overcurrent elements operate from the internally derived residual current IG IG 3I0 IA IB IC Figure 2 15 SEL 351A Provides Directional Overcurrent Protection and Reclosing for a Transmission Line Current Polarization Source Connected to Channel IN Wye Connected PTs TC Trip Coil 52A Trip Circuit IA C B A N VC VB SEL 351 RELAY VA OU...

Page 58: ... supervision e g hot bus check For sensitive earth fault SEF applications the SEL 351A should be ordered with channel IN rated at 0 2 A or 0 05 A nominal See AC Current Input on page 1 10 See neutral ground overcurrent element pickup specifications in Section 3 Overcurrent Voltage Synchronism Check and Frequency Elements See also the note following Table 4 1 Figure 2 16 SEL 351A Provides Overcurre...

Page 59: ... contact OUT102 can close the circuit breaker via initiation from various means serial port communications optoisolated input assertion etc with desired supervision e g hot bus check Figure 2 17 SEL 351A Provides Overcurrent Protection for a Transformer Bank With a Tertiary Winding Wye Connected PTs TC Trip Coil 52A Trip Circuit IA C B A N VC VB SEL 351 RELAY VA OUT101 Forward Tripping Direction C...

Page 60: ...vision For sensitive earth fault SEF applications the SEL 351A should be ordered with channel IN rated at 0 2 A or 0 05 A nominal See AC Current Input on page 1 10 See neutral ground overcurrent element pickup specifications in Section 3 Overcurrent Voltage Synchronism Check and Frequency Elements See also the note following Table 4 1 Figure 2 18 SEL 351A Provides Overcurrent Protection for an Ind...

Page 61: ... the internally derived residual current IG IG 3I0 IA IB IC But in this residual connection example the neutral ground and residual ground overcurrent elements operate the same because IN IG Figure 2 19 SEL 351A Provides Dedicated Breaker Failure Protection TC Trip Coil 52A Retrip Circuit IA C B A SEL 351 RELAY OUT101 Forward Tripping Direction 86 Lock Out 86B Breaker Failure Trip Circuit IB OUT10...

Page 62: ... see Table 4 1 Table 4 3 Nondirectional sensitive earth fault SEF protection is also available Note The SEL 351A 1 is not equipped for this application Figure 2 20 SEL 351A Provides Overcurrent Protection for a High Impedance or Low Impedance Grounded System Wye Connected PTs TC Trip Coil 52A Trip Circuit IA C B A N VC VB SEL 351 RELAY VA OUT101 Forward Tripping Direction CC Close Coil 52B Close C...

Page 63: ...nsitive earth fault SEF protection is also available Note The SEL 351A 1 is not equipped for this application Figure 2 21 SEL 351A Provides Overcurrent Protection for a Petersen Coil Grounded System Wye Connected PTs TC Trip Coil 52A 52A Trip Circuit IA C B A N VC VB SEL 351 RELAY VA OUT101 Forward Tripping Direction Core Balance CT CC Close Coil 52B Close Circuit IB OUT102 86 Lock Out 86B Breaker...

Page 64: ...ive earth fault SEF protection is also available Note The SEL 351A 1 is not equipped for this application Figure 2 22 SEL 351A Provides Overcurrent Protection for an Ungrounded System Wye Connected PTs TC Trip Coil 52A 52A Trip Circuit IA C B A N VC VB SEL 351 RELAY VA OUT101 Forward Tripping Direction Core Balance CT CC Close Coil 52B Close Circuit IB OUT102 86 Lock Out 86B Breaker Failure Trip C...

Page 65: ... To use this connection make global setting VSCONN 3V0 Make group setting PTRS as shown in Section 9 Setting the Relay The step down transformer is required when the maximum expected residual voltage exceeds the relay voltage channel rating See Voltage Input Rating on page 2 14 The polarity of voltage input VS NS connection should be verified prior to placing the relay into service See Polarity Ch...

Page 66: ...n See Synchronism Check Elements Not in SEL 351A 1 on page 3 36 Current Channel IN does not need to be connected Channel IN provides current IN for the neutral ground overcurrent elements Separate from Channel IN the residual ground overcurrent elements operate from the internally derived residual current IG IG 3I0 IA IB IC But in this residual connection example the neutral ground and residual gr...

Page 67: ...ed for use in voltage and synchronism check elements and voltage metering See Synchronism Check VS Connection Global setting VSCONN VS on page 2 15 and Broken Delta VS Connection Global setting VSCONN 3V0 on page 2 15 Current Channel IN does not need to be connected Channel IN provides current IN for the neutral ground overcurrent elements Separate from Channel IN the residual ground overcurrent e...

Page 68: ... board and drawout tray to be removed a The ribbon cables can be removed by carefully pulling the cable away from the connector b The six conductor power cable can be removed by grasping the power connector wires and pulling away from the circuit board Step 6 Grasp the drawout assembly of the board and pull the assembly from the relay chassis Step 7 Locate the jumper s or battery to be changed ref...

Page 69: ...osed when the output contact coil is de energized and open when the output contact coil is energized These jumpers are soldered in place In the figures referenced in Table 2 2 note that the ALARM output contacts are b type output contacts and the other output contacts are all a type output contacts This is how these jumpers are configured in a standard relay shipment Refer to corresponding Figure ...

Page 70: ...erates the dedicated ALARM output contact it will be in the opposite state of the dedicated ALARM output contact in a standard relay shipment In a standard relay shipment the dedicated ALARM output contact comes as a b type output contact and all the other output contacts including the extra alarm come as a type output contacts Table 2 2 Output Contact Jumpers and Corresponding Output Contacts Rel...

Page 71: ...or end use applications in North America use an external fuse rated 3 A or less in line with the 5 Vdc source on pin 1 SEL fiber optic transceivers include a fuse that meets this requirement Table 2 5 Password and Breaker Jumper Positions for Standard Relay Shipments Relay Model Number Password Jumper Position for standard relay shipments Breaker Jumper Position for standard relay shipments Refere...

Page 72: ...er the relay is installed The battery cannot be recharged If the relay does not maintain the date and time after power loss replace the battery Follow the instructions in Accessing the Relay Circuit Boards on page 2 34 to remove the relay main board Remove the battery from beneath the clip and install a new one The positive side of the battery faces up Reassemble the relay as described in Accessin...

Page 73: ...and Figure 3 3 NOTE The definite time elements are not supported in the SEL 351A 1 The SEL 351A 1 supports six levels of phase instantaneous elements Settings Ranges Setting range for pickup settings 50P1P 50P6P 0 25 100 00 A secondary 5 A nominal phase current inputs IA IB IC 0 05 20 00 A secondary 1 A nominal phase current inputs IA IB IC Setting range for definite time settings 67P1D 67P4D 0 00...

Page 74: ...s 5 Through 6 Phase Instantaneous Overcurrent Elements Level 1 Setting E5OP 1 Level 2 Setting E5OP 2 Level 3 Setting E5OP 3 Level 4 Setting E5OP 4 50P1P 50P2P 50P3P Settings 50P1 50A1 50B1 50C1 50P2 50A2 50B2 50C2 50P3 50A3 50B3 50C3 50P4 50P4P IA 50A4 IB 50B4 IC 50C4 Enabled Levels Relay Word Bits 5OP5 5OP6 Relay Word Bits 50P5P 50P6P IP Settings Enabled Levels Max Phase Level 5 Setting E5OP 5 Le...

Page 75: ...ngle phase overcurrent elements are not available in Levels 5 and 6 see Figure 3 2 Ideally set 50P1P 50P2P 50P3P 50P4P so that instantaneous overcurrent elements 50P1 50P4 will display in an organized fashion in event reports see Figure 3 3 and Table 12 3 50A1 1 logical 1 if IA pickup setting 50P1P 0 logical 0 if IA pickup setting 50P1P 50B1 1 logical 1 if IB pickup setting 50P1P 0 logical 0 if IB...

Page 76: ...Levels 67P1 67P1T q 50P1 67P1TC SELOGIC Setting 67P1D 0 Directional Control asserted to logical 1 continuously if E32 N SELOGIC Torque Control w Level 1 Level 1 Setting E5OP 1 Directional Control asserted to logical 1 continuously if E32 N SELOGIC Torque Control 67P3 67P3T q 50P3 Relay Word Bit 67P3TC SELOGIC Setting 67P3D 0 w Level 3 Level 3 Setting E5OP 3 Directional Control asserted to logical ...

Page 77: ... instantaneous definite time overcurrent elements 67P1 67P1T SELOGIC control equation torque control settings are discussed next Torque Control Not in SEL 351A 1 Levels 1 through 4 in Figure 3 3 have corresponding SELOGIC control equation torque control settings 67P1TC 67P4TC SELOGIC control equation torque control settings cannot be set directly to logical 0 The following are torque control setti...

Page 78: ...3 4 on a per phase basis producing Relay Word bit outputs 50A 50B and 50C Relay Word bits 50A 50B and 50C can be used to indicate the presence or absence of current in a particular phase q From Figure 3 1 Figure 3 4 Combined Single Phase Instantaneous Overcurrent Elements Pickup and Reset Time Curves Figure 3 5 and Figure 3 6 show pickup and reset time curves applicable to all nondirectional insta...

Page 79: ...uts IA IB IC 0 20 34 00 A secondary 1 A nominal phase current inputs IA IB IC Accuracy Pickup 0 05 A secondary and 3 of setting 5 A nominal phase current inputs IA IB IC 0 01 A secondary and 3 of setting 1 A nominal phase current inputs IA IB IC Pickup Operation The pickup settings for each level 50PP1P 50PP4P are compared to the magnitudes of the individual phase to phase difference currents IAB ...

Page 80: ...le The different levels are enabled with the E50N enable setting as shown in Figure 3 8 and Figure 3 9 NOTE The definite time elements are not supported in the SEL 351A 1 To understand the operation of Figure 3 8 and Figure 3 9 follow the explanation given for Figure 3 1 Figure 3 2 and Figure 3 3 in Phase Instantaneous Definite Time Overcurrent Elements on page 3 1 substituting current IN channel ...

Page 81: ...nts Figure 3 7 Levels 1 Through 4 Phase to Phase Instantaneous Overcurrent Elements 50PP1 50PP2 50PP3 50PP4 IA IB IB IC IC IA Enabled Levels Level 1 Setting E5OP 1 Level 2 Setting E5OP 2 Level 3 Setting E5OP 3 Level 4 Setting E5OP 4 Settings 50AB1 50BC1 50CA1 50AB2 50BC2 50CA2 50AB3 50BC3 50CA3 50AB4 50BC4 50CA4 Relay Word Bits Courtesy of NationalSwitchgear com ...

Page 82: ...C Torque Control q Level 1 Level 1 Setting E5ON 1 67N3 50N3 67N3T 67N3TC SELOGIC Setting 67N3D 0 Directional Control asserted to logical 1 continuously if E32 N SELOGIC Torque Control Level 3 Setting E5ON 3 67N4 50N4 67N4T 67N4TC SELOGIC Setting 67N4D 0 Directional Control asserted to logical 1 continuously if E32 N SELOGIC Torque Control Level 4 Setting E5ON 4 50N2 67N2 67N2T 67N2D 0 Directional ...

Page 83: ...05 1 500 A secondary 0 05 A nominal channel IN current input Setting range for definite time settings 67N1D 67N4D 0 00 16000 00 cycles in 0 25 cycle steps Accuracy Pickup 0 05 A secondary and 3 of setting 5 A nominal channel IN current input 0 01 A secondary and 3 of setting 1 A nominal channel IN current input 1 mA secondary and 3 of setting 0 2 A nominal channel IN current input 1 mA secondary a...

Page 84: ...evel 1 Level 1 Setting E5OG 1 67G3 50G3 67G3T 67G3TC SELOGIC Setting 67G3D 0 Directional Control asserted to logical 1 continuously if E32 N SELOGIC Torque Control Level 3 Setting E5OG 3 67G4 50G4 67G4T 67G4TC SELOGIC Setting 67G4D 0 Directional Control asserted to logical 1 continuously if E32 N SELOGIC Torque Control Level 4 Setting E5OG 4 50G2 67G2 67G2T 67G2D 0 Directional Control asserted to ...

Page 85: ...ting 1 A nominal phase current inputs IA IB IC Timer 0 25 cycles and 0 1 of setting Transient Overreach 5 of setting Pickup and Reset Time Curves See Figure 3 5 and Figure 3 6 Negative Sequence Instantaneous Definite Time Overcurrent Elements IMPORTANT See Appendix F Setting Negative Sequence Overcurrent Elements for information on setting negative sequence overcurrent elements Four levels of nega...

Page 86: ...d substituting like settings and Relay Word bits Settings Ranges Setting range for pickup settings 50Q1P 50Q6P 0 25 100 00 A secondary 5 A nominal phase current inputs IA IB IC 0 05 20 00 A secondary 1 A nominal phase current inputs IA IB IC Setting range for definite time settings 67Q1D 67Q4D 0 00 16000 00 cycles in 0 25 cycle steps Accuracy Pickup 0 05 A secondary and 3 of setting 5 A nominal ph...

Page 87: ...GIC Torque Control q Level 1 Level 1 Setting E5OQ 1 67Q3 50Q3 67Q3T 67Q3TC SELOGIC Setting 67Q3D 0 Directional Control asserted to logical 1 continuously if E32 N SELOGIC Torque Control Level 3 Setting E5OQ 3 67Q4 50Q4 67Q4T 67Q4TC SELOGIC Setting 67Q4D 0 Directional Control asserted to logical 1 continuously if E32 N SELOGIC Torque Control Level 4 Setting E5OQ 4 50Q2 67Q2 67Q2T 67Q2D 0 Directiona...

Page 88: ...mation Table 3 1 Available Phase Time Overcurrent Elements Time Overcurrent Element Enabled With Setting Operating Current See Figure 51PT E51P 1 or 2 IP maximum of A B and C phase currents Figure 3 14 51AT E51P 2 IA A phase current Figure 3 15 51BT E51P 2 IB B phase current Figure 3 16 51CT E51P 2 IC C phase current Figure 3 17 Table 3 2 Phase Time Overcurrent Element Maximum Phase Settings Setti...

Page 89: ...ogical 1 continuously if E32 N q Level 1 SELOGIC Torque Control 51PT Phase Time Overcurrent Element Curve Timing and Reset Timing Settings 51PP Pickup 51PC Curve Type 51PTD Time Dial 51PRS Electromechanical Reset Y N Pickup Curve Timeout Reset 51P 51PR 51PT Torque Control TCP State Switch Position Logical 1 Closed Logical 0 Open Logic Point TCP Controls the Torque Control Switch Setting 51PRS Rese...

Page 90: ...rd bit 51PT also deasserting to logical 0 The phase time overcurrent element then starts to time to reset Relay Word bit 51PR asserts to logical 1 when the phase time overcurrent element is fully reset Control of Logic Point TCP Refer to Figure 3 14 The Torque Control Switch is controlled by logic point TCP Logic point TCP is controlled by directional control not available in SEL 351A 1 and SELOGI...

Page 91: ...hase time overcurrent element 51PT Example 1 51PTC 1 NOTE All overcurrent element SELOGIC control equation torque control settings are set directly to logical 1 e g 51PTC 1 for the factory default settings See SHO Command Show View Settings on page 10 25 for a list of the factory default settings Setting 51PTC set directly to logical 1 Then only the corresponding directional control input from Fig...

Page 92: ...and then current IP goes below 51PP the element starts to time to reset emulating electromechanical reset timing Relay Word bit 51PR resetting indication logical 1 when the element is fully reset Setting 51PRS N If reset timing setting 51PRS N element 51PT reset timing is a 1 cycle dropout If current IP goes above pickup setting 51PP element is timing or already timed out and then current IP goes ...

Page 93: ...iming Settings 51AP Pickup 51AC Curve Type 51ATD Time Dial 51ARS Electromechanical Reset Y N Pickup Curve Timeout Reset 51A 51AR 51AT Torque Control TCA State Switch Position Logical 1 Closed Logical 0 Open Logic Point TCA Controls the Torque Control Switch Setting 51ARS Reset Timing Y Electromechanical N 1 Cycle TCA Relay Word Bits SELOGIC Setting 51BP IB Setting 51BTC Torque Control Switch Direc...

Page 94: ...SEL 351A 51CP IC Setting 51CTC Torque Control Switch Directional Control asserted to logical 1 continuously if E32 N q Level 1 SELOGIC Torque Control 51CT C Phase Time Overcurrent Element Curve Timing and Reset Timing Settings 51CP Pickup 51CC Curve Type 51CTD Time Dial 51CRS Electromechanical Reset Y N Pickup Curve Timeout Reset 51C 51CR 51CT Torque Control TCC State Switch Position Logical 1 Clo...

Page 95: ...input Residual Ground Time Overcurrent Element s One or two residual ground time overcurrent elements are available The element s are enabled with the E51G enable setting as shown in Table 3 5 Table 3 4 Neutral Ground Time Overcurrent Element Settings Setting Definition Range 51NP pickup 0 500 16 000 A secondary 5 A nominal channel IN current input 0 100 3 200 A secondary 1 A nominal channel IN cu...

Page 96: ...und current Figure 3 20 SEL 351A 1 51GT E51G Y IG 3I0 calculated residual ground current Figure 3 19 51GP residual IG Setting 51GTC Torque Control Switch Directional Control asserted to logical 1 continuously if E32 N q Level 1 SELOGIC Torque Control 51GT Residual Ground Time Overcurrent Element Curve Timing and Reset Timing Settings 51GP Pickup 51GC Curve Type 51GTD Time Dial 51GRS Electromechani...

Page 97: ...Time Overcurrent Element Curve Timing and Reset Timing Settings 51G2P Pickup 51G2C Curve Type 51G2TD Time Dial 51G2RS Electromechanical Reset Y N Pickup Curve Timeout Reset 51G2 51G2R 51G2T Torque Control TCG2 State Switch Position Logical 1 Closed Logical 0 Open Logic Point TCG2 Controls the Torque Control Switch Setting 51G2RS Reset Timing Y Electromechanical N 1 Cycle TCG2 Relay Word Bits SELOG...

Page 98: ...its q From Figure 4 23 Directional Control logic input is constantly asserted to logical 1 in SEL 351A 1 Figure 3 21 Negative Sequence Time Overcurrent Element 51QT With Directional Control Option in SEL 351A IMPORTANT See Appendix F Setting Negative Sequence Overcurrent Elements for information on setting negative sequence overcurrent elements where a 120 a2 1 120 51QP 312 Setting 51QTC Torque Co...

Page 99: ...0 multiples of pickup Table 3 8 Negative Sequence Time Overcurrent Element Settings Setting Definition Range 51QP pickup 0 25 16 00 A secondary 5 A nominal phase current inputs IA IB IC 0 05 3 20 A secondary 1 A nominal phase current inputs IA IB IC 51QC curve type U1 U5 US curves see Figure 9 1 Figure 9 10 C1 C5 IEC curves 51QTD time dial 0 50 15 00 US curves see Figure 9 1 Figure 9 10 0 05 1 00 ...

Page 100: ...ence voltagea V2 Negative sequence voltage V1 Positive sequence voltage VS Synchronism check voltage from SEL 351A rear panel voltage input VSc c Voltage VS can be used in the synchronism check elements when global setting VSCONN VS see Synchronism Check Elements Not in SEL 351A 1 on page 3 36 Voltage VS can be connected to a zero sequence voltage source typically a broken delta connection when gl...

Page 101: ...anges VS Channel Voltage Element Relay Word Bits Operating Voltage Pickup Setting Range See Figure 27S VS 27SP 0 00 300 00 V secondary Figure 3 26 59S1 VS 59S1P 0 00 300 00 V secondary 59S2 VS 59S2P 0 00 300 00 V secondary Table 3 12 Voltage Elements Settings and Settings Ranges Delta Connected PTs Sheet 1 of 2 Voltage Element Relay Word Bits Operating Voltage Pickup Setting Range See Figure 27AB ...

Page 102: ... 59AB 59BC 59CA 59AB2 VAB 59PP2P 0 00 300 00 V secondary 59BC2 VBC 59CA2 VCA 59Q V2 59QP 0 00 120 00 V secondary Figure 3 25 59Q2 V2 59Q2P 0 00 120 00 V secondary 59V1 V1 59V1P 0 00 170 00 V secondary Table 3 12 Voltage Elements Settings and Settings Ranges Delta Connected PTs Sheet 2 of 2 Voltage Element Relay Word Bits Operating Voltage Pickup Setting Range See Figure Courtesy of NationalSwitchg...

Page 103: ...heck and Frequency Elements Voltage Elements Figure 3 22 Single Phase and Three Phase Voltage Elements Wye Connected PTs 27A1 27B1 27C1 3P27 27A2 27B2 27C2 59A1 59B1 59C1 3P59 59A2 59B2 59C2 27P1P 27P2P 59P1P 59P2P VA VB VC Settings Voltages Relay Word Bits Courtesy of NationalSwitchgear com ...

Page 104: ...heck and Frequency Elements Voltage Elements Figure 3 23 Phase to Phase and Sequence Voltage Elements Wye Connected PTs 27AB 27BC 27CA 59N1 59N2 59Q 59V1 59AB 59BC 59CA 27PP 59PP 3V0 59N1P 59N2P V2 59QP V1 59V1P VAB VBC VCA Settings Voltages Relay Word Bits Courtesy of NationalSwitchgear com ...

Page 105: ...to Phase Voltage Elements Delta Connected PTs Figure 3 25 Sequence Voltage Elements Delta Connected PTs 27AB 27BC 27CA 3P27 27AB2 27BC2 27CA2 59AB 59BC 59CA 3P59 59AB2 59BC2 59CA2 27PP 27PP2P 59PP 59PP2P VAB VBC VCA Settings Voltages Relay Word Bits 59Q 59Q2 59V1 V2 59QP 59Q2P V1 59V1P Settings Voltages Relay Word Bits Courtesy of NationalSwitchgear com ...

Page 106: ...tage elements Device 59 assert when the operating voltage goes above the corresponding pickup setting Undervoltage Element Operation Example Refer to Figure 3 22 top of the figure Pickup setting 27P1P is compared to the magnitudes of the individual phase voltages VA VB and VC The logic outputs in Figure 3 22 are the following Relay Word bits 27S 59S1 59S2 27SP VS 59S1P 59S2P Settings Voltages Rela...

Page 107: ...s in Figure 3 22 are the following Relay Word bits 59A1 1 logical 1 if VA pickup setting 59P1P 0 logical 0 if VA pickup setting 59P1P 59B1 1 logical 1 if VB pickup setting 59P1P 0 logical 0 if VB pickup setting 59P1P 59C1 1 logical 1 if VC pickup setting 59P1P 0 logical 0 if VC pickup setting 59P1P 3P59 1 logical 1 if all three Relay Word bits 59A1 59B1 and 59C1 are asserted 59A1 1 59B1 1 and 59C1...

Page 108: ...ith respect to one another the two synchronism check elements operate as shown in the bottom of Figure 3 28 The angle difference is compensated by breaker close time and the breaker is ideally closed at a zero degree phase angle difference to minimize system shock These synchronism check elements are explained in detail in the following text Voltage Input VS Connected Phase to Phase or Beyond Delt...

Page 109: ...is most straightforward to have the angle setting choices 0 30 300 or 330 degrees referenced to VAB Figure 2 24 shows a relay wired with delta connected phase PTs and a C phase to ground connected VS NS input With ABC rotation the correct SYNCP setting for this example is 270 degrees the amount that VC lags VAB See the Application Guide entitled Compensate for Constant Phase Angle Difference in Sy...

Page 110: ...tting Wye Connected Select VA VB or VC with setting SYNCP if SYNCP 0 330 then VP VA Delta Connected Select VAB VBC or VCA with setting SYNCP if SYNCP 0 330 then VP VAB Block Synchronism Check VA wye connected VAB delta connected VP Within Healthy Voltage Window VS Within Healthy Voltage Window VA or VAB Within Healthy Voltage Window Slip Frequency Calculator Enable Frequency of VP less than or equ...

Page 111: ...Calculator Angle Difference Calculator Slip Frequency Element Maximum Angle 1 Maximum Angle 2 Maximum Angle 1 Breaker Close Time Maximum Angle 2 Slip Frequency Element SF VP VP VS VS Relay Word Bits SF Slip Frequency q 0 Relay Word Bits 25A1 25A2 25A1 25A2 Relay Word Bits Angle Difference Angle Difference Enable Enable absolute value absolute value compensated by setting TCLOSD Synchronism Check E...

Page 112: ... needed for voltage connection VA N or VA VB for delta The presumption is that the frequency determined for A phase or AB phase to phase for delta is also valid for B and C phase or BC and CA phase to phase for delta in a three phase power system However for example if voltage VB or VBC for delta is to be synchronized with voltage VS and plans were to connect only voltage terminals VB N and VS NS ...

Page 113: ...9VS indicates that voltage VS is within voltage window setting limits 25VLO and 25VHI As discussed previously voltage VA determines the frequency on the voltage VP side of the circuit breaker Voltage VA is also run through voltage limits 25VLO and 25VHI to ensure healthy voltage for frequency determination with corresponding Relay Word bit output 59VA Other Uses for Voltage Window Elements If volt...

Page 114: ...evolution of one voltage e g VS by another voltage e g VP Both voltages are thought of as revolving phasor wise so the slipping of VS past VP is the relative revolving of VS past VP For example in Figure 3 27 if voltage VP has a frequency of 59 95 Hz and voltage VS has a frequency of 60 05 Hz the difference between them is the slip frequency Slip Frequency 59 95 Hz 60 05 Hz 0 10 Hz 0 10 slip cycle...

Page 115: ...ose time it presumes voltages VP and VS are static not slipping with respect to one another This would usually be the case for an open breaker with voltages VP and VS that are paralleled via some other electric path in the power system The Angle Difference Calculator calculates the angle difference between voltages VP and VS Equation 3 1 For example if SYNCP 90 indicating VS constantly lags VP VA ...

Page 116: ...on 3 6 Resulting in Equation 3 7 During the breaker close time TCLOSD the voltage angle difference between voltages VP and VS changes by six degrees This six degree angle compensation is applied to voltage VS resulting in derived voltage VS as shown in Figure 3 29 Angle Difference VP V S fp fs TCLOSD 1 second 60 cycles 360 slip cycle Angle Difference VP V S fp fs TCLOSD 1 second 60 cycles 360 slip...

Page 117: ...ly close VS is in phase with VP minimizing system shock The bottom of Figure 3 29 shows the Angle Difference increasing VS is moving away from VP Ideally circuit breaker closing is initiated when VS is in phase with VP Angle Difference 0 degrees Then when the circuit breaker main contacts finally close VS is in phase with VP But in this case Angle Difference Decreasing VS Approaching VP Angle Diff...

Page 118: ... window Voltages VP and VS are Slipping and Setting TCLOSD 0 00 Refer to bottom of Figure 3 28 If VP and VS are slipping with respect to one another and breaker close time setting 0 00 the Angle Difference compensated by breaker close time TCLOSD changes through time Synchronism check element 25A1 or 25A2 asserts to logical 1 for any one of the following three scenarios 1 The top of Figure 3 29 sh...

Page 119: ...ism check logic at the bottom of Figure 3 28 becomes less restrictive at the instant timer 79CLSD is going to time out or make the single check It drops the requirement of waiting until the decreasing Angle Difference VS approaching VP brings VS in phase with VP Angle Difference 0 degrees Instead it just checks to see that the Angle Difference is less than angle settings 25ANG1 or 25ANG2 If the An...

Page 120: ...t in SEL 351A 1 In this example the angular difference across the circuit breaker can be greater for a manual close 25 degrees than for an automatic reclose 15 degrees A single output contact e g OUT102 CLOSE can provide the close function for both automatic reclosing and manual closing see Figure 6 1 logic output Courtesy of NationalSwitchgear com ...

Page 121: ...L 351A 1 as shown in Figure 3 32 Frequency is determined from the voltage connected to voltage terminals VA N Frequency Element Settings q Figure 3 32 Figure 3 30 Undervoltage Block for Frequency Elements Group Setting VNOM OFF q Figure 3 32 Figure 3 31 Undervoltage Block for Frequency Elements Group Setting VNOM OFF 0 5 CYC 27B81P Setting VA VAB VB VBC VC VCA Voltages Wye Delta to Frequency Eleme...

Page 122: ...derfrequency Overfrequency Underfrequency Overfrequency Underfrequency 81D2 w 81D2T 0 81D3 w 81D3T 0 81D4 w 81D4T 0 27B81 Relay Word Bits 81D1 w Relay Word Bits Enabled Frequency Elements 81D1P Settings in Hz Frequency Element 2 Setting E81 2 81D2P NFREQ 81D2P NFREQ 81D2P Frequency Element 3 Setting E81 3 81D3P NFREQ 81D3P NFREQ 81D3P Frequency Element 4 Setting E81 4 81D4P NFREQ 81D4P NFREQ 81D4P...

Page 123: ...00 Hz 81D1Da a Frequency element time delays are best set no less than 5 cycles Frequency is determined by a zero crossing technique on voltage VA If voltage waveform offset occurs e g due to a fault then frequency can be off for a few cycles A 5 cycle or greater time delay e g 81D1D 6 00 cycles overrides this occurrence frequency element 1 time delay 2 00 16000 00 cycles in 0 25 cycle steps 81D2P...

Page 124: ...quency element example settings if system frequency is less than or equal to 61 25 Hz 81D1P 61 25 Hz frequency element 1 outputs 81D1 logical 0 instantaneous element 81D1T logical 0 time delayed element If system frequency is greater than 61 25 Hz 81D1P 61 25 Hz frequency element 1 outputs 81D1 logical 1 instantaneous element 81D1T logical 1 time delayed element Relay Word bit 81D1T asserts to log...

Page 125: ...cations where there is only single phase voltage available to the relay Other Uses for Undervoltage Element 27B81 If voltage pickup setting 27B81P is applicable to other control schemes Relay Word bit 27B81 can be used in other logic at the same time it is used in the frequency element logic If frequency elements are not being used Relay Word bit 27B81 can still be used in other logic with voltage...

Page 126: ...This page intentionally left blank Courtesy of NationalSwitchgear com ...

Page 127: ...3PO three pole open condition indicates circuit breaker open condition see Figure 5 3 V1 positive sequence voltage V secondary I1 positive sequence current A secondary I0 zero sequence current A secondary V0 zero sequence voltage V secondary wye connected PTs V2 negative sequence voltage V secondary delta connected PTs VNOM PT nominal voltage setting line to neutral wye connected PTs or line to li...

Page 128: ...ed to logical 0 and setting ELOP can only be set to N See Potential Transformer Ratios and PT Nominal Secondary Voltage Settings on page 9 39 for more details on the VNOM setting Setting ELOP Y or Y1 If setting ELOP Y or Y1 and a loss of potential condition occurs Relay Word bit LOP asserts to logical 1 all internal enables see Note 1 except for 32IE are disabled see Figure 4 6 Figure 4 7 Figure 4...

Page 129: ... quantities ORDER settings V S P and U are not affected by a loss of potential condition on relay inputs VA VB and VC because these elements use the 3V0 zero sequence voltage that comes directly from voltage input VS rather than the zero sequence voltage calculated from voltage inputs VA VB and VC wye connected PTs This difference is shown in Figure 4 15 and Figure 4 16 where Relay Word bit 3V0 is...

Page 130: ...umulative currents of all the feeders but still has to provide overcurrent backup protection for all these feeders If the phase elements in the bus relay are set to provide adequate backup they often are set close to maximum bus load current levels This runs the risk of tripping on bus load current The load encroachment feature prevents this from happening as shown in the example that follows in t...

Page 131: ...it ZLOAD is the OR combination of ZLOUT and ZLIN ZLOAD ZLOUT ZLIN Settings Ranges Refer to Figure 4 2 Load Encroachment Setting Example Example system conditions The PTs are connected line to neutral Convert Maximum Loads to Equivalent Secondary Impedances Start with maximum forward load Equation 4 1 Setting Description and Range ZLF Forward Minimum Load Impedance corresponding to maximum load flo...

Page 132: ...for setting ZLF multiply by a factor of 0 9 Equation 4 10 For the maximum reverse load Equation 4 11 230 kV 1 3 132 8 kV line to neutral 267 MVA 1 132 8 kV 1000 kV MV 2010 A primary 2010 A primary 1 CT ratio 2010 A primary 1 A secondary 400 A primary 5 03 A secondary 132 8 kV 1000 V kV 132800 V primary 132800 V primary 1 PT ratio 132800 V primary 1 V secondary 2000 V primary 66 4 V secondary 66 4 ...

Page 133: ...0 80 180 37 217 Apply Load Encroachment Logic to a Phase Time Overcurrent Again from Figure 4 2 ZLOAD ZLOUT ZLIN Figure 4 3 Migration of Apparent Positive Sequence Impedance for a Fault Condition Refer to Figure 4 3 In a load condition the apparent positive sequence impedance is within the ZLOUT area resulting in ZLOAD ZLOUT ZLIN logical 1 ZLIN logical 1 If a fault occurs the apparent positive seq...

Page 134: ...condition occurs 51PTC ZLOAD LOP 50P6 ZLOAD NOT LOP 50P6 ZLOAD NOT logical 1 50P6 50P6 If phase time overcurrent element 51PT is used in a directional application then this special torque control logic is not used and the corresponding torque control setting is set directly to logical 1 51PTC 1 unless additional control is desired Embedded logic handles load encroachment concerns for directional p...

Page 135: ... Directional Control Settings Not in SEL 351A 1 on page 4 38 Six directional elements are available to control the neutral ground and residual ground overcurrent elements not all available simultaneously These six directional elements are Negative sequence voltage polarized directional element Zero sequence voltage polarized directional element Channel IN current polarized directional element Zero...

Page 136: ... are mutually exclusive choices for setting ORDER see r 32NE 50NF 50NR Disable Inputs Petersen Coil o Low Impedance i to Neutral Ground Time Overcurrent Elements j to Neutral Ground Inst Def Time Overcurrent Elements k Level 1 Level 2 Level 3 Level 4 32NF 32NR Best Choice Ground Directional Logic r Zero Sequence Voltage Polarized y Negative Sequence Voltage Polarized t q a w 32VE V listed in setti...

Page 137: ...sidual Ground Inst Def Time Overcurrent Elements i Level 2 Level 3 Level 4 to Residual Ground Time Overcurrent Elements u Enable Directional Elements with Setting ORDER Internal Enables Relay Word Bit Outputs Directional Elements Relay Word Bit Outputs Relay Word Bit Outputs Direction Forward Reverse Logic Directional Control Directional Element Routing Table 4 1 Available Ground Directional Eleme...

Page 138: ...els not dependent on neutral channel IN Q 32QGE QV 32QGE 32VE V 32VE VQ 32VE 32QGE I 32IE Additional setting combinations for models with a 1 A or 5 A nominal neutral channel IN IQ 32IE 32QGE IQV 32IE 32QGE 32VE IV 32IE 32VE IVQ 32IE 32VE 32QGE QI 32QGE 32IE QIV 32QGE 32IE 32VE QVI 32QGE 32VE 32IE VI 32VE 32IE VIQ 32VE 32IE 32QGE VQI 32VE 32QGE 32IE VS 32VE 32NE Low impedance Additional setting co...

Page 139: ...ed and nonoperational For example suppose that setting choice S is listed in setting ORDER By virtue of not being available or not being listed in setting ORDER the directional elements corresponding to setting choices I P and U see Table 4 1 Figure 4 4 and Figure 4 5 are defeated and nonoperational So for nonavailable setting choice I corresponding internal enable 32IE logical 0 and directional o...

Page 140: ...al Control Settings Not in SEL 351A 1 on page 4 38 Switch Between IN and IG for Low Impedance Grounded and Ungrounded High Impedance Grounded Systems If an ungrounded or high impedance grounded system setting ORDER U has appreciable circuit length the capacitance levels can be such that appreciable current flows for a ground fault A low impedance grounded system setting ORDER contains S can also h...

Page 141: ...ent IG is derived internally from these phase currents as are the negative sequence impedance settings Z2F and Z2R However settings Z0F and Z0R are applied to Figure 4 12 and Figure 4 14 where neutral current IN from neutral current channel IN is also applied Settings Z0F and Z0R are adjusted internally with CT ratio settings to operate on this IN current base Z0F CTRN CTR IN base Z0R CTRN CTR IN ...

Page 142: ...ements corresponding to S or P Figure 4 12 and Figure 4 13 respectively This Best Choice Ground Directional Element logic for the directional elements corresponding to S or P is effectively handled with the disable inputs internal enables 32QGE and 32VE running into the internal enable logic of Figure 4 8 If neither 32QGE nor 32VE is asserted and thus their corresponding directional element is not...

Page 143: ...e 4 15 and Figure 4 16 In this situation the elements that are enabled by signals 32VE and 32NE are still able to operate reliably during a loss of potential condition so there is no need to force the forward outputs to assert However when 32VE or 32NE are not asserted a standing LOP condition will force the forward outputs to assert continuously Consider this when determining residual and neutral...

Page 144: ...he directional control enable setting E32 is set to E32 N In some applications level direction settings DIR1 DIR4 are not flexible enough in assigning the desired direction for certain overcurrent elements Directional Control Provided by Torque Control Settings Not in SEL 351A 1 on page 4 57 describes how to avoid this limitation for special cases q From Figure 4 1 w from Figure 4 7 e to Figure 4 ...

Page 145: ...Polarized Directional Elements 3V0 q Loss of Potential ELOP Y or Y1 LOP t I listed in setting ORDER Setting Enable Setting Enable V listed in setting ORDER r 32IE Internal Enable e 32VE Internal Enable w Neutral Ground Threshold Channel IN Nominal Rating 0 05 IN E32IV 50GF 50GR Neutral Ground Threshold 50GRP 50GFP Setting IG Residual Relay Word Bits SELOGIC Enable Relay Word Bits I0 IG 3 I0 a0 I1 ...

Page 146: ...nts Low Impedance Grounded Petersen Coil Grounded and Ungrounded High Impedance Grounded Systems Refer to the setting ideas for SELOGIC setting E32IV near the back of this section especially if setting ORDER U ungrounded or high impedance grounded system 3V0 q Loss of Potential 32NE Internal Enable High Impedance Grounded e ORDER U Ungrounded Petersen Coil Grounded Low Impedance Grounded LOP P lis...

Page 147: ...5 Z2F 0 25 I2 V2 If Z2F Setting 0 Forward Threshold 0 75 Z2F 0 25 Forward Threshold I2 V2 If Z2R Setting 0 Reverse Threshold 1 25 Z2R 0 25 I2 V2 If Z2R Setting 0 Reverse Threshold 0 75 Z2R 0 25 Reverse Threshold Note 1 Z1L One Ohm at the Positive Sequence Line Angle Direction Element Characteristics R2 X2 Forward Threshold Reverse Threshold Z2 PLANE 32QGE is highest w R32QG Reverse F32QG Forward B...

Page 148: ...ources on page 4 15 I0 V0 If Z0F Setting 0 Forward Threshold 1 25 Z0F 0 25 I0 V0 If Z0F Setting 0 Forward Threshold 0 75 Z0F 0 25 Forward Threshold I0 V0 If Z0R Setting 0 Reverse Threshold 1 25 Z0R 0 25 I0 V0 If Z0R Setting 0 Reverse Threshold 0 75 Z0R 0 25 Reverse Threshold Note 1 Z0MTA One Ohm at the Zero Sequence Line Angle Direction Element Characteristics R0 X0 Forward Threshold Reverse Thres...

Page 149: ...ed Directional Element Forward Threshold Channel IN Nominal Rating Phase Channels Nominal Rating 0 05 2 Forward Threshold Reverse Threshold Channel IN Nominal Rating Phase Channels Nominal Rating 0 05 2 Reverse Threshold 32IE is highest w R32I Reverse F32I Forward Best Choice Ground Directional Logic 50GF Enable Forward Threshold 32IE Reverse Threshold 50GR q Re IG IN IG IN Relay Word Bits Relay W...

Page 150: ... VSCONN 3V0 See Zero Sequence Voltage Sources on page 4 15 IN 3V0 If Z0F Setting 0 Forward Threshold 1 25 Z0F 0 25 IN 3V0 If Z0F Setting 0 Forward Threshold 0 75 Z0F 0 25 Forward Threshold IN 3V0 If Z0R Setting 0 Reverse Threshold 1 25 Z0R 0 25 IN 3V0 If Z0R Setting 0 Reverse Threshold 0 75 Z0R 0 25 Reverse Threshold Note 1 Z0MTA One Ohm at the Zero Sequence Line Angle Direction Element Characteri...

Page 151: ...age Sources on page 4 15 P 0 Reverse Threshold Forward Threshold Q 0 Zero Sequence Power Plane Forward Threshold 32WFP 0 95 3V 0 I N 0 05 32WFP Wattmetric Forward Pickup W Secondary 32WRP Wattmetric Reverse Pickup W Secondary Reverse Threshold 32WRP 0 95 3V 0 I N 0 05 Re 3V 0 I N Enable 0 32WD 0 32WD Forward Reverse R32W F32W Delay Setting Cyc Reverse Threshold Forward Threshold Wattmetric Element...

Page 152: ...TCONN WYE or a measured value when global setting VSCONN 3V0 See Zero Sequence Voltage Sources on page 4 15 IN 3V0 Z0F 0 10 Forward Threshold 0 75 Z0F 0 25 Forward Threshold IN 3V0 Z0R 0 10 Reverse Threshold 0 75 Z0R 0 25 Reverse Threshold Note 1 90 One Ohm at 90 Angle For setting ORDER U settings Z0F and Z0R are set internally as shown above and hidden Direction Element Characteristics R0 X0 Forw...

Page 153: ...q From Figure 4 7 w from Figure 4 8 e from Figure 9 11 r from Figure 4 1 t from Figure 4 9 y from Figure 4 10 u from Figure 4 11 i from Figure 4 12 Figure 4 13 or Figure 4 14 o to Figure 4 18 Figure 4 16 Routing of Direction Elements to Neutral Ground Overcurrent Elements LOP Relay Word Bits q 32VE w 32NE F32QG R32QG e 3V0 q 32IE Relay Word Bits 32GF Forward 32GR Reverse Relay Word Bits Setting EL...

Page 154: ...erse Logic for Residual Ground Overcurrent Elements Level Direction Settings Directional Control 32GF q DIR1 F DIR1 N Relay Word Bits to Residual Ground Time 0vercurrent Elements w to Residual Ground Instantaneous Definite Time Overcurrent Elements e ORDER OFF or ORDER P Setting Forward Forward 32GR q Reverse Level 1 DIR1 R Reverse DIR2 F DIR2 N Forward Level 2 DIR2 R Reverse DIR3 F DIR3 N Forward...

Page 155: ...ard Reverse Logic for Neutral Ground Overcurrent Elements Level Direction Settings Directional Control 32NF q DIR1 F DIR1 N Relay Word Bits to Neutral Ground Time 0vercurrent Elements w to Neutral Ground Instantaneous Definite TIme Overcurrent Elements e ORDER OFF Setting Forward Forward 32NR q Reverse Level 1 DIR1 R Reverse DIR2 F DIR2 N Forward Level 2 DIR2 R Reverse DIR3 F DIR3 N Forward Level ...

Page 156: ...ns of Figure 4 6 and Figure 4 21 See Settings for Voltage Input Configuration on page 9 36 for a complete list of changes caused by setting VNOM OFF q Figure 4 6 w Figure 4 20 e Figure 4 21 r Figure 4 22 t Figure 4 23 y Figure 4 24 u Figure 3 21 i Figure 3 12 o to Figure 3 14 Figure 3 17 a Figure 3 3 Figure 4 19 General Logic Flow of Directional Control for Negative Sequence and Phase Overcurrent ...

Page 157: ...tive sequence voltage polarized directional element operates for unbalanced faults while the positive sequence voltage polarized directional element operates for three phase faults Note also in Figure 4 21 that the assertion of ZLOAD disables the positive sequence voltage polarized directional element ZLOAD asserts when the relay is operating in a user defined load region see Figure 4 2 Directiona...

Page 158: ...current elements set direction forward DIR2 F Level 3 overcurrent elements set direction reverse DIR3 R If a level direction setting e g DIR1 is set DIR1 N nondirectional then the corresponding Level 1 directional control outputs in Figure 4 23 and Figure 4 24 assert to logical 1 The referenced Level 1 overcurrent elements in Figure 4 23 and Figure 4 24 are then not controlled by the directional c...

Page 159: ... I2 V2 If Z2F Setting 0 Forward Threshold 1 25 Z2F 0 25 I2 V2 If Z2F Setting 0 Forward Threshold 0 75 Z2F 0 25 Forward Threshold I2 V2 If Z2R Setting 0 Reverse Threshold 1 25 Z2R 0 25 I2 V2 If Z2R Setting 0 Reverse Threshold 0 75 Z2R 0 25 Reverse Threshold Direction Element Characteristics R2 X2 Forward Threshold Reverse Threshold Z2 PLANE q R32Q Reverse F32Q Forward 50QF Enable Forward Threshold ...

Page 160: ... Sequence Voltage Polarized Directional Element for Phase Overcurrent Elements 50P32P 3 50P32 IA IB IB IC IC IA ELOP Y or Y1 LOP Setting w 32QE q ZLOAD VPOLV Setting fixed at phase channels nominal rating 0 1 when enable setting ELOAD Y F32P Forward R32P Reverse 90 Z1ANG Z1 90 Z1ANG q e r Z1ANG X1 90 270 0 180 R1 Forward Reverse Loss of Potential Neg Seq Dir Element Has Priority Load Condition Pos...

Page 161: ...ent Elements Not in SEL 351A 1 q From Figure 4 1 w from Figure 4 20 e from Figure 4 21 r to Figure 4 23 t to Figure 4 24 Figure 4 22 Routing of Directional Elements to Negative Sequence and Phase Overcurrent Elements LOP w e F32Q R32Q Relay Word Bits 32PF Forward 32QF Forward 32PR Reverse 32QR Reverse Setting ELOP Y q r t Loss of Potential F32P R32P Courtesy of NationalSwitchgear com ...

Page 162: ...gic for Negative Sequence Overcurrent Elements Directional Control Level Direction Settings 32QF q DIR1 F DIR1 N Relay Word Bit Relay Word Bit to Negative Sequence Time 0vercurrent Element w to Negative Sequence Instantaneous Definite TIme Overcurrent Elements e VNOM OFF Setting Forward Forward 32QR q Reverse Level 1 DIR1 R Reverse DIR2 F DIR2 N Forward Level 2 DIR2 R Reverse DIR3 F DIR3 N Forward...

Page 163: ...tion Forward Reverse Logic for Phase Overcurrent Elements Directional Control Level Direction Settings 32PF q DIR1 F DIR1 N Relay Word Bit Relay Word Bit to Phase Time 0vercurrent Elements w to Phase Instantaneous Definite TIme Overcurrent Elements e VNOM OFF Setting Forward Forward 32PR q Reverse Level 1 DIR1 R Reverse DIR2 F DIR2 N Forward Level 2 DIR2 R Reverse DIR3 F DIR3 N Forward Level 3 DIR...

Page 164: ...ert to logical 1 The overcurrent elements referenced in Figure 4 17 Figure 4 18 Figure 4 23 and Figure 4 24 are then not controlled by the directional control logic There is one case that does not allow group setting E32 Y or AUTO If all three of the following are true E32 can only be set to N The relay model has a 0 2 A or 0 05 A nominal neutral channel Global setting VSCONN VS Group setting VNOM...

Page 165: ...a0 setting ORDER does not contain V or I Z0F Z0R Z0MTA setting ORDER does not contain V or S 59RES 32WFP 32WRP 32WD setting ORDER does not contain P or model does not have a 0 2 A nominal neutral channel IN 50NFP 50NRP a0N setting ORDER does not contain S or U or model does not have a 0 2 A nominal neutral channel IN Table 4 4 Overcurrent Elements Controlled by Level Direction Settings DIR1 DIR4 C...

Page 166: ...directional element to provide directional control for the neutral ground and residual ground overcurrent elements If the negative sequence voltage polarized directional element is not operable i e it does not have sufficient operating quantity as indicated by its internal enable 32QGE not being asserted see Figure 4 6 then the second listed directional element V zero sequence voltage polarized di...

Page 167: ...le current flows for a ground fault With such low current levels the neutral ground overcurrent elements referenced in Figure 4 18 are the elements that detect the ground fault not the residual ground overcurrent elements referenced in Figure 4 17 The residual ground overcurrent elements including forward and reverse fault detectors 50GF and 50GR respectively see Figure 4 7 should be set above any...

Page 168: ...able below Figure 4 25 and Figure 4 26 and supporting text concern the zero sequence impedance network relay polarity and the derivation of settings Z0F and Z0R The same general approach outlined for deriving settings Z0F and Z0R can also be applied to deriving settings Z2F and Z2R in the negative sequence impedance network though the preceding method of automatically making settings Z2F and Z2R u...

Page 169: ...he elements from operating for negative sequence current system unbalance which circulates due to line asymmetries CT saturation during three phase faults etc a2 Set Automatically If enable setting E32 AUTO setting a2 is set automatically at a2 0 1 For setting a2 0 1 the negative sequence current I2 magnitude has to be greater than 1 10 of the positive sequence current I1 magnitude in order for th...

Page 170: ...lement k2 Set Automatically If enable setting E32 AUTO setting k2 is set automatically at k2 0 2 For setting k2 0 2 the negative sequence current I2 magnitude has to be greater than 1 5 of the zero sequence current I0 magnitude in order for the negative sequence voltage polarized directional elements to be enabled I2 0 2 I0 Again this presumes at least one of the internal enables 32VE or 32IE is a...

Page 171: ...current inputs IA IB IC a0 Positive Sequence Current Restraint Factor I0 I1 Setting Range 0 02 0 50 unitless If preceding setting ORDER does not contain V or I no zero sequence voltage polarized or channel IN current polarized directional elements are enabled then setting a0 is not made or displayed Refer to Figure 4 7 The a0 factor increases the security of the zero sequence voltage polarized and...

Page 172: ...ble below If setting ORDER U ungrounded or high impedance grounded system see Figure 4 14 the following settings are made internally and hidden Z0F 0 10 Ω secondary Z0R 0 10 Ω secondary Deriving Z0F and Z0R Settings Figure 4 25 shows the voltage and current polarity for an SEL 351A in a zero sequence impedance network the same approach can be instructive for negative sequence impedance analysis to...

Page 173: ...tems Figure 4 25 and Figure 4 26 just provide a theoretic background Figure 4 25 Zero Sequence Impedance Network and Relay Polarity Figure 4 26 Zero Sequence Impedance Plot for Solidly Grounded Mostly Inductive System Z0MTA Zero Sequence Maximum Torque Angle Setting Range 90 to 5 00 degrees 5 00 to 90 00 degrees If enable setting E32 Y and ORDER contains a V or S setting Z0MTA should be set Z0MTA ...

Page 174: ...t contain S or U zero sequence voltage polarized directional elements low impedance grounded or ungrounded high impedance grounded are not enabled or the model does not have a 0 2 A nominal neutral channel IN then setting a0N is not made or displayed Refer to Figure 4 8 The following comparison is made as part of internal enable 32NE for low impedance grounded and ungrounded high impedance grounde...

Page 175: ...ce It is part of the enabling logic for the wattmetric element part of the Petersen Coil directional element see Figure 4 13 The 3V0 input to Figure 4 13 may come either from a calculation or from a direct measurement as described in Zero Sequence Voltage Sources on page 4 15 When using a broken delta PT connection to terminals VS NS as the zero sequence voltage source global setting VSCONN 3V0 th...

Page 176: ...1 only one feeder position is shown but one can imagine the bus extending to the right with other feeder positions The Petersen Coil in the transformer neutral is tuned to cancel out the cumulative zero sequence line capacitance of all the connected feeders The Petersen Coil and the zero sequence line capacitance are a parallel LC circuit In a tuned state they create a high impedance circuit and t...

Page 177: ...13 operates Whether the zero sequence network behind Relay 1 appears net capacitive or net inductive the wattmetric real power portion for Relay 1 faulted Feeder 1 labeled WF is polar opposite of the wattmetric real power portion for Relay 2 unfaulted Feeder 2 labeled WR The calculations for the 32WFP and 32WRP wattmetric pickups are made as follows Equation 4 18 The cosine part of the above calcu...

Page 178: ...r Petersen Coil Grounded Systems The Petersen Coil elements require a zero sequence voltage source which is calculated from voltages VA VB and VC when the relay is wye connected global setting PTCONN WYE and VSCONN VS or which is measured from the VS channel when the relay is connected to a broken delta 3V0 source and global setting VSCONN 3V0 Three of the required Petersen Coil element settings 5...

Page 179: ... Settings on page 9 39 is used for subsequent examples The relay internally converts the VS channel signal to the VA VB VC voltage base before using it as the 3V0 quantity as shown in Table 4 5 Thus when the zero sequence voltage pickup for the Wattmetric element is known in terms of the system primary voltage level the required calculation for setting 59RES is the same as the calculation for the ...

Page 180: ... same value as before Similarly if the desired Wattmetric pickup for the Wattmetric element is known in terms of VS channel volts secondary and IN channel current secondary then the setting value must be scaled by PTRS PTR prior to entry This pre scaling makes the 32WFP and 32WRP settings match the scaling the relay does when it converts the VS value into the VA VB VC voltage base For our example ...

Page 181: ... result in possible mutual coupling problems for the zero sequence voltage polarized and channel IN current polarized directional elements SELOGIC control equation setting E32IV should be deasserted to logical 0 In this example connect a circuit breaker auxiliary contact from the isolating circuit breaker to the SEL 351A E32IV IN106 52a connected to optoisolated input IN106 Almost any desired cont...

Page 182: ...three phase fault and the 32QE Relay Word bit see Figure 4 6 asserts during a phase to phase fault If either one of these occur the E32IV setting evaluates to logical 0 and the ungrounded high impedance grounded directional element is blocked see Figure 4 8 When a switch or breaker closes the poles can close sequentially not at the same time creating a momentary current unbalance condition To avoi...

Page 183: ...on forward 51AT direction reverse 51BT direction reverse 51CT direction reverse 51NT nondirectional 51GT direction forward 51G2T direction reverse To accomplish this the DIR1 setting is turned off and the corresponding SELOGIC control equation torque control settings for the above overcurrent elements are used to make the elements directional forward or reverse or nondirectional The required setti...

Page 184: ...This page intentionally left blank Courtesy of NationalSwitchgear com ...

Page 185: ...onto fault logic enable SOTFE See the Switch Onto Fault SOTF Trip Logic on page 5 7 TR Other Trip Conditions Setting TR is the SELOGIC control equation trip setting most often used if tripping does not involve communications assisted setting DTT or switch onto fault setting TRSOTF trip logic Note that in Figure 5 1 setting TR is unsupervised Any element that asserts in setting TR will cause Relay ...

Page 186: ...tion if it is not already timing timer is reset The TDURD timer ensures that the TRIP Relay Word bit remains asserted at logical 1 for a minimum of TDURD cycles If the output of OR 1 gate is logical 1 beyond the TDURD time Relay Word bit TRIP remains asserted at logical 1 for as long as the output of OR 1 gate remains at logical 1 regardless of other trip logic conditions The Minimum Trip Duration...

Page 187: ... COMM target LED option for the OPEN command is discussed in the Front Panel Target LEDS on page 5 10 Unlatch Trip Once Relay Word bit TRIP is asserted to logical 1 it remains asserted at logical 1 until all the following conditions come true Minimum Trip Duration Timer stops timing logic output of the TDURD timer goes to logical 0 Output of OR 1 gate deasserts to logical 0 One of the following oc...

Page 188: ...y setting for the Minimum Trip Duration Timer setting is TDURD 9 00 cycles See the Settings Sheets in Section 9 Setting the Relay for setting ranges Set Trip In SELOGIC control equation setting TR 51PT 51GT 81D1T LB3 50P1 SH0 OC Time overcurrent elements 51PT and 51GT trip directly Time overcurrent and definite time overcurrent elements can be torque controlled e g elements 51PT and 51GT are torqu...

Page 189: ...ndition A circuit breaker status unlatch trip condition can be programmed as shown in the following examples Unlatch Trip With 52a Circuit Breaker Auxiliary Contact A 52a circuit breaker auxiliary contact is wired to optoisolated input IN101 52A IN101 SELOGIC control equation circuit breaker status setting see Optoisolated Inputs on page 7 2 ULTR IN101 Input IN101 has to be de energized 52a circui...

Page 190: ...OGIC control equation setting OUT101 TRIP If more than one TRIP output contact is needed program other output contacts with the TRIP Relay Word bit Examples of uses for additional TRIP output contacts Tripping more than one breaker Keying an external breaker failure relay Keying communications equipment in a Direct Transfer Trip scheme See Output Contacts on page 7 31 for more information on progr...

Page 191: ...TF trip logic Refer to the switch onto fault trip logic in Figure 5 1 top of figure The SOTF trip logic permits tripping if both the following occur An element asserts in SELOGIC control equation trip setting TRSOTF Relay Word bit SOTFE is asserted to logical 1 Relay Word bit SOTFE the output of the SOTF logic provides the effective time window for an element in trip setting TRSOTF e g TRSOTF 50P2...

Page 192: ...is set below load current levels When the circuit breaker is open Relay Word bit 50L drops out logical 0 and the 3PO condition asserts 3PO logical 1 circuit breaker open When the circuit breaker is closed Relay Word bit 50L picks up logical 0 current above phase pickup 50LP and the 3PO condition deasserts after the 3POD dropout time 3PO logical 0 circuit breaker closed Note that the 3PO condition ...

Page 193: ...of SOTFD cycles any time it sees a rising edge on its input logical 0 to logical 1 transition if it is not already timing The SOTF logic output SOTFE asserts to logical 1 for SOTFD time Switch Onto Fault Logic Enable SOTFE Relay Word bit SOTFE is the output of the circuit breaker operated SOTF logic or the close bus operated SOTF logic described previously Time setting SOTFD in each of these logic...

Page 194: ...a the front panel local control local bits serial port remote bits or OPEN command or voltage elements is indicated only by the illumination of the TRIP target LED Table 5 1 SEL 351A Front Panel Target LED Definitions LED Number LED Label Definition 1 EN Relay Enabled see subsection Relay Self Tests on page 13 9 2 TRIP Indication that a trip occurred by overcurrent element frequency element or oth...

Page 195: ...and or remote bit RB1 see CON Command Control Remote Bit on page 10 36 are used to trip via the serial port and they should illuminate the COMM target LED set them in SELOGIC control equation setting DTT DTT OC RB1 Additionally if SCADA asserts optoisolated input IN104 to trip and it should illuminate the COMM target LED set it in SELOGIC control equation setting DTT also DTT IN104 Relay Word bits...

Page 196: ... test setup SELOGIC control equation setting FAULT also controls other relay functions See subsection SELOGIC Control Equation Setting FAULT on page 5 13 If neutral channel IN is rated 0 2 A nominal and directional control is selected for a Petersen Coil grounded or ungrounded high impedance grounded system see Table 4 1 then A B and C target logic for ground faults uses Relay Word bits NSA NSB an...

Page 197: ...ay If a breaker failure trip has occurred the momentary assertion of SV7T breaker failure trip will cause SV8 in Figure 5 4 to seal in Asserted SV8 in turn asserts DP3 causing the message to display in the rotating default display This message can be removed from the display rotation by pushing the TARGET RESET pushbutton Relay Word bit TRGTR pulses to logical 1 unlatching SV8 and in turn deassert...

Page 198: ...This page intentionally left blank Courtesy of NationalSwitchgear com ...

Page 199: ...losing relay settings and logic needed for automatic reclosing besides the final close logic and reclose supervision logic described in the previous subsections The reclose enable setting E79 has setting choices N 1 2 3 4 C1 C2 C3 and C4 Setting E79 N defeats the reclosing relay Setting choices 1 4 and C1 C4 are the number of desired automatic reclosures Setting choices 1 4 have the reclosing rela...

Page 200: ...re condition does not exist Relay Word bit CF 0 Then the CLOSE Relay Word bit can be asserted to logical 1 if either of the following occurs A reclosing relay open interval times out qualified by SELOGIC control equation setting 79CLS see Figure 6 2 Or SELOGIC control equation setting CL goes from logical 0 to logical 1 rising edge transition 52A Breaker Status Close Failure Timer CF Rising Edge D...

Page 201: ...r the Close Failure Timer times out Relay Word bit CF 1 The Close Failure Timer is inoperative if setting CFD OFF Factory Settings Example The factory settings for the close logic SELOGIC control equation settings are 52A IN101 CL LB4 CC ULCL TRIP The factory setting for the Close Failure Timer setting is CFD 60 00 cycles See the Settings Sheets at the end of Section 9 Setting the Relay for settin...

Page 202: ...then the close logic is inoperable Also the reclosing relay is defeated see Reclosing Relay on page 6 12 Circuit Breaker Status Refer to the bottom of Figure 6 1 Note that SELOGIC control equation setting 52A circuit breaker status is available as Relay Word bit 52A This makes for convenience in setting other SELOGIC control equations For example if the following setting is made 52A IN101 52a auxi...

Page 203: ...Reclosing Relay Open Interval Timeout qualified by 79CLS Reclosing Relay Open Interval Timeout qualified by 79CLS Reclose Initiate If setting 79CLSD OFF the Reclose Supervision Limit Timer is inoperative and does not time limit the wait for the Reclose Supervision condition 79CLS to assert to logical 1 Reclosing Relay Open Interval Timeout 79RI 79CLSD OFF Lockout Reclose Supervision Limit Timer Re...

Page 204: ... ranges For Most Applications Top of Figure 6 2 For most applications the Reclose Supervision Limit Time setting should be set to zero cycles 79CLSD 0 00 open interval 1 times out open interval 1 times out 1 Open Interval Timer Open Interval Timer Reclose Supervision Limit Timer Reclose Supervision Limit Timer 79CLS Reclose Supervision Condition 79CLS Reclose Supervision Condition RCSF Reclose Sup...

Page 205: ...elay is then driven to the Lockout State See Factory Settings Example on page 6 9 and Additional Settings Example 1 on page 6 9 For a Few Unique Applications Bottom of Figure 6 2 and Figure 6 3 For a few unique applications the Reclose Supervision Limit Time setting is not set equal to zero cycles e g 79CLSD 60 00 With this setting the logic in the bottom of Figure 6 2 is operative When an open in...

Page 206: ...close Supervision Logic Bottom of Figure 6 2 Refer to the bottom of Figure 6 2 If the reclosing relay open interval time out condition is sealed in it stays sealed in until one of the following occurs The close logic output CLOSE also see Figure 6 1 asserts Relay Word bit CLOSE logical 1 The reclosing relay goes to the Lockout State Relay Word bit 79LO logical 1 The circuit breaker closes 52A logi...

Page 207: ...51A 2 Relay reclosing circuit breaker 52 2 after a synchronism check across circuit breaker 52 2 NOTE Does not apply to the SEL 351A 1 Figure 6 4 SEL 351A Relays Installed at Both Ends of a Transmission Line in a High Speed Reclose Scheme SEL 351A 1 Relay Before allowing circuit breaker 52 1 to be reclosed after an open interval time out the SEL 351A 1 Relay checks that Bus 1 voltage is hot and th...

Page 208: ...ted to one of these briefly energized phases synchronism check element 25A1 could momentarily assert to logical 1 So that this possible momentary assertion of synchronism check element 25A1 does not cause any inadvertent reclose of circuit breaker 52 2 make sure the open interval timers in the SEL 351A 2 Relay are set with some appreciable time greater than the momentary energization time of the f...

Page 209: ...sert for one processing interval then the reclosing relay goes to the Lockout State If E79 C3 which allows three automatic reclose attempts and the slipping voltages fail to come into synchronism while timer 79CLSD is timing resulting in a reclose supervision failure causing RCSF to assert for one processing interval then the reclosing relay increments the shot counter and starts timing on the nex...

Page 210: ...rval Timers on page 6 16 Setting choices 1 4 also have the reclosing relay go to the Lockout state upon reclose supervision failure refer to Reclose Supervision Logic on page 6 5 Setting choice C1 C4 similarly are the number of desired automatic reclosures C1 for one reclosure C2 for two reclosures etc Setting choices C1 C4 however do not have the reclosing relay go to the Lockout state upon reclo...

Page 211: ... Initiation Successful Reclose Initiation Maintained Lockout Condition The circuit breaker has been closed for a qualifying reset time The SEL 351A is ready to go through an automatic reclosing sequence in the reclose cycle state if the circuit breaker trips open and reclose initiation is successful Relay Word bit 79RS logical 1 Front panel RS LED illuminated The SEL 351A automatically recloses th...

Page 212: ...10 35 for more information on the OPEN command Also see Drive to Lockout and Drive to Last Shot Settings 79DTL and 79DLS respectively If the OPEN command is set to trip TR OC see Note following Figure 5 2 then the following reclosing relay SELOGIC control equation settings should also be made presuming that an OPEN command trip should not initiate reclosing 79RI TRIP reclose initiate 79DTL OC driv...

Page 213: ... reclosing relay is defeated the close logic see Figure 6 1 can still operate if SELOGIC control equation circuit breaker status setting 52A is set to something other than numeral 0 Making the setting 52A 0 defeats the close logic and also defeats the reclosing relay For example if 52A IN101 a 52a circuit breaker auxiliary contact is connected to input IN101 If the reclosing relay does not exist t...

Page 214: ...ay is defeated The open interval timers time consecutively they do not have the same beginning time reference point For example with settings 79OI1 30 00 cycles and 79OI2 600 00 cycles open interval 1 time setting 79OI1 times first If the subsequent first reclosure is not successful then open interval 2 time setting 79OI2 starts timing If the subsequent second reclosure is not successful the relay...

Page 215: ...lting from open interval time out It is also the reset time used in sequence coordination schemes see Sequence Coordination Setting 79SEQ on page 6 26 Setting 79RSLD Qualifies closures when the relay is in the Lockout State These closures are usually manual closures These manual closures can originate external to the relay via the CLOSE command or via the SELOGIC control equation setting CL see Fi...

Page 216: ...and so forth for the set open intervals that follow The shot counter cannot increment beyond the last shot for automatic reclosing see Determination of Number of Reclosures Last Shot on page 6 16 The shot counter resets back to shot 0 when the reclosing relay returns to the Reset State When the shot counter is at a particular shot value e g shot 2 the corresponding Relay Word bit asserts to logica...

Page 217: ...irst open interval The SEL 351A is not yet in the reclose cycle state 79CY logical 0 at the instant of the first trip Then for any subsequent trip operations in the auto reclose cycle the SEL 351A is in the reclose cycle state 79CY logical 1 and the SEL 351A successfully initiates reclosing for each trip Because of factory setting 79RIS 52A 79CY successful reclose initiation in the reclose cycle s...

Page 218: ...eaker openings caused by trips external to the relay If circuit breaker status indication 52A is slow additional setting change ULCL 0 unlatch close refer to Figure 6 1 and accompanying explanation may need to be made when 79RI 52A ULCL 0 avoids going to lockout prematurely for an instantaneous trip after an auto reclose by not turning CLOSE off until the circuit breaker status indication tells th...

Page 219: ...elay goes to the last shot if the shot counter is not at a shot value greater than or equal to the calculated last shot see Reclosing Relay Shot Counter on page 6 18 Factory Settings Example The drive to lockout factory setting is 79DTL IN102 LB3 OC Optoisolated input IN102 is set to operate as a reclose enable switch see Optoisolated Inputs on page 7 2 When Relay Word bit IN102 logical 1 reclosin...

Page 220: ...e enable switch optoisolated input IN102 is put in the reclosing disabled position Relay Word bit IN102 logical 0 79DTL IN102 NOT IN102 NOT logical 0 logical 1 To disable reclosing but not drive the relay to the Lockout State until the relay trips make settings similar to the following 79DTL IN102 TRIP Additional Settings Example 2 To drive the relay to the Lockout State for fault current above a ...

Page 221: ...shot turns out to be the last shot no open interval timing takes place and the relay goes to the Lockout State if the circuit breaker is open see Lockout State If the relay is in the middle of timing on an open interval and 79STL changes state to 79STL logical 1 open interval timing stops where it is If 79STL changes state back to 79STL logical 0 open interval timing resumes where it left off Use ...

Page 222: ...ator To monitor line voltage and block reclosing connect a line side single phase potential transformer to channel VS on the SEL 351A as shown in Figure 6 7 Figure 6 7 Reclose Blocking for Islanded Generator If the line is energized channel VS overvoltage element 59S1 can be set to assert Make the following setting 79STL 59S1 If line voltage is present Relay Word bit 59S1 asserts stalling open int...

Page 223: ...tings 79BRS 0 numeral 0 Additional Settings Example 1 The block reset timing setting is 79BRS 51P 51G 79CY Relay Word bit 79CY corresponds to the Reclose Cycle State The reclosing relay is in one of the three reclosing relay states at any one time see Figure 6 5 and Table 6 1 When the relay is in the Reset or Lockout States Relay Word bit 79CY is deasserted to logical 0 Thus the 79BRS setting has ...

Page 224: ...or at least 1 25 cycles and then deasserts the shot counter increments by one count This assertion deassertion indicates that a downstream device e g line recloser see Figure 6 8 has operated to clear a fault Incrementing the shot counter keeps the SEL 351A in step with the downstream device as is shown in the following Additional Settings Example 1 and Additional Settings Example 2 Every time a s...

Page 225: ... with the line recloser fast curve The SEL 351A single phase time overcurrent elements 51AT 51BT and 51CT are coordinated with the line recloser slow curve q Fault occurs beyond line recloser w fault cleared by line recloser fast curve e line recloser recloses into fault r fault cleared by line recloser slow curve Figure 6 9 Operation of SEL 351A Shot Counter for Sequence Coordination With Line Re...

Page 226: ...ckup 51P can still assert and then deassert thus continuing the sequencing of the shot counter to shot 3 etc The 51PT phase time overcurrent element cannot cause a trip because shot 2 and SH0 and SH1 both are deasserted to logical 0 The shot counter returns to shot 0 after the reset timer loaded with reset time 79RSD times out Additional Settings Example 2 Review preceding Additional Settings Exam...

Page 227: ... r fault cleared by line recloser slow curve Figure 6 10 Operation of SEL 351A Shot Counter for Sequence Coordination With Line Recloser Additional Settings Example 2 The line recloser continues to operate for the permanent fault beyond it but the SEL 351A shot counter does not continue to increment Sequence coordination setting 79SEQ is effectively disabled by the shot counter incrementing from s...

Page 228: ...This page intentionally left blank Courtesy of NationalSwitchgear com ...

Page 229: ...t Contacts on page 7 31 OUT101 OUT107 and ALARM Rotating Default Display Only on Models With LCD on page 7 34 display points DP1 DP16 models with LCD only The above items are all the logic input output of the relay They are combined with the overcurrent voltage frequency and reclosing elements in SELOGIC control equation settings to realize numerous protection and control schemes Relay Word bits a...

Page 230: ...st 1 16 cycle 13 16 cycles 13 16 0 8125 The ac setting allows the input to sense ac control signals The input has a maximum pickup time of 0 75 cycles and a maximum dropout time of 1 25 cycles The ac setting qualifies the input by not asserting until two successive 1 16 cycle samples are higher than the optoisolated input voltage threshold and not deasserting until sixteen successive 1 16 cycle sa...

Page 231: ...Functions There are no optoisolated input settings such as IN101 IN102 Optoisolated inputs IN101 IN106 receive their function by how their corresponding Relay Word bits IN101 IN106 are used in SELOGIC control equations Factory Settings Examples Figure 7 2 Circuit Breaker Auxiliary Contact and Reclose Enable Switch Connected to Optoisolated Inputs IN101 and IN102 The functions for inputs IN101 and ...

Page 232: ...y Word bit IN102 is used in the factory settings for the SELOGIC control equation drive to lockout setting 79DTL IN102 NOT IN102 Connect input IN102 to a reclose enable switch When the reclose enable switch is open input IN102 is de energized and the reclosing relay is driven to lockout 79DTL IN102 NOT IN102 NOT logical 0 logical 1 When the reclose enable switch is closed input IN102 is energized ...

Page 233: ...l port using the command SET T View these settings using the serial port command SHO T see Section 9 Setting the Relay and Section 10 Serial Port Communications and Commands Local Control Switch Types Configure any local control switch as one of the following three switch types ON OFF Switch Local bit LBn is in either the ON LBn logical 1 or OFF LBn logical 0 position Table 7 1 Correspondence Betw...

Page 234: ...ical 1 position for one processing interval 1 4 cycle Figure 7 6 Local Control Switch Configured as an ON OFF MOMENTARY Switch Disable local control switches by nulling out all the label settings for that switch see Section 9 Setting the Relay The local bit associated with this disabled local control switch is then fixed at logical 0 Logical 1 LBn n 1 through 16 ON Position OFF Position Logical 0 ...

Page 235: ...ng relay to lockout for a manual trip see Section 6 Close and Reclose Logic 79DTL LB3 Figure 7 8 Configured Manual Close Switch Drives Local Bit LB4 Local bit LB4 is set to close the circuit breaker in the following SELOGIC control equation setting CL LB4 SELOGIC control equation setting CL is for close conditions other than automatic reclosing or serial port CLOSE command see Figure 6 1 Local Bit...

Page 236: ...ed to logical 0 when power is restored This feature makes the local bit feature behave the same as a traditional installation with panel mounted control switches If power is lost to the panel the front panel control switch positions remain unchanged If a local bit is routed to a programmable output contact and control power is lost the state of the local bit is stored in nonvolatile memory but the...

Page 237: ...ome back in the OFF position corresponding remote bit is deasserted to logical 0 when power is restored to the relay Remote Bit States Retained When Settings Changed or Active Setting Group Changed The state of each remote bit Relay Word bits RB1 RB16 is retained if relay settings are changed for the active setting group or one of the other setting groups or the active setting group is changed If ...

Page 238: ...t with the CON 3 command and PRB 3 subcommand will change RB3 to a logical 1 for one processing interval and then return it to a logical 0 In this situation the RB3 rising edge operator will also assert for one processing interval followed by the RB3 falling edge operator one processing interval later If RB3 is initially at logical 1 instead pulsing it with the CON 3 command and PRB 3 subcommand w...

Page 239: ... latching relay output contact Often the external contacts wired to the latching relay inputs are from remote control equipment e g SCADA RTU Figure 7 10 Traditional Latching Relay The sixteen 16 latch control switches in the SEL 351A provide latching relay type functions Figure 7 11 Latch Control Switches Drive Latch Bits LT1 LT16 The output of the latch control switch in Figure 7 11 is a Relay W...

Page 240: ...ntact is not maintained just pulsed to enable disable the reclosing relay Figure 7 12 SCADA Contact Pulses Input IN104 to Enable Disable Reclosing Relay If the reclosing relay is enabled and the SCADA contact is pulsed the reclosing relay is then disabled If the SCADA contact is pulsed again the reclosing relay is enabled again The control operates in a cyclic manner pulse to enable pulse to disab...

Page 241: ...ndividual assertion of input IN104 should only change the state of the latch control switch once e g latch bit LT1 changes state from logical 0 to logical 1 For example in Figure 7 13 if LT1 logical 0 input IN104 is routed to setting SET1 as discussed previously SET1 IN104 rising edge of input IN104 If input IN104 is then asserted for a few cycles by the SCADA contact see Pulse 1 in Figure 7 14 SE...

Page 242: ...e serial port See Figure 7 9 and Section 10 Serial Port Communications and Commands for more information on remote bits These are just a few control logic examples many variations are possible Latch Control Switch States Retained Power Loss The states of the latch bits LT1 LT16 are retained if power to the relay is lost and then restored If a latch bit is asserted e g LT2 logical 1 when power is l...

Page 243: ...ight after a settings group change using SELOGIC control equation setting RSTn n 1 16 Relay Word bits SG1 SG6 indicate the active setting Group 1 6 respectively see Table 7 3 For example when setting Group 4 becomes the active setting group latch bit LT2 should be reset Make the following SELOGIC control equation settings in setting Group 4 SV7 SG4 RST2 SV7T NOT SV7T Figure 7 15 Time Line for Rese...

Page 244: ... enable disable example application Figure 7 13 and Figure 7 14 the SCADA contact cannot be asserting deasserting continuously thus causing latch bit LT1 to change state continuously Note that the rising edge operators in the SET1 and RST1 settings keep latch bit LT1 from cyclically operating for any single assertion of the SCADA contact Another variation to the example application in Figure 7 13 ...

Page 245: ...ol Switches Figure 7 17 Latch Control Switch With Time Delay Feedback Operation Time Line RST1 IN104 SV6T IN104 IN104 SET1 IN104 SV6T Rising Edge One Processing Interval SV6DO SV6PU Pulse 1 Pulse 2 Pulse 3 Pulse 4 Rising Edge Rising Edge No Effect No Effect Rising Edge SV6 LT1 SV6T Courtesy of NationalSwitchgear com ...

Page 246: ...ettings SS1 SS6 have priority over the serial port GROUP command and the front panel GROUP pushbutton in selecting the active setting group Operation of SELOGIC Control Equation Settings SS1 SS6 Each setting group has its own set of SELOGIC control equation settings SS1 SS6 Table 7 3 Definitions for Active Setting Group Indication Relay Word Bits SG1 Through SG6 Relay Word Bit Definition SG1 Indic...

Page 247: ... front panel GROUP pushbutton can be used to switch the active setting group See Section 10 Serial Port Communications and Commands for more information on the serial port GROUP command See Section 11 Front Panel Interface Only on Models With LCD for more information on the front panel GROUP pushbutton Relay Disabled Momentarily During Active Setting Group Change The relay is disabled for a few se...

Page 248: ...in the SELOGIC control equation settings in Table 7 5 SELOGIC control equation timer input setting SV8 in Table 7 5 has logic output SV8T shown in operation in Figure 7 19 for both setting Groups 1 and 4 Figure 7 19 SELOGIC Control Equation Variable Timer SV8T Used in Setting Group Switching Table 7 5 SELOGIC Control Equation Settings for Switching Active Setting Group Between Setting Groups 1 and...

Page 249: ...ng SS4 Optoisolated input IN105 also has its own built in debounce timer IN105D available see Figure 7 1 Note that Figure 7 20 shows both setting Group 1 and setting Group 4 settings The setting Group 1 settings top of Figure 7 20 are enabled only when setting Group 1 is the active setting group and likewise for the setting Group 4 settings at the bottom of the figure Setting Group 4 is now the ac...

Page 250: ...7 6 The SEL 351A can be programmed to operate similarly Use three optoisolated inputs to switch between the six setting groups in the SEL 351A In this example optoisolated inputs IN101 IN102 and IN103 on the relay are connected to a rotating selector switch in Figure 7 21 TGR SV8PU SV8PU 4 1 SV8 SG1 TGR 1 SV8 SG4 SV8T SS1 IN105 SV8T Active Setting Group SV8T SS4 IN105 SV8T Setting Group 1 IN105 Se...

Page 251: ...ition 3 in Figure 7 21 setting Group 3 is the active setting group Relay Word bit SG3 logical 1 Inputs IN101 and IN102 are energized and IN103 is de energized SS3 IN103 IN102 IN101 NOT IN103 IN102 IN101 NOT logical 0 logical 1 logical 1 logical 1 To get from the position 3 to position 5 on the selector switch the switch passes through the position 4 The switch is only briefly in position 4 SS4 IN1...

Page 252: ...ergized and IN102 is de energized SS5 IN103 IN102 IN101 IN103 NOT IN102 IN101 logical 1 NOT logical 0 logical 1 logical 1 To get from position 5 to position REMOTE on the selector switch the switch passes through the positions 4 3 2 and 1 The switch is only briefly in the these positions but not long enough to be qualified by time setting TGR to change the active setting group to any one of these ...

Page 253: ...gs Change If individual settings are changed for the active setting group or one of the other setting groups the active setting group is retained much like in the Power Loss explanation If individual settings are changed for a setting group other than the active setting group there is no interruption of the active setting group the relay is not momentarily disabled If the individual settings chang...

Page 254: ... result in an EEPROM self test failure An average of 1 setting group change per day can be made for a 25 year relay service life This requires that SELOGIC control equation settings SS1 SS6 see Table 7 4 be set with care Settings SS1 SS6 cannot result in continuous cyclical changing of the active setting group Time setting TGR qualifies settings SS1 SS6 before changing the active setting group If ...

Page 255: ...ng range of a little over 4 5 hours 0 00 999999 00 cycles in 0 25 cycle increments Timers SV7T SV16T in Figure 7 24 have a setting range of almost 4 5 minutes 0 00 16000 00 cycles in 0 25 cycle increments These timer setting ranges apply to both pickup and dropout times SVnPU and SVnDO n 1 16 Figure 7 23 SELOGIC Control Equation Variables Timers SV1 SV1T SV6 SV6T SV1T SV1 SV1 SV2 SV2T SV2 SV3 SV3T...

Page 256: ...r a 2 cycle dropout SV1DO 2 cycles The output of the timer Relay Word bit SV1T operates output contact OUT103 OUT103 SV1T Additional Settings Example 1 Another application idea is dedicated breaker failure protection see Figure 7 25 SV6 IN101 breaker failure initiate SV7 SV7 IN101 50P1 50N1 OUT101 SV6T retrip OUT102 SV7T breaker failure trip SV7T SV7 SV7 SV7PU SV7D0 SV8 SV8T SV8 SV8PU SV8D0 SV9 SV...

Page 257: ...opout Note that Figure 7 25 suggests the option of having output contacts OUT103 and OUT104 operate as additional breaker failure trip outputs This is done by making the following SELOGIC control equation settings OUT103 SV7T breaker failure trip OUT104 SV7T breaker failure trip Additional Settings Example 2 The seal in logic circuit in the dedicated breaker failure scheme in Figure 7 25 can be re...

Page 258: ...ower is lost to the relay settings are changed for the active setting group or the active setting group is changed the seal in logic circuit is broken by virtue of Relay Word bit SV7 being reset to logical 0 assuming input IN101 is not asserted Relay Word bit SV7T is also reset to logical 0 and timer settings SV7PU and SV7DO load up again Courtesy of NationalSwitchgear com ...

Page 259: ...failure trip see SELOGIC Control Equation Variables Timers on page 7 27 OUT104 0 output contact OUT104 not used set equal to zero OUT107 0 output contact OUT107 not used set equal to zero Operation of Output Contacts for Different Output Contact Types Output Contacts OUT101 OUT107 Refer to Figure 7 26 The execution of the serial port command PULSE n n OUT101 OUT107 asserts the corresponding Relay ...

Page 260: ...n when the output contact coil is de energized and closed when the output contact coil is energized A b type output contact is closed when the output contact coil is de energized and open when the output contact coil is energized To verify ALARM output contact mechanical integrity execute the serial port command PULSE ALARM Execution of this command momentarily de energizes the ALARM output contac...

Page 261: ...T101 a De energized Logical 0 OUT101 OUT101 PULSE OUT101 Output Contact Coil States SELOGIC Control Equations Settings Relay Word Bits Example Relay Word Bits States Serial Port Commands see q Output Contacts and example contact types see w Output Contact Terminal States Closed OUT102 a Energized Logical 1 OUT102 OUT102 PULSE OUT102 Open OUT103 a De energized Logical 0 OUT103 OUT103 PULSE OUT103 O...

Page 262: ...g Figure 7 27 Traditional Panel Light Installations Note that Figure 7 27 corresponds to Figure 7 2 factory input settings example Reclosing Relay Status Indication In Figure 7 27 the 79 ENABLED panel light illuminates when the 79 Enable switch is closed When the 79 Enable switch is open the 79 ENABLED panel light extinguishes and it is understood that the reclosing relay is disabled Circuit Break...

Page 263: ...t settings are displayed on the SEL 351A front panel display on a time variable rotation using Global setting SCROLD see Rotating Default Display on page 11 12 for more specific operation information The following factory settings examples use Relay Word bits 52A and IN102 in the display points settings Local bits LB1 LB16 latch bits LT1 LT16 remote bits RB1 RB16 setting group indicators SG1 SG6 a...

Page 264: ... 0 This results in the display of corresponding text setting DP1_0 on the front panel display Circuit Breaker Status Indication Make SELOGIC control equation display point setting DP2 and 52A 52A IN101 see Figure 7 2 DP2 52A Make corresponding complementary text settings DP2_1 BREAKER CLOSED DP2_0 BREAKER OPEN Display point setting DP2 controls the display of the text settings Circuit Breaker Clos...

Page 265: ...eaker open condition make the following settings 52A IN101 52a circuit breaker auxiliary contact connected to input IN101 see Figure 7 28 DP2 52A DP2_1 BREAKER CLOSED displays when DP2 logical 1 DP2_0 blank Circuit Breaker Closed In Figure 7 28 optoisolated input IN101 is energized when the 52a circuit breaker auxiliary contact is closed resulting in 52A IN101 logical 1 DP2 52A logical 1 This resu...

Page 266: ...hen DP5 logical 0 This results in the continual display of text setting DP5_0 on the front panel display Active Setting Group Switching Considerations The SELOGIC control equation display point settings DPn n 1 16 are available separately in each setting group The corresponding text settings DPn_1 and DPn_0 are made only once and used in all setting groups Refer to Figure 7 28 and the following ex...

Page 267: ...IN102 has no control over the reclosing relay The text settings cannot be changed they are used in all setting groups but the SELOGIC control equation settings can be changed SELOGIC control equation settings 79DTL 1 set directly to logical 1 reclosing relay permanently driven to lockout DP1 0 set directly to logical 0 Text settings remain the same for all setting groups DP1_1 79 ENABLED displayed...

Page 268: ...ding DPn_0 value to permanently rotate in the display the mnemonics in the DPn_0 settings indicate the value displayed per Table 7 8 then The Rotating Default Display on page 11 12 explains pictorially which display setting is displayed DPn_0 or DPn_1 depending on the logic state logical 0 or 1 of corresponding logic setting DPn Values Displayed for Incorrect Settings If the display point setting ...

Page 269: ...lue in Table 7 8 is shown generically as in this example Magnitudes less than 10 display with three digits behind the decimal point Magnitudes greater than or equal to 10 display with two or fewer digits behind the decimal point IAPK IBPJ IA x xxxA yyy IA 8 372A 0 IA 52 37A 0 IB 635 8A 120 IC 1173A 120 Table 7 8 Mnemonic Settings for Metering on the Rotating Default Display Sheet 1 of 4 Mnemonic D...

Page 270: ... y º VBC input voltage VCA V C A x x x x k V _ y y y º VCA input voltage IADEM I A D E M x x x x x IA demand current IAPK I A P E A K x x x x x IA peak demand current IBDEM I B D E M x x x x x IB demand current IBPK I B P E A K x x x x x IB peak demand current ICDEM I C D E M x x x x x IC demand current ICPK I C P E A K x x x x x IC peak demand current INDEM I N D E M x x x x x IN demand current I...

Page 271: ...RAPOa M V R A O P K x x x x A phase peak demand megavars out MVRBDOa M V R B O D E M x x x x B phase demand megavars out MVRBPOa M V R B O P K x x x x B phase peak demand megavars out MVRCDOa M V R C O D E M x x x x C phase demand megavars out MVRCPOa M V R C O P K x x x x C phase peak demand megavars out MVR3DO M V R 3 O D E M x x x x three phase demand megavars out MVR3PO M V R 3 O P K x x x x t...

Page 272: ...display to show breaker wear monitor quantities automatically on the rotating default display This example will set the EXTTR INTTR INTIA EXTIA and WEARA to display in the rotating default display Set the following MVRH3I M V A R h 3 I x x x x x three phase megavar hours in MVRH3O M V A R h 3 O x x x x x three phase megavar hours out a Delta connected relays do not respond to VA VB VC 3V0 MWA MWB ...

Page 273: ...t first enter the two character sequence double colon followed by the name of the desired time overcurrent element pickup setting e g 51PP 51AP 51BP 51CP 51NP 51GP 51G2P or 51QP EXT TRIPS XXXXX INT TRIPS XXXXX INT IA XXXXXX kA EXT IA XXXXXX kA WEAR A XXX Table 7 9 Mnemonic Settings for Breaker Wear Monitor Values on the Rotating Default Display Mnemonic Display Description BRKDAT R S T D A T m m d...

Page 274: ...rent Elements that rotate on the default display subject to the number of available display points Displaying Time Overcurrent Elements Example This example demonstrates use of the rotating display to show time overcurrent elements in primary units This example will set the 51PP and 51NP to display in the rotating default display Set the following Setting DPn 0 and using the DPn_0 in the text sett...

Page 275: ...a display point number from 1 16 j either 1 or 0 logic high or low XXX an optional pre label consisting of any characters that you want to add for labeling the setting value signifies an optional for the control string to make more characters available for labeling purposes The label character count is the sum of the characters used in the pre and post labels For example three characters at the be...

Page 276: ...N D P U and two post characters B 1 The maximum number of label characters is six so the B1 will be ignored The relay setting to be displayed is 51GP as indicated after the control string SET T DP2_0 N SEQ 51QP A The characters for DP2_0 consist of six pre characters N S E Q and one post character A The A will be ignored The relay setting to be displayed is 51QP as indicated after the control stri...

Page 277: ...characters followed by the setting values The post character s A in this case are ignored Examples With xxx Control Strings Use the control string to decrease the display resolution and make more characters available for labeling purposes Use the table above to determine the appropriate numerical setting variable The following setting example allows 9 characters of label text SET L DP1 IN101 SET L...

Page 278: ...This page intentionally left blank Courtesy of NationalSwitchgear com ...

Page 279: ...C Battery Monitor Not in SEL 351A 1 on page 8 15 In addition to instantaneous metering the SEL 351A metering functions include Demand Metering on page 8 20 Energy Metering on page 8 28 Maximum Minimum Metering on page 8 29 Small Signal Cutoff for Metering on page 8 31 Synchrophasor Metering on page 8 32 This section explains these functions in detail Courtesy of NationalSwitchgear com ...

Page 280: ...e of breaker maintenance information for a 25 kV circuit breaker The breaker maintenance information in Table 8 1 is plotted in Figure 8 1 Connect the plotted points in Figure 8 1 for a breaker maintenance curve To estimate this breaker maintenance curve in the SEL 351A breaker monitor three set points are entered Set Point 1 maximum number of close open operations with corresponding current inter...

Page 281: ...Breaker Monitor Figure 8 1 Plotted Breaker Maintenance Points for a 25 kV Circuit Breaker 10 000 1000 2 3 4 5 6 7 8 9 100 2 3 4 5 6 7 8 9 10 2 3 4 5 6 7 8 9 1 2 3 4 5 6 7 8 9 50 40 30 20 10 5 Number of Close Open Operations kA Interrupted per Operation Courtesy of NationalSwitchgear com ...

Page 282: ...intenance point in the breaker maintenance information in Table 8 1 and Figure 8 1 but it does not have to be Set point KASP2 COSP2 should be set to provide the best curve fit with the plotted breaker maintenance points in Figure 8 1 Each phase A B and C has its own breaker maintenance curve like that in Figure 8 2 because the separate circuit breaker interrupting contacts for phases A B and C do ...

Page 283: ... levels off horizontally below set point KASP1 COSP1 This is the close open operation limit of the circuit breaker COSP1 10000 regardless of interrupted current value 10 000 100 1000 2 3 4 5 6 7 8 9 100 2 3 4 5 6 7 8 9 10 2 3 4 5 6 7 8 9 1 2 3 4 5 6 7 8 9 50 40 30 20 10 5 Number of Close Open Operations kA Interrupted per Operation KASP1 1 2 COSP1 10000 KASP2 8 0 COSP2 150 KASP3 20 0 COSP3 12 Cour...

Page 284: ... to the breaker monitor maintenance curve and the breaker monitor accumulated currents trips As detailed in Figure 8 3 the breaker monitor actually reads in the current values 1 5 cycles after the assertion of BKMON This helps especially if an instantaneous trip occurs The instantaneous element trips when the fault current reaches its pickup setting level The fault current may still be climbing to...

Page 285: ...100 percent curve 25 Percent to 50 Percent Breaker Wear Refer to Figure 8 6 The current value changes from 2 5 kA to 12 0 kA 12 0 kA is interrupted 11 times 11 close open operations 24 13 pushing the breaker maintenance curve from the 25 percent wear level to the 50 percent wear level Compare the 100 percent and 50 percent curves and note that for a given current value the 50 percent curve has onl...

Page 286: ...ering Breaker Monitor Figure 8 4 Breaker Monitor Accumulates 10 Percent Wear 10 000 100 10 1000 2 3 4 5 6 7 8 9 100 2 3 4 5 6 7 8 9 10 2 3 4 5 6 7 8 9 1 2 3 4 5 6 7 8 9 50 40 30 20 10 5 Number of Close Open Operations kA Interrupted per Operation Courtesy of NationalSwitchgear com ...

Page 287: ...ring Breaker Monitor Figure 8 5 Breaker Monitor Accumulates 25 Percent Wear 10 000 100 10 1000 2 3 4 5 6 7 8 9 100 2 3 4 5 6 7 8 9 10 2 3 4 5 6 7 8 9 1 2 3 4 5 6 7 8 9 50 40 30 20 10 5 Number of Close Open Operations kA Interrupted per Operation 25 Courtesy of NationalSwitchgear com ...

Page 288: ...ring Breaker Monitor Figure 8 6 Breaker Monitor Accumulates 50 Percent Wear 10 000 100 1000 2 3 4 5 6 7 8 9 100 2 3 4 5 6 7 8 9 10 2 3 4 5 6 7 8 9 1 2 3 4 5 6 7 8 9 50 40 30 20 10 5 Number of Close Open Operations kA Interrupted per Operation 25 50 Courtesy of NationalSwitchgear com ...

Page 289: ...cumulates 100 Percent Wear Additionally logic outputs assert for alarm or other control applications See the following discussion 10 000 100 1000 2 3 4 5 6 7 8 9 100 2 3 4 5 6 7 8 9 10 2 3 4 5 6 7 8 9 1 2 3 4 5 6 7 8 9 50 40 30 20 10 5 Number of Close Open Operations kA Interrupted per Operation 50 Courtesy of NationalSwitchgear com ...

Page 290: ...rnally initiated trips Percent circuit breaker contact wear for each phase Date when the preceding items were last reset via the BRE R command See BRE n Command Preload Reset Breaker Wear on page 10 33 The BRE W command allows the trip counters accumulated values and percent breaker wear to be preloaded for each individual phase The BRE R command resets the accumulated values and the percent wear ...

Page 291: ... 1 If TRIP is asserted TRIP logical 1 the current and trip count information is accumulated under relay initiated trips Rly Trips If TRIP is deasserted TRIP logical 0 the current and trip count information is accumulated under externally initiated trips Ext Trips Regardless of whether the current and trip count information is accumulated under relay initiated trips or externally initiated trips th...

Page 292: ...newly asserted input IN106 energized the TRIP Relay Word bit is asserted Thus the current and trip count information is accumulated under relay initiated trips Rly Trips If the control switch trip or some other external trip asserts energizing the trip bus the breaker monitor will deem it an externally initiated trip This is because when BKMON is newly asserted input IN106 energized the TRIP Relay...

Page 293: ...s range allows the SEL 351A to monitor nominal battery voltages of 24 48 110 125 220 and 250 V When testing the pickup settings DCLOP and DCHIP do not operate the SEL 351A outside of its power supply limits See Power Supply on page 1 10 for the various power supply specifications The power supply rating is located on the serial number sticker on the relay rear panel Figure 8 9 DC Under and Overvol...

Page 294: ...tacts deassert on total loss of power Thus the resultant dc voltage element at the bottom of Figure 8 10 would probably be a better choice See following discussion DCLO DCHI Bottom of Figure 8 10 Output contact OUT106 asserts when DCHIP Vdc DCLOP Pickup settings DCLOP and DCHIP are set such that output contact OUT106 asserts when dc battery voltage stays between allowable limits If the relay loses...

Page 295: ...type output contact Additional Application Other than alarming the dc voltage elements can be used to disable reclosing For example if the station dc batteries have a problem and the station dc battery voltage is declining drive the reclosing relay to lockout 79DTL SV4T NOT SV4T Timer output SV4T is from the bottom of Figure 8 10 When dc voltage falls below pickup DCHIP timer output SV4T drops out...

Page 296: ...n column Vdc in the event report Station DC Battery Voltage Dips During Circuit Breaker Closing To generate an event report when the SEL 351A closes the circuit breaker make the SELOGIC control equation event report generation setting ER OUT102 In this example output contact OUT102 is set to close OUT102 CLOSE CLOSE is the logic output of Figure 6 1 Anytime output contact OUT102 closes and energiz...

Page 297: ...en powering the relay with ac voltage the dc voltage elements in Figure 8 9 see the average of the sampled ac voltage powering the relay which is very near zero volts as displayed in column Vdc in event reports Thus pickup settings DCLOP and DCHIP should be set off DCLOP OFF DCHIP OFF They are of no real use If a raw event report is displayed with the EVE R command column Vdc will display the samp...

Page 298: ...lues are thermal demand or rolling demand values The differences between thermal and rolling demand metering are explained in the following discussion Comparison of Thermal and Rolling Demand Meters The example in Figure 8 11 shows the response of thermal and rolling demand meters to a step current input The current input is at a magnitude of zero and then suddenly goes to an instantaneous level o...

Page 299: ...l demand meter in Figure 8 11 middle to the step current input top is analogous to the series RC circuit in Figure 8 12 Thermal Demand Meter Response EDEM THM Thermal Demand Current per unit 0 0 5 10 15 0 5 0 9 1 0 Time Minutes Rolling Demand Meter Response EDEM ROL Rolling Demand Current per unit DMTC 15 minutes 0 0 5 10 15 33 67 1 0 Time Minutes Step Current Input Instantaneous Current per unit ...

Page 300: ...fter a time period equal to setting DMTC 15 minutes referenced to when the step current input is first applied The SEL 351A updates thermal demand values approximately every two seconds Rolling Demand Meter Response EDEM ROL The response of the rolling demand meter in Figure 8 11 bottom to the step current input top is calculated with a sliding time window arithmetic average calculation The width ...

Page 301: ...e window at Time 10 minutes each integrate into the following 5 minute totals Rolling demand meter response at Time 10 minutes 2 0 3 0 67 per unit Time 15 Minutes The three 5 minute intervals in the sliding time window at Time 15 minutes each integrate into the following 5 minute totals 5 Minute Totals Corresponding 5 Minute Interval 0 0 per unit 15 to 10 minutes 0 0 per unit 10 to 5 minutes 0 0 p...

Page 302: ...ettings from Table 8 3 pertinent residual ground overcurrent element settings and SELOGIC control equation torque control setting 51GTC EDEM THM DMTC 5 GDEMP 1 0 51GP 1 50 50G5P 2 30 51GTC GDEM GDEM 50G5 Refer to Figure 8 13 Figure 8 14 and Figure 3 19 Table 8 3 Demand Meter Settings and Settings Range Setting Definition Range EDEM Demand meter type THM thermal ROL rolling DMTC Demand meter time c...

Page 303: ...C DEM IN DEM Demand Currents Instantaneous Currents Serial Port Command Demand Function Maximum Phase Demand Current Thermal EDEM THM or Rolling EDEM ROL Reset Demand Reset Demand Thermal EDEM THM or Rolling EDEM ROL NDEM NDEMP PDEMP IN Demand Function IG DEM Reset Demand Thermal EDEM THM or Rolling EDEM ROL GDEM GDEMP IG residual Demand Function 3I2 DEM Reset Demand Thermal EDEM THM or Rolling ED...

Page 304: ...dual Ground Demand Current Goes Above Pickup GDEMP When unbalance current IG increases unbalance demand current IG DEM follows going above corresponding demand pickup GDEMP 1 00 A secondary and Relay Word bit GDEM asserts to logical 1 This results in SELOGIC control equation torque control setting 51GTC being in the state 51GTC GDEM GDEM 50G5 NOT GDEM GDEM 50G5 NOT logical 1 logical 1 50G5 logical...

Page 305: ...nel METER pushbutton See Figure 11 2 Demand Metering Updating and Storage The SEL 351A updates demand values approximately every two seconds The relay stores peak demand values to nonvolatile storage once per day it overwrites the previous stored value if it is exceeded Should it lose control power the relay will restore the peak demand values it saved at 23 50 hours on the previous day Demand met...

Page 306: ...vailable via the front panel METER pushbutton See Figure 11 2 Energy Metering Updating and Storage The SEL 351A updates energy values approximately every two seconds The relay stores energy values to nonvolatile storage once per day it overwrites the previous stored value Should it lose control power the relay will restore the energy values saved by it at 23 50 hours on the previous day Accumulate...

Page 307: ... via the front panel METER pushbutton See Figure 11 2 Maximum Minimum Metering Update and Storage The maximum minimum metering function is intended to reflect normal load variations rather than fault conditions or outages Therefore the SEL 351A updates maximum minimum values only if SELOGIC control equation setting FAULT is deasserted logical 0 and has been deasserted for at least 3600 cycles Curr...

Page 308: ...alue is above the previous maximum or below the previous minimum for approximately four seconds The SEL 351A stores maximum minimum values to nonvolatile storage once per day and overwrites the previous stored value if that is exceeded If the relay loses control power it will restore the maximum minimum values saved at 23 50 hours on the previous day NOTE SELOGIC control equation setting FAULT als...

Page 309: ...neous energy accumulation These thresholds affect the metering functions for power and energy on a per phase basis For example if a load side single phase disconnect is open on C phase the relay will force the IC metering value to 0 00 and the resulting power and energy values for C phase will be 0 00 In this example the A phase and B phase values are still calculated provided the current and volt...

Page 310: ...rophasor Metering Information Via Serial Port See MET Command Metering Data on page 10 20 The MET PM command displays the Synchrophasor measurements For more information see View Synchrophasors by Using the MET PM Command on page L 12 Courtesy of NationalSwitchgear com ...

Page 311: ...roup settings SET SET 1 SET 6 logic settings SET L SET L 1 SET L 6 and report settings SET R will be lost and will need to be re entered The relay will provide two confirmation prompts prior to accepting a change to either PTCONN or VSCONN See Delta Connected Voltages Global setting PTCONN DELTA on page 2 14 and Broken Delta VS Connection Global setting VSCONN 3V0 on page 2 15 Table 9 1 Serial Por...

Page 312: ...ation on serial port communications and relay access levels The SET commands in Table 9 1 operate at Access Level 2 screen prompt To change a specific setting enter the command SET n m s TERSE When you issue the SET command the relay presents a list of settings one at a time Enter a new setting or press Enter to accept the existing setting Editing keystrokes are shown in Table 9 2 where n L G R T ...

Page 313: ...e it saves the new settings The ALARM contact closes momentarily for b contact opens for an a see Figure 7 26 and the EN LED extinguishes see Table 5 1 while the relay is disabled The relay is disabled for about one second If Logic settings are changed for the active group the relay can be disabled for up to 15 seconds If changes are made to the Relay or Logic settings for a setting group other th...

Page 314: ...kup current for operating time Tp M 1 for reset time TR M 1 Table 9 3 Equations Associated With U S Curves Curve Type Operating Time Reset Time Figure U1 Moderately Inverse Figure 9 1 U2 Inverse Figure 9 2 U3 Very Inverse Figure 9 3 U4 Extremely Inverse Figure 9 4 U5 Short Time Inverse Figure 9 5 Table 9 4 Equations Associated With IEC Curves Sheet 1 of 2 Curve Type Operating Time Reset Time Figur...

Page 315: ...rcurrent Curves C4 Long Time Inverse Figure 9 9 C5 Short Time Inverse Figure 9 10 Table 9 4 Equations Associated With IEC Curves Sheet 2 of 2 Curve Type Operating Time Reset Time Figure Tp TD 120 M 1 TR TD 120 1 M Tp TD 0 05 M 0 04 1 TR TD 4 85 1 M 2 Courtesy of NationalSwitchgear com ...

Page 316: ... 2 00 1 00 15 00 12 00 10 00 8 00 01 5 6 7 8 9 1 02 03 04 05 09 07 06 08 1 2 3 4 5 7 6 9 8 1 4 2 3 5 6 7 8 9 10 40 20 30 70 50 60 80 90 100 80 10 2 3 6 4 5 7 9 8 20 50 30 40 60 70 100 90 Time in Seconds Multiples of Pickup Time in Cycles 60 Hz 50Hz 3 2 5 6 5 15 12 5 30 25 60 50 600 500 150 125 300 250 1500 1250 3000 2500 6000 5000 Courtesy of NationalSwitchgear com ...

Page 317: ... 1 00 15 00 12 00 10 00 8 00 01 5 6 7 8 9 1 02 03 04 05 09 07 06 08 1 2 3 4 5 7 6 9 8 1 4 2 3 5 6 7 8 9 10 40 20 30 70 50 60 80 90 100 80 10 2 3 6 4 5 7 9 8 20 50 30 40 60 70 100 90 Time in Seconds Multiples of Pickup Time in Cycles 60 Hz 50Hz 3 2 5 6 5 15 12 5 30 25 60 50 600 500 150 125 300 250 1500 1250 3000 2500 6000 5000 Courtesy of NationalSwitchgear com ...

Page 318: ...6 00 5 00 4 00 3 00 2 00 15 00 01 5 6 7 8 9 1 02 03 04 05 09 07 06 08 1 2 3 4 5 7 6 9 8 1 4 2 3 5 6 7 8 9 10 40 20 30 70 50 60 80 90 100 80 10 2 3 6 4 5 7 9 8 20 50 30 40 60 70 100 90 Time in Seconds Multiples of Pickup Time in Cycles 60 Hz 50Hz 3 2 5 6 5 15 12 5 30 25 60 50 600 500 150 125 300 250 1500 1250 3000 2500 6000 5000 Courtesy of NationalSwitchgear com ...

Page 319: ...0 12 00 10 00 8 00 6 00 5 00 4 00 01 5 6 7 8 9 1 02 03 04 05 09 07 06 08 1 2 3 4 5 7 6 9 8 1 4 2 3 5 6 7 8 9 10 40 20 30 70 50 60 80 90 100 80 10 2 3 6 4 5 7 9 8 20 50 30 40 60 70 100 90 Time in Seconds Multiples of Pickup Time in Cycles 60 Hz 50Hz 3 2 5 6 5 15 12 5 30 25 60 50 600 500 150 125 300 250 1500 1250 3000 2500 6000 5000 Courtesy of NationalSwitchgear com ...

Page 320: ...0 4 00 5 00 10 00 8 00 12 00 15 00 01 5 6 7 8 1 9 02 03 04 05 06 07 1 08 09 2 3 4 5 6 1 7 8 9 2 3 4 5 6 7 8 10 9 20 30 50 40 60 100 90 70 80 80 9 2 3 4 5 6 7 8 10 20 30 40 50 60 70 90 100 Time in Seconds Multiples of Pickup Time in Cycles 60 Hz 50Hz 3 2 5 6 5 15 12 5 60 50 30 25 150 125 300 250 1500 1250 600 500 3000 2500 6000 5000 Courtesy of NationalSwitchgear com ...

Page 321: ...0 0 30 0 20 0 10 1 00 0 90 0 80 0 70 01 5 6 7 8 9 1 02 03 04 05 09 07 06 08 1 2 3 4 5 7 6 9 8 1 4 2 3 5 6 7 8 9 10 40 20 30 70 50 60 80 90 100 80 10 2 3 6 4 5 7 9 8 20 50 30 40 60 70 100 90 Time in Seconds Multiples of Pickup Time in Cycles 60 Hz 50Hz 3 2 5 6 5 15 12 5 30 25 60 50 600 500 150 125 300 250 1500 1250 3000 2500 6000 5000 Courtesy of NationalSwitchgear com ...

Page 322: ...1 00 0 90 0 80 0 70 0 60 0 50 0 40 01 5 6 7 8 9 1 02 03 04 05 09 07 06 08 1 2 3 4 5 7 6 9 8 1 4 2 3 5 6 7 8 9 10 40 20 30 70 50 60 80 90 100 80 10 2 3 6 4 5 7 9 8 20 50 30 40 60 70 100 90 Time in Seconds Multiples of Pickup Time in Cycles 60 Hz 50Hz 3 2 5 6 5 15 12 5 30 25 60 50 600 500 150 125 300 250 1500 1250 3000 2500 6000 5000 Courtesy of NationalSwitchgear com ...

Page 323: ... 03 04 05 09 07 06 08 1 2 3 4 5 7 6 9 8 1 4 2 3 5 6 7 8 9 10 40 20 30 70 50 60 80 90 100 80 10 2 3 6 4 5 7 9 8 20 50 30 40 60 70 100 90 0 20 0 10 0 05 1 00 0 90 0 80 0 70 0 60 0 50 0 40 0 30 Time in Seconds Multiples of Pickup Time in Cycles 60 Hz 50Hz 3 2 5 6 5 15 12 5 30 25 60 50 600 500 150 125 300 250 1500 1250 3000 2500 6000 5000 Courtesy of NationalSwitchgear com ...

Page 324: ...0 60 0 50 0 40 0 30 7 6 5 1 9 8 1 4 2 3 5 6 8 7 9 1 2 3 4 5 7 6 4 2 3 7 6 5 10 9 8 40 20 30 70 50 60 80 90 100 50 9 8 10 20 30 40 300 200 100 80 60 70 90 1000 900 800 700 600 500 400 Time in Seconds Multiples of Pickup Time in Cycles 60 Hz 50Hz 30 25 60 50 150 125 300 250 3000 2500 600 500 1500 1250 6000 5000 15000 12500 30000 25000 60000 50000 Courtesy of NationalSwitchgear com ...

Page 325: ...80 90 100 1 2 3 4 5 6 7 8 9 1 2 3 4 5 6 7 8 9 01 02 03 04 05 06 07 08 09 100 1 2 3 4 5 6 7 8 9 5 6 7 8 9 90 80 70 60 50 40 30 20 10 Time in Seconds Time in Cycles 60 Hz 50 Hz 6000 5000 3000 2500 1500 1250 600 500 300 250 150 125 60 50 30 25 15 12 5 6 5 3 2 5 Multiples of Pickup 0 05 0 10 0 20 0 30 0 40 0 50 0 60 0 70 0 80 0 90 1 00 Courtesy of NationalSwitchgear com ...

Page 326: ...CA3 50AB4 50BC4 50CA4 5 50A 50B 50C 51A 51AT 51AR 51B 51BT 6 51BR 51C 51CT 51CR 51P 51PT 51PR 51N 7 51NT 51NR 51G 51GT 51GR 51Q 51QT 51QR 8 50P1 50P2 50P3 50P4 50N1 50N2 50N3 50N4 9 67P1a 67P2a 67P3a 67P4a 67N1a 67N2a 67N3a 67N4a 10 67P1Ta 67P2Ta 67P3Ta 67P4Ta 67N1Ta 67N2Ta 67N3Ta 67N4Ta 11 50G1 50G2 50G3 50G4 50Q1 50Q2 50Q3 50Q4 12 67G1a 67G2a 67G3a 67G4a 67Q1a 67Q2a 67Q3a 67Q4a 13 67G1Ta 67G2Ta ...

Page 327: ...c 49 c c c c c c c c 50 c c c c c c c c 51 c c c c c c c c 52 c c c c c c c c 53 c c c c c c c c 54 c c c c c c c c 55 c c c c c c c c 56 c c c c c c c c 57 c c c c c c TSOK TIRIG 58 c c c c c c c DELTA 59 27AB2 27BC2 27CA2 59AB2 59BC2 59CA2 59Q2 3V0a 60 V1GOOD c c V0GAIN INMET ICMET IBMET IAMET 61 GNDSWa e 50NFa e 50NRa e 32NEa e F32Na e R32Na e 32NFa 32NRa 62 PMDOK F32Wa e R32Wa e F32Ca e R32Ca ...

Page 328: ...ercurrent element C phase current above pickup setting 50P4P see Figure 3 1 50AB1 Level 1 AB phase to phase instantaneous overcurrent element AB phase to phase current above pickup setting 50PP1P see Figure 3 7 50BC1 Level 1 BC phase to phase instantaneous overcurrent element BC phase to phase current above pickup setting 50PP1P see Figure 3 7 50CA1 Level 1 CA phase to phase instantaneous overcurr...

Page 329: ... setting 51PP for phase time overcurrent element 51PT see Figure 3 14 Testing Control 51PT Phase time overcurrent element 51PT timed out see Figure 3 14 Tripping 51PR Phase time overcurrent element 51PT reset see Figure 3 14 Testing 51N Neutral ground current channel IN above pickup setting 51NP for neutral ground time overcurrent element 51NT see Figure 3 18 Testing Control 7 51NT Neutral ground ...

Page 330: ...re 3 3 67P4b Level 4 phase instantaneous overcurrent element derived from 50P4 see Figure 3 3 67N1b Level 1 neutral ground instantaneous overcurrent element derived from 50N1 see Figure 3 8 67N2b Level 2 neutral ground instantaneous overcurrent element derived from 50N2 see Figure 3 8 67N3b Level 3 neutral ground instantaneous overcurrent element derived from 50N3 see Figure 3 8 67N4b Level 4 neut...

Page 331: ...ound instantaneous overcurrent element derived from 50G3 see Figure 3 10 67G4b Level 4 residual ground instantaneous overcurrent element derived from 50G4 see Figure 3 10 67Q1a b Level 1 negative sequence instantaneous overcurrent element derived from 50Q1 see Figure 3 12 Testing Control 67Q2a b Level 2 negative sequence instantaneous overcurrent element derived from 50Q2 see Figure 3 12 67Q3a b L...

Page 332: ...direction residual ground overcurrent threshold exceeded see Figure 4 4 and Figure 4 7 50GRb Reverse direction residual ground overcurrent threshold exceeded see Figure 4 4 and Figure 4 7 32VEb Internal enable for zero sequence voltage polarized directional element see Figure 4 4 and Figure 4 7 32QGEb Internal enable for negative sequence voltage polarized directional ele ment for ground see Figur...

Page 333: ...l control routed to residual ground overcurrent elements see Figure 4 4 and Figure 4 15 18 27A1 A phase instantaneous undervoltage element A phase voltage below pickup setting 27P1P see Figure 3 22 Control 27B1 B phase instantaneous undervoltage element B phase voltage below pickup setting 27P1P see Figure 3 22 27C1 C phase instantaneous undervoltage element C phase voltage below pickup setting 27...

Page 334: ...se to phase voltage above pickup setting 59PP see Figure 3 23 and Figure 3 24 20 59BC BC phase to phase instantaneous overvoltage element BC phase to phase voltage above pickup setting 59PP see Figure 3 23 and Figure 3 24 59CA CA phase to phase instantaneous overvoltage element CA phase to phase voltage above pickup setting 59PP see Figure 3 23 and Figure 3 24 59N1 Zero sequence instantaneous over...

Page 335: ...setting 81D4P see Figure 3 32 81D5b Level 5 instantaneous frequency element with corresponding pickup setting 81D5P see Figure 3 32 81D6b Level 6 instantaneous frequency element with corresponding pickup setting 81D6P see Figure 3 32 27B81 Undervoltage element for frequency element blocking any phase voltage below pickup setting 27B81P see Figure 3 30 and Figure 3 31 50L Phase instantaneous overcu...

Page 336: ...it 7 asserted see Figure 7 3 LB8 Local Bit 8 asserted see Figure 7 3 26 LB9 Local Bit 9 asserted see Figure 7 3 LB10 Local Bit 10 asserted see Figure 7 3 LB11 Local Bit 11 asserted see Figure 7 3 LB12 Local Bit 12 asserted see Figure 7 3 LB13 Local Bit 13 asserted see Figure 7 3 LB14 Local Bit 14 asserted see Figure 7 3 LB15 Local Bit 15 asserted see Figure 7 3 LB16 Local Bit 16 asserted see Figur...

Page 337: ...ed see Figure 7 11 LT15 Latch Bit 15 asserted see Figure 7 11 LT16 Latch Bit 16 asserted see Figure 7 11 31 SV1 SELOGIC control equation variable timer input SV1 asserted see Figure 7 23 Testing Seal in functions etc see Figure 7 25 SV2 SELOGIC control equation variable timer input SV2 asserted see Figure 7 23 SV3 SELOGIC control equation variable timer input SV3 asserted see Figure 7 23 SV4 SELOG...

Page 338: ...ted see Figure 7 24 SV12 SELOGIC control equation variable timer input SV12 asserted see Figure 7 24 SV9T SELOGIC control equation variable timer output SV9T asserted see Figure 7 24 Control SV10T SELOGIC control equation variable timer output SV10T asserted see Figure 7 24 SV11T SELOGIC control equation variable timer output SV11T asserted see Figure 7 24 SV12T SELOGIC control equation variable t...

Page 339: ...fication logic output used in B phase targeting see Front Panel Target LEDS on page 5 10 FSC C phase fault identification logic output used in C phase targeting see Front Panel Target LEDS on page 5 10 37 BCW BCWA BCWB BCWC Indication 50P32b Three phase overcurrent threshold exceeded see Figure 4 21 Testing c 59VAb Channel VA voltage window element channel VA voltage between threshold settings 25V...

Page 340: ...gure 3 20 Tripping 51G2Rb Residual ground time overcurrent element 51G2T reset see Figure 3 20 Testing 40 ALARM ALARM output contact indicating that relay failed or PULSE ALARM command executed see Figure 7 26 OUT107 Output contact OUT107 asserted see Figure 7 26 OUT106 Output contact OUT106 asserted see Figure 7 26 OUT105 Output contact OUT105 asserted see Figure 7 26 OUT104 Output contact OUT104...

Page 341: ...rrent above pickup setting PDEMP see Figure 8 13 NDEM Neutral ground demand current above pickup setting NDEMP see Figure 8 13 GDEM Residual ground demand current above pickup setting GDEMP see Figure 8 13 QDEM Negative sequence demand current above pickup setting QDEMP see Figure 8 13 45 to 56 c Relay Word bits in rows 45 56 are not used in this version of the SEL 351 Relay Family 57 c c c c c c ...

Page 342: ...to phase voltage above pickup setting 59PP2P see Figure 3 24 59Q2 Negative sequence instantaneous overvoltage element negative sequence voltage above pickup setting 59Q2P see Figure 3 25 3V0b 3V0 configuration element asserts when global setting VSCONN 3V0 see Figure 9 11 Indication 60 V1GOOD Positive sequence overvoltage element positive sequence voltage greater than setting VNOM 0 75 wye connect...

Page 343: ...d Bits on page L 11 Synchrophasors F32Wb e Forward directional output for Petersen Coil Wattmetric element an input to F32N logic see Figure 4 4 and Figure 4 13 Control Indication R32Wb e Reverse directional output for Petersen Coil Wattmetric element an input to R32N logic see Figure 4 4 and Figure 4 13 F32Cb e Forward directional element for Petersen Coil Incremental Conductance Element see Figu...

Page 344: ... Ratios Refer to Current and Potential Transformer Ratios See Settings Explanations on page 9 34 on page SET 1 Phase and neutral current transformer ratios are set independently If neutral channel IN is connected residually with IA IB and IC then set CTR and CTRN the same Relay settings CTR and CTRN are used in relay event reports and metering functions to scale secondary current quantities into p...

Page 345: ... derived from Equation 9 1 above An SEL 351A phase instantaneous overcurrent element is to be set at 80 amps The relay will be used with a C400 400 5 current transformer with a 0 50 Ω ohm total burden The X R ratio is 20 Determine the maximum fault current for dependable operation The burden is primarily from the CT windings and external leads to the SEL 351A the SEL 351A has a negligible burden E...

Page 346: ... and VSCONN and a new group setting VNOM NOTE VSCONN is not available in the SEL 351A 1 Refer to Voltage Input Configuration See Settings for Voltage Input Configuration on page 9 36 on page SET 20 PTCONN WYE is the factory default value PTCONN DELTA if selected allows an open delta PT connection See Delta Connected Voltages Global setting PTCONN DELTA on page 2 14 for connection details When PTCO...

Page 347: ...meric setting values VNOM OFF if selected causes several relay elements and functions to be disabled or nonselectable as shown in Table 9 9 The relay interprets setting VNOM OFF as indicating that valid three phase voltages are not connected to relay terminals VA VB VC and N See Figure 2 25 for an example application that uses VNOM OFF This selection is intended to allow the remaining relay featur...

Page 348: ...metering accuracy will be reduced in conditions of system unbalance Uses a three phase power formula including VS as 3V0 primary value Quantity 3V0 in Metering Fast Meter and Distributed Network Protocol DNP No difference 3V0 is not shown in METER command Fast Meter and DNP return 3V0 0 00 kV Quantity VS in Metering Fast Meter and DNP No difference Uses VS as VS primary value Table 9 9 Main Relay ...

Page 349: ...are three PTs connected wye primary broken delta secondary with ratios of 7200 120 and a 400 250 step down instrumentation transformer in the circuit the correct PTRS setting is 60 1 6 96 00 Settings PTR and PTRS are used in event report and METER commands so that power system values can be reported in primary units Settings PTR and PTRS are also used when global setting VSCONN 3V0 to scale the me...

Page 350: ...r to Line Settings See Settings Explanations on page 9 34 on page SET 1 Line impedance settings Z1MAG Z1ANG Z0MAG and Z0ANG are used in the fault locator see Fault Location on page 12 5 and in automatically making directional element settings Z2F Z2R Z0F and Z0R see Settings Made Automatically on page 4 38 A corresponding line length setting LL is also used in the fault locator If the protected li...

Page 351: ... on page SET 2 E50P EDEM control the settings that follow through SELOGIC Control Equation Variable Timers See Figure 7 23 and Figure 7 24 on page SET 13 Enable setting EBMON in Breaker Monitor Settings See Breaker Monitor on page 8 2 on page SET 21 controls the settings that immediately follow it This helps limit the number of settings that need to be made Each setting subgroup from Phase Inst De...

Page 352: ...lay Element Setting Ranges and Accuracies on page 1 11 for information on 5 A nominal and 1 A nominal ordering options and additional 0 2 A nominal and 0 05 A nominal options for neutral channel IN and how they influence overcurrent element setting ranges Separate settings sheets are provided for SEL 351A relays SEL 351A Settings Sheets and SEL 351A 1 relays SEL 351A 1 Settings Sheets Courtesy of ...

Page 353: ...os See Settings Explanations on page 9 34 Phase IA IB IC Current Transformer Ratio 1 6000 CTR Neutral IN Current Transformer Ratio 1 10000 CTRN Phase VA VB VC wye connected or Phase to Phase VAB VBC VCA delta connected Potential Transformer Ratio 1 00 10000 00 PTR Synchronism Voltage VS Potential Transformer Ratio 1 00 10000 00 PTRS PT Nominal Voltage line to neutral wye connected or line to line ...

Page 354: ...e sequence element levels N 1 6 see Figure 3 12 and Figure 3 13 E50Q Time Overcurrent Enable Settings Phase elements N 1 2 see Table 3 1 Figure 3 14 Figure 3 15 Figure 3 16 and Figure 3 17 E51P Neutral ground elements channel IN Y N see Figure 3 18 E51N Residual ground elements N 1 2 see Figure 3 19 and Figure 3 20 E51G Negative sequence elements Y N see Figure 3 21 E51Q Other Enable Settings When...

Page 355: ...100 00 A 5 A nom 0 05 20 00 A 1 A nom 50P2P Pickup OFF 0 25 100 00 A 5 A nom 0 05 20 00 A 1 A nom 50P3P Pickup OFF 0 25 100 00 A 5 A nom 0 05 20 00 A 1 A nom 50P4P Pickup OFF 0 25 100 00 A 5 A nom 0 05 20 00 A 1 A nom 50P5P Pickup OFF 0 25 100 00 A 5 A nom 0 05 20 00 A 1 A nom 50P6P Phase Definite Time Overcurrent Elements See Figure 3 3 Number of phase element time delay settings dependent on pre...

Page 356: ... 100 000 A 5 A nom 0 050 20 000 A 1 A nom 0 005 2 500 A 0 2 A nom 0 005 1 500 A 0 05 A nom 50N3P Pickup OFF 0 250 100 000 A 5 A nom 0 050 20 000 A 1 A nom 0 005 2 500 A 0 2 A nom 0 005 1 500 A 0 05 A nom 50N4P Pickup OFF 0 250 100 000 A 5 A nom 0 050 20 000 A 1 A nom 0 005 2 500 A 0 2 A nom 0 005 1 500 A 0 05 A nom 50N5P Pickup OFF 0 250 100 000 A 5 A nom 0 050 20 000 A 1 A nom 0 005 2 500 A 0 2 A...

Page 357: ...0 Number of residual ground element time delay settings dependent on preceding enable setting E50G 1 6 all four time delay settings are enabled if E50G 4 Time delay 0 00 16000 00 cycles in 0 25 cycle steps 67G1D Time delay 0 00 16000 00 cycles in 0 25 cycle steps 67G2D Time delay 0 00 16000 00 cycles in 0 25 cycle steps 67G3D Time delay 0 00 16000 00 cycles in 0 25 cycle steps 67G4D Negative Seque...

Page 358: ...6 00 A 5 A nom 0 05 3 20 A 1 A nom 51PP Curve U1 U5 C1 C5 see Figure 9 1 Figure 9 10 51PC Time Dial 0 50 15 00 for curves U1 U5 0 05 1 00 for curves C1 C5 51PTD Electromechanical Reset Y N 51PRS A Phase Time Overcurrent Element See Figure 3 15 Make the following settings if preceding enable setting E51P 2 Pickup OFF 0 25 16 00 A 5 A nom 0 05 3 20 A 1 A nom 51AP Curve U1 U5 C1 C5 see Figure 9 1 Fig...

Page 359: ...eceding enable setting E51G 1 or 2 Pickup OFF 0 10 16 00 A 5 A nom 0 02 3 20 A 1 A nom 51GP Curve U1 U5 C1 C5 see Figure 9 1 Figure 9 10 51GC Time Dial 0 50 15 00 for curves U1 U5 0 05 1 00 for curves C1 C5 51GTD Electromechanical Reset Y N 51GRS Residual Ground Time Overcurrent Element 2 See Figure 3 20 Make the following settings if preceding enable setting E51G 2 Pickup OFF 0 10 16 00 A 5 A nom...

Page 360: ...Reverse None F R N DIR3 Level 4 direction Forward Reverse None F R N DIR4 Ground directional element priority combination of Q V I P S U or OFF ORDER If neutral channel IN is rated 0 05 A or 0 20 A nominal then setting option I is not available for setting ORDER Setting options P S and U are only available if neutral channel IN is rated 0 2 A nominal and either global setting PTCONN WYE or global ...

Page 361: ... A nom 50GRP Positive sequence current restraint factor I0 I1 0 02 0 50 unitless a0 Make settings Z0F and Z0R if preceding enable setting E32 Y and preceding setting ORDER contains V or S If E32 AUTO and ORDER contains V or S these settings are made automatically Forward directional Z0 threshold 128 00 to 128 00 Ω secondary 5 A nom 640 00 to 640 00 Ω secondary 1 A nom Z0F Reverse directional Z0 th...

Page 362: ...00 300 00 V secondary 59N2P Negative sequence V2 overvoltage pickup OFF 0 00 200 00 V secondary 59QP Positive sequence V1 overvoltage pickup OFF 0 00 300 00 V secondary 59V1P Channel VS undervoltage pickup OFF 0 00 300 00 V secondary 27SP Channel VS overvoltage pickup OFF 0 00 300 00 V secondary 59S1P Channel VS overvoltage pickup OFF 0 00 300 00 V secondary 59S2P Phase to phase undervoltage picku...

Page 363: ...or 0 to 330 in 30 steps degree option is for VS not in phase with VA VB or VC set with respect to VS constantly lagging VA Global setting PTCONN DELTA VAB VBC VCA or 0 to 330 in 30 steps degree option is for VS not in phase with VAB VBC or VCA set with respect to VS constantly lagging VAB SYNCP Breaker close time for angle compensation 0 00 60 00 cycles in 0 25 cycle steps TCLOSD Frequency Element...

Page 364: ...9RSD Reset time from lockout 0 00 999999 00 cycles in 0 25 cycle steps 79RSLD Reclose supervision time limit OFF 0 00 999999 00 cycles in 0 25 cycle steps set 79CLSD 0 00 for most applications see Figure 6 2 79CLSD Switch Onto Fault See Figure 5 3 Make the following settings if preceding enable setting ESOTF Y Close enable time delay OFF 0 00 16000 00 cycles in 0 25 cycle steps CLOEND 52A enable t...

Page 365: ...00 999999 00 cycles in 0 25 cycle steps SV1DO SV2 Pickup Time 0 00 999999 00 cycles in 0 25 cycle steps SV2PU SV2 Dropout Time 0 00 999999 00 cycles in 0 25 cycle steps SV2DO SV3 Pickup Time 0 00 999999 00 cycles in 0 25 cycle steps SV3PU SV3 Dropout Time 0 00 999999 00 cycles in 0 25 cycle steps SV3DO SV4 Pickup Time 0 00 999999 00 cycles in 0 25 cycle steps SV4PU SV4 Dropout Time 0 00 999999 00 ...

Page 366: ...PU SV12 Dropout Time 0 00 16000 00 cycles in 0 25 cycle steps SV12DO SV13 Pickup Time 0 00 16000 00 cycles in 0 25 cycle steps SV13PU SV13 Dropout Time 0 00 16000 00 cycles in 0 25 cycle steps SV13DO SV14 Pickup Time 0 00 16000 00 cycles in 0 25 cycle steps SV14PU SV14 Dropout Time 0 00 16000 00 cycles in 0 25 cycle steps SV14DO SV15 Pickup Time 0 00 16000 00 cycles in 0 25 cycle steps SV15PU SV15...

Page 367: ...C Control Equations gives SELOGIC control equation details examples and limitations Trip Logic Equations See Figure 5 1 Other trip conditions TR Switch onto fault trip conditions TRSOTF Direct transfer trip conditions DTT Unlatch trip conditions ULTR Close Logic Equations See Figure 6 1 Circuit breaker status used in Figure 5 3 also 52A Close conditions other than automatic reclosing or CLOSE comm...

Page 368: ...T8 SET8 Reset Latch Bit LT8 RST8 Set Latch Bit LT9 SET9 Reset Latch Bit LT9 RST9 Set Latch Bit LT10 SET10 Reset Latch Bit LT10 RST10 Set Latch Bit LT11 SET11 Reset Latch Bit LT11 RST11 Set Latch Bit LT12 SET12 Reset Latch Bit LT12 RST12 Set Latch Bit LT13 SET13 Reset Latch Bit LT13 RST13 Set Latch Bit LT14 SET14 Reset latch Bit LT14 RST14 Set Latch Bit LT15 SET15 Reset Latch Bit LT15 RST15 Set Lat...

Page 369: ...67Q1TC Level 2 negative sequence see Figure 3 12 67Q2TC Level 3 negative sequence see Figure 3 12 67Q3TC Level 4 negative sequence see Figure 3 12 67Q4TC Torque Control Equations for Time Overcurrent Elements NOTE torque control equation settings cannot be set directly to logical 0 A phase see Figure 3 15 51ATC B phase see Figure 3 16 51BTC C phase see Figure 3 17 51CTC Phase see Figure 3 14 51PTC...

Page 370: ...14 SV14 SELOGIC Control Equation Variable SV15 SV15 SELOGIC Control Equation Variable SV16 SV16 Output Contact Equations See Figure 7 26 Output Contact OUT101 OUT101 Output Contact OUT102 OUT102 Output Contact OUT103 OUT103 Output Contact OUT104 OUT104 Output Contact OUT105 OUT105 Output Contact OUT106 OUT106 Output Contact OUT107 OUT107 Display Point Equations only on models with LCD See Rotating...

Page 371: ...ting Group 3 SS3 Select Setting Group 4 SS4 Select Setting Group 5 SS5 Select Setting Group 6 SS6 Other Equations Event report trigger conditions see Section 12 ER Fault indication used in INST A B and C target logic and other relay functions see subsection SELOGIC Control Equation Setting FAULT on page 5 13 FAULT Block synchronism check elements see Figure 3 27 BSYNCH Close bus monitor see Figure...

Page 372: ..._ Phase Potential Transformer Connection DELTA WYE PTCONN VS Channel Input VS 3V0 VSCONN Settings Group Change Delay See Multiple Setting Groups on page 7 18 Group change delay 0 00 16000 00 cycles in 0 25 cycle steps TGR Power System Configuration and Date Format See Settings Explanations on page 9 34 Nominal frequency 50 Hz 60 Hz NFREQ Phase rotation ABC ACB PHROT Date format MDY YMD DATE_F Fron...

Page 373: ...00 cycles in 0 25 cycle steps IN106D Breaker Monitor Settings See Breaker Monitor on page 8 2 Breaker monitor enable Y N EBMON Make the following settings if preceding enable setting EBMON Y Close Open set point 1 max 0 65000 operations COSP1 Close Open set point 2 mid 0 65000 operations COSP2 Close Open set point 3 min 0 65000 operations COSP3 kA Interrupted set point 1 min 0 00 999 00 kA primary...

Page 374: ...______________ Make the following settings if preceding enable setting EPMU Y PMU Hardware ID PMID Phasor Data Set Voltages V1 ALL PHDATAV Voltage Angle Comp Factor 179 99 to 180 degrees VCOMP Phasor Data Set Currents ALL NA PHDATAI Current Angle Comp Factor 179 99 to 180 degrees ICOMP Time Source Type IRIG IEEE TS_TYPE Courtesy of NationalSwitchgear com ...

Page 375: ...ettings Serial Port Command SET R Sequential Events Recorder settings are comprised of three trigger lists Each trigger list can include up to 24 Relay Word bits delimited by commas Enter NA to remove a list of these Relay Word bit settings See Sequential Events Recorder SER Report on page 12 21 SER Trigger List 1 SER1 SER Trigger List 2 SER2 SER Trigger List 3 SER3 Courtesy of NationalSwitchgear ...

Page 376: ...Local Bit LB2 Label 7 characters PLB2 Local Bit LB3 Name 14 characters NLB3 Clear Local Bit LB3 Label 7 characters CLB3 Set Local Bit LB3 Label 7 characters SLB3 Pulse Local Bit LB3 Label 7 characters PLB3 Local Bit LB4 Name 14 characters NLB4 Clear Local Bit LB4 Label 7 characters CLB4 Set Local Bit LB4 Label 7 characters SLB4 Pulse Local Bit LB4 Label 7 characters PLB4 Local Bit LB5 Name 14 char...

Page 377: ...4 characters NLB11 Clear Local Bit LB11 Label 7 characters CLB11 Set Local Bit LB11 Label 7 characters SLB11 Pulse Local Bit LB11 Label 7 characters PLB11 Local Bit LB12 Name 14 characters NLB12 Clear Local Bit LB12 Label 7 characters CLB12 Set Local Bit LB12 Label 7 characters SLB12 Pulse Local Bit LB12 Label 7 characters PLB12 Local Bit LB13 Name 14 characters NLB13 Clear Local Bit LB13 Label 7 ...

Page 378: ..._0 Display if DP4 logical 1 16 characters DP4_1 Display if DP4 logical 0 16 characters DP4_0 Display if DP5 logical 1 16 characters DP5_1 Display if DP5 logical 0 16 characters DP5_0 Display if DP6 logical 1 16 characters DP6_1 Display if DP6 logical 0 16 characters DP6_0 Display if DP7 logical 1 16 characters DP7_1 Display if DP7 logical 0 16 characters DP7_0 Display if DP8 logical 1 16 character...

Page 379: ...al 0 16 characters DP14_0 Display if DP15 logical 1 16 characters DP15_1 Display if DP15 logical 0 16 characters DP15_0 Display if DP16 logical 1 16 characters DP16_1 Display if DP16 logical 0 16 characters DP16_0 Reclosing Relay Labels See Functions Unique to the Front Panel Interface on page 11 6 Reclosing Relay Last Shot Label 14 char 79LL Reclosing Relay Shot Counter Label 14 char 79SL Courtes...

Page 380: ...dress 01 99 ADDR LMD Settling Time 0 30 seconds SETTLE Communications Settings Baud Rate 300 1200 2400 4800 9600 19200 SPEED Data Bits 6 7 8 BITS Parity O E N Odd Even None PARITY Stop Bits 1 2 STOP Other Port Settings See Below Time out 0 30 minutes T_OUT Send Auto Messages to Port Y N DTA AUTO Fast Operate Enable Y N FASTOP Other Port Settings Set T_OUT to the number of minutes of serial port in...

Page 381: ... to Port Y N DTA AUTO Enable Hardware Handshaking Y N MBT RTSCTS Fast Operate Enable Y N FASTOP Other Port Settings Set T_OUT to the number of minutes of serial port inactivity for an automatic log out Set T_OUT 0 for no port time out Set AUTO Y to allow automatic messages at the serial port Set AUTO DTA to use the serial port with an SEL DTA2 Display Transducer Adapter Set RTSCTS Y to enable hard...

Page 382: ... to Port Y N DTA AUTO Enable Hardware Handshaking Y N MBT RTSCTS Fast Operate Enable Y N FASTOP Other Port Settings Set T_OUT to the number of minutes of serial port inactivity for an automatic log out Set T_OUT 0 for no port time out Set AUTO Y to allow automatic messages at the serial port Set AUTO DTA to use the serial port with an SEL DTA2 Display Transducer Adapter Set RTSCTS Y to enable hard...

Page 383: ... to Port Y N DTA AUTO Enable Hardware Handshaking Y N MBT RTSCTS Fast Operate Enable Y N FASTOP Other Port Settings Set T_OUT to the number of minutes of serial port inactivity for an automatic log out Set T_OUT 0 for no port time out Set AUTO Y to allow automatic messages at the serial port Set AUTO DTA to use the serial port with an SEL DTA2 Display Transducer Adapter Set RTSCTS Y to enable hard...

Page 384: ...This page intentionally left blank Courtesy of NationalSwitchgear com ...

Page 385: ...t and Potential Transformer Ratios See Settings Explanations on page 9 34 Phase IA IB IC Current Transformer Ratio 1 6000 CTR Neutral IN Current Transformer Ratio 1 10000 CTRN Phase VA VB VC wye connected or Phase to Phase VAB VBC VCA delta connected Potential Transformer Ratio 1 00 10000 00 PTR PT Nominal Voltage line to neutral wye connected or line to line delta connected OFF 25 00 300 00 V sec...

Page 386: ...element levels N 1 6 see Figure 3 10 and Figure 3 11 E50G Negative sequence element levels N 1 6 see Figure 3 12 and Figure 3 13 E50Q Time Overcurrent Enable Settings Phase elements N 1 2 see Table 3 1 Figure 3 14 Figure 3 15 Figure 3 16 and Figure 3 17 E51P Neutral ground elements channel IN Y N see Figure 3 18 E51N Residual ground elements Y N see Figure 3 19 E51G Negative sequence elements Y N ...

Page 387: ...s dependent on preceding enable setting E50P 1 6 all four pickup settings are enabled if E50P 4 Pickup OFF 1 00 170 00 A 5 A nom 0 20 34 00 A 1 A nom 50PP1P Pickup OFF 1 00 170 00 A 5 A nom 0 20 34 00 A 1 A nom 50PP2P Pickup OFF 1 00 170 00 A 5 A nom 0 20 34 00 A 1 A nom 50PP3P Pickup OFF 1 00 170 00 A 5 A nom 0 20 34 00 A 1 A nom 50PP4P Neutral Ground Inst Overcurrent Elements Channel IN See Figu...

Page 388: ...ickup OFF 0 050 100 000 A 5 A nom 0 010 20 000 A 1 A nom 50G5P Pickup OFF 0 050 100 000 A 5 A nom 0 010 20 000 A 1 A nom 50G6P 50G1P 50G6P setting step size 0 010 A 5 A nom 0 002 A 1 A nom Negative Sequence Inst Overcurrent Elements See Figure 3 12 and Figure 3 13 IMPORTANT See Appendix F for information on setting negative sequence overcurrent elements Number of negative sequence element time del...

Page 389: ...ickup OFF 0 25 16 00 A 5 A nom 0 05 3 20 A 1 A nom 51BP Curve U1 U5 C1 C5 see Figure 9 1 Figure 9 10 51BC Time Dial 0 50 15 00 for curves U1 U5 0 05 1 00 for curves C1 C5 51BTD Electromechanical Reset Y N 51BRS C Phase Time Overcurrent Element See Figure 3 17 Make the following settings if preceding enable setting E51P 2 Pickup OFF 0 25 16 00 A 5 A nom 0 05 3 20 A 1 A nom 51CP Curve U1 U5 C1 C5 se...

Page 390: ...C1 C5 51QTD Electromechanical Reset Y N 51QRS Voltage Elements See Figure 3 22 Figure 3 23 Figure 3 24 Figure 3 25 and Figure 3 26 Make the following settings if preceding enable setting EVOLT Y and global setting PTCONN WYE Phase undervoltage pickup OFF 0 00 300 00 V secondary 27P1P Phase undervoltage pickup OFF 0 00 300 00 V secondary 27P2P Phase overvoltage pickup OFF 0 00 300 00 V secondary 59...

Page 391: ...D1P Level 1 time delay 2 00 16000 00 cycles in 0 25 cycle steps 81D1D Level 2 pickup OFF 40 10 65 00 Hz 81D2P Level 2 time delay 2 00 16000 00 cycles in 0 25 cycle steps 81D2D Level 3 pickup OFF 40 10 65 00 Hz 81D3P Level 3 time delay 2 00 16000 00 cycles in 0 25 cycle steps 81D3D Reclosing Relay See Table 6 2 and Table 6 3 Make the following settings if preceding enable setting E79 1 4 or C1 C4 O...

Page 392: ... 0 640 A 0 2 A nom 0 005 0 160 A 0 05 A nom NDEMP Residual ground pickup OFF 0 10 16 00 A 5 A nom 0 02 3 20 A 1 A nom GDEMP Negative sequence pickup OFF 0 50 16 00 A 5 A nom 0 10 3 20 A 1 A nom QDEMP Other Settings Make the following settings they have no controlling enable setting Minimum trip duration time 4 00 16000 00 cycles in 0 25 cycle steps see Figure 5 1 TDURD Close failure time delay OFF...

Page 393: ...ycles in 0 25 cycle steps SV8PU SV8 Dropout Time 0 00 16000 00 cycles in 0 25 cycle steps SV8DO SV9 Pickup Time 0 00 16000 00 cycles in 0 25 cycle steps SV9PU SV9 Dropout Time 0 00 16000 00 cycles in 0 25 cycle steps SV9DO SV10 Pickup Time 0 00 16000 00 cycles in 0 25 cycle steps SV10PU SV10 Dropout Time 0 00 16000 00 cycles in 0 25 cycle steps SV10DO SV11 Pickup Time 0 00 16000 00 cycles in 0 25 ...

Page 394: ...GIC Control Equations gives SELOGIC control equation details examples and limitations Trip Logic Equations See Figure 5 1 Other trip conditions TR Switch onto fault trip conditions TRSOTF Direct transfer trip conditions DTT Unlatch trip conditions ULTR Close Logic Equations See Figure 6 1 Circuit breaker status used in Figure 5 3 also 52A Close conditions other than automatic reclosing or CLOSE co...

Page 395: ...atch Bit LT8 SET8 Reset Latch Bit LT8 RST8 Set Latch Bit LT9 SET9 Reset Latch Bit LT9 RST9 Set Latch Bit LT10 SET10 Reset Latch Bit LT10 RST10 Set Latch Bit LT11 SET11 Reset Latch Bit LT11 RST11 Set Latch Bit LT12 SET12 Reset Latch Bit LT12 RST12 Set Latch Bit LT13 SET13 Reset Latch Bit LT13 RST13 Set Latch Bit LT14 SET14 Reset latch Bit LT14 RST14 Set Latch Bit LT15 SET15 Reset Latch Bit LT15 RST...

Page 396: ... Control Equation Variable SV4 SV4 SELOGIC Control Equation Variable SV5 SV5 SELOGIC Control Equation Variable SV6 SV6 SELOGIC Control Equation Variable SV7 SV7 SELOGIC Control Equation Variable SV8 SV8 SELOGIC Control Equation Variable SV9 SV9 SELOGIC Control Equation Variable SV10 SV10 SELOGIC Control Equation Variable SV11 SV11 SELOGIC Control Equation Variable SV12 SV12 SELOGIC Control Equatio...

Page 397: ... DP2 DP2 Display Point DP3 DP3 Display Point DP4 DP4 Display Point DP5 DP5 Display Point DP6 DP6 Display Point DP7 DP7 Display Point DP8 DP8 Display Point DP9 DP9 Display Point DP10 DP10 Display Point DP11 DP11 Display Point DP12 DP12 Display Point DP13 DP13 Display Point DP14 DP14 Display Point DP15 DP15 Display Point DP16 DP16 Setting Group Selection Equations See Table 7 4 Select Setting Group ...

Page 398: ...te________________ Other Equations Event report trigger conditions see Section 12 ER Fault indication used in INST A B and C target logic and other relay functions see subsection SELOGIC Control Equation Setting FAULT on page 5 13 FAULT Close bus monitor see Figure 5 3 CLMON Breaker monitor initiation see Figure 8 3 BKMON Courtesy of NationalSwitchgear com ...

Page 399: ...TA WYE PTCONN Settings Group Change Delay See Multiple Setting Groups on page 7 18 Group change delay 0 00 16000 00 cycles in 0 25 cycle steps TGR Power System Configuration and Date Format See Settings Explanations on page 9 34 Nominal frequency 50 Hz 60 Hz NFREQ Phase rotation ABC ACB PHROT Date format MDY YMD DATE_F Front Panel Display Operation See Section 11 Front panel display time out OFF 1...

Page 400: ...en set point 3 min 0 65000 operations COSP3 kA Interrupted set point 1 min 0 00 999 00 kA primary in 0 01 kA steps KASP1 kA Interrupted set point 2 mid 0 00 999 00 kA primary in 0 01 kA steps KASP2 kA Interrupted set point 3 max 0 00 999 00 kA primary in 0 01 kA steps KASP3 Notes COSP1 must be set greater than COSP2 COSP2 must be set greater than or equal to COSP3 KASP1 must be set less than KASP2...

Page 401: ... Settings Serial Port Command SET R Sequential Events Recorder settings are comprised of three trigger lists Each trigger list can include up to 24 Relay Word bits delimited by commas Enter NA to remove a list of these Relay Word bit settings See Sequential Events Recorder SER Report on page 12 21 SER Trigger List 1 SER1 SER Trigger List 2 SER2 SER Trigger List 3 SER3 Courtesy of NationalSwitchgea...

Page 402: ...LB2 Label 7 characters PLB2 Local Bit LB3 Name 14 characters NLB3 Clear Local Bit LB3 Label 7 characters CLB3 Set Local Bit LB3 Label 7 characters SLB3 Pulse Local Bit LB3 Label 7 characters PLB3 Local Bit LB4 Name 14 characters NLB4 Clear Local Bit LB4 Label 7 characters CLB4 Set Local Bit LB4 Label 7 characters SLB4 Pulse Local Bit LB4 Label 7 characters PLB4 Local Bit LB5 Name 14 characters NLB...

Page 403: ... 14 characters NLB11 Clear Local Bit LB11 Label 7 characters CLB11 Set Local Bit LB11 Label 7 characters SLB11 Pulse Local Bit LB11 Label 7 characters PLB11 Local Bit LB12 Name 14 characters NLB12 Clear Local Bit LB12 Label 7 characters CLB12 Set Local Bit LB12 Label 7 characters SLB12 Pulse Local Bit LB12 Label 7 characters PLB12 Local Bit LB13 Name 14 characters NLB13 Clear Local Bit LB13 Label ...

Page 404: ... if DP4 logical 1 16 characters DP4_1 Display if DP4 logical 0 16 characters DP4_0 Display if DP5 logical 1 16 characters DP5_1 Display if DP5 logical 0 16 characters DP5_0 Display if DP6 logical 1 16 characters DP6_1 Display if DP6 logical 0 16 characters DP6_0 Display if DP7 logical 1 16 characters DP7_1 Display if DP7 logical 0 16 characters DP7_0 Display if DP8 logical 1 16 characters DP8_1 Di...

Page 405: ...ical 0 16 characters DP14_0 Display if DP15 logical 1 16 characters DP15_1 Display if DP15 logical 0 16 characters DP15_0 Display if DP16 logical 1 16 characters DP16_1 Display if DP16 logical 0 16 characters DP16_0 Reclosing Relay Labels See Functions Unique to the Front Panel Interface on page 11 6 Reclosing Relay Last Shot Label 14 char 79LL Reclosing Relay Shot Counter Label 14 char 79SL Court...

Page 406: ...ddress 01 99 ADDR LMD Settling Time 0 30 seconds SETTLE Communications Settings Baud Rate 300 1200 2400 4800 9600 19200 SPEED Data Bits 6 7 8 BITS Parity O E N Odd Even None PARITY Stop Bits 1 2 STOP Other Port Settings See Below Time out 0 30 minutes T_OUT Send Auto Messages to Port Y N DTA AUTO Fast Operate Enable Y N FASTOP Other Port Settings Set T_OUT to the number of minutes of serial port i...

Page 407: ... to Port Y N DTA AUTO Enable Hardware Handshaking Y N MBT RTSCTS Fast Operate Enable Y N FASTOP Other Port Settings Set T_OUT to the number of minutes of serial port inactivity for an automatic log out Set T_OUT 0 for no port time out Set AUTO Y to allow automatic messages at the serial port Set AUTO DTA to use the serial port with an SEL DTA2 Display Transducer Adapter Set RTSCTS Y to enable hard...

Page 408: ... to Port Y N DTA AUTO Enable Hardware Handshaking Y N MBT RTSCTS Fast Operate Enable Y N FASTOP Other Port Settings Set T_OUT to the number of minutes of serial port inactivity for an automatic log out Set T_OUT 0 for no port time out Set AUTO Y to allow automatic messages at the serial port Set AUTO DTA to use the serial port with an SEL DTA2 Display Transducer Adapter Set RTSCTS Y to enable hard...

Page 409: ... to Port Y N DTA AUTO Enable Hardware Handshaking Y N MBT RTSCTS Fast Operate Enable Y N FASTOP Other Port Settings Set T_OUT to the number of minutes of serial port inactivity for an automatic log out Set T_OUT 0 for no port time out Set AUTO Y to allow automatic messages at the serial port Set AUTO DTA to use the serial port with an SEL DTA2 Display Transducer Adapter Set RTSCTS Y to enable hard...

Page 410: ...This page intentionally left blank Courtesy of NationalSwitchgear com ...

Page 411: ...ariety of terminal emulation programs on your personal computer to communicate with the relay For the best display use VT 100 terminal emulation or the closest variation The default settings for all serial ports are Baud Rate 2400 Data Bits 8 Parity N Stop Bits 1 To change the port settings use the SET P command see Section 9 Setting the Relay or the front panel SET pushbutton Table 10 1 SEL 351A ...

Page 412: ...IRIG TIRIG asserts when the relay time is based on an IRIG B time source In the event that the relay is not synchronized to a connected IRIG B time source TIRIG logical 0 the troubleshooting steps detailed in IRI command discussion should be used Relay Word Bit TSOK TSOK asserts to indicate that the IRIG B time source is of a sufficient accuracy for synchrophasor measurement See Appendix L SEL Syn...

Page 413: ...D CTS TXD RXD GND CTS RTS DCD DTR DSR Pin Func Pin Func Pin Pin Cable SEL C234A DTE Device DTE Data Terminal Equipment Computer Terminal Printer etc SEL 351A Relay 9 Pin Male D Subconnector 25 Pin Female D Subconnector 5 3 2 9 8 7 3 2 1 4 5 6 8 20 GND TXD RXD GND CTS GND RXD TXD GND RTS CTS DSR DCD DTR Pin Func Pin Func Pin Pin Cable SEL C227A DTE Device DTE Data Terminal Equipment Computer Termin...

Page 414: ...D TXD IRIG GND IRIG RTS CTS TXD RXD IRIG GND IRIG CTS RTS Pin Func Pin Func Pin Pin SEL Communications Processors and SEL 2100 Cable SEL C273A SEL 351A Relay Table 10 4 Serial Communications Port Pin Terminal Function Definitions Sheet 1 of 2 Pin Function Definition N C No Connection 5 Vdc 0 5 A limit 5 Vdc Power Connection RXD RX Receive Data TXD TX Transmit Data IRIG B IRIG B Time Code Input GND...

Page 415: ...nications up to 500 meters and for electrical isolation of communications ports use the SEL 2800 family of Fiber Optic Transceivers Contact SEL for more details on these devices DTR Data Terminal Ready DSR Data Set Ready Table 10 4 Serial Communications Port Pin Terminal Function Definitions Sheet 2 of 2 Pin Function Definition Courtesy of NationalSwitchgear com ...

Page 416: ...28 To select SEL ASCII protocol set the port PROTO setting to SEL To select SEL Distributed Port Switch Protocol LMD set PROTO LMD To select DNP protocol set PROTO DNP SEL Fast Meter and SEL Compressed ASCII commands are active when PROTO is set to either SEL or LMD The commands are not active when PROTO is set to DNP SEL ASCII Protocol SEL ASCII protocol is designed for manual and automatic commu...

Page 417: ... in progress when the relay receives XOFF it blocks transmission of any message presented to its buffer Messages will be accepted after the relay receives XON The CAN character ASCII hex 18 aborts a pending transmission This is useful in terminating an unwanted transmission Control characters can be sent from most keyboards with the following keystrokes XON Ctrl Q hold down the Control key and pre...

Page 418: ...R Protocol is available on any serial port The protocol is described in Appendix J SEL 351A Fast SER Protocol Distributed Network Protocol DNP3 The relay provides Distributed Network Protocol DNP3 slave support DNP is an optional protocol and is described in Appendix H Distributed Network Protocol SEL Fast Message Synchrophasor Protocol SEL Fast Message Synchrophasor protocol are general Fast Mess...

Page 419: ... Table 10 5 Serial Port Automatic Messages Condition Description Power Up The relay sends a message containing the present date and time Relay and Terminal Identifiers and the Access Level 0 prompt when the relay is turned on Event Trigger The relay sends an event summary each time an event report is triggered See Section 12 Standard Event Reports and SER Group Switch The relay displays the active...

Page 420: ...ailable at Access Level 0 is the ACC command see Table 10 6 Enter the ACC command at the Access Level 0 prompt ACC Enter The ACC command takes the relay to Access Level 1 see ACC BAC and 2AC Commands Go to Access Level 1 B or 2 on page 10 14 for more detail Access Level 1 When the relay is in Access Level 1 the relay sends the following prompt Commands BAC TRI in Table 10 6 are available from Acce...

Page 421: ...ccess Level B commands BAC TRI in Table 10 6 The 2AC command allows the relay to go to Access Level 2 see ACC BAC and 2AC Commands Go to Access Level 1 B or 2 for more detail Enter the 2AC command at the Access Level B prompt 2AC Enter Access Level 2 When the relay is in Access Level 2 the relay sends the prompt Commands CON VER in Table 10 6 are available from Access Level 2 For example enter the...

Page 422: ...oup The Access Level 2 commands primarily allow the user to change relay settings Again a higher access level can access the serial port commands in a lower access level The commands are shown in uppercase letters but they can also be entered with lowercase letters Table 10 6 Serial Port Command Summary Sheet 1 of 2 Access Level Prompt Serial Port Command Command Description Corresponding Front Pa...

Page 423: ...ords SET 2 SET Change settings SET 2 VER Show Relay Configuration and Firmware version Table 10 6 Serial Port Command Summary Sheet 2 of 2 Access Level Prompt Serial Port Command Command Description Corresponding Front Panel Pushbutton Relay Display Definition FEEDER 1 This is the RID setting the relay is shipped with the default setting RID FEEDER 1 see Identifier Labels on page 9 34 STATION A Th...

Page 424: ...rds are not required if the main board Password jumper is in place Password jumper ON Refer to Table 2 5 and Table 2 6 for Password jumper information See PAS Command Change Passwords on page 10 37 for the list of default passwords and for more information on changing passwords Access Level Attempt Password Required Assume the following conditions Password jumper OFF not in place Access Level 0 At...

Page 425: ... indicates the relay is now in Access Level 1 The above two examples demonstrate how to go from Access Level 0 to Access Level 1 The procedure to go from Access Level 1 to Access Level B Access Level 1 to Access Level 2 or Access Level B to Access Level 2 is much the same with command BAC or 2AC entered at the access level screen prompt The relay closes the ALARM contact for one second after a suc...

Page 426: ...GRO n Command Change Active Setting Group on page 10 35 and Multiple Setting Groups on page 7 18 for further details on settings groups HIS Command Event Summaries History HIS x displays event summaries or allows you to clear event summaries and corresponding event reports from nonvolatile memory If no parameters are specified with the HIS command HIS Enter the relay displays the most recent event...

Page 427: ...ype e g AG T If the fault locator does not run successfully is listed in the LOCAT column If the fault locator is disabled enable setting EFLOC N the LOCAT column is left blank For either of these cases where the fault locator does not run the event type listed in the EVENT column is one of the following Relay Response Definition AG for A phase to ground faults BG for B phase to ground faults CG f...

Page 428: ...r if the code cannot be read successfully the relay responds IRIG B DATA ERROR If an IRIG B signal is present the relay synchronizes its internal clock with IRIG B It is not necessary to issue the IRI command to synchronize the relay clock with IRIG B Use the IRI command to determine if the relay is properly reading the IRIG B signal MET Command Metering Data The MET commands provide access to the...

Page 429: ...nnected voltage inputs kV primary a a VS is not available in the SEL 351A 1 VAB BC CA S Delta connected voltage inputs kV primary a Power MWA B C Single phase megawatts wye connected voltage inputs only MW3P Three phase megawatts MVARA B C Single phase megavars wye connected voltage inputs only MVAR3P Three phase megavars Power Factor PFA B C Single phase power factor leading or lagging wye connec...

Page 430: ...mmand with the addition of calculated phase to phase voltage quantities Vab Vbc and Vca NOTE See Small Signal Cutoff for Metering on page 8 31 for metering behavior with small signals Currents IA B C N Input currents A primary IG Residual ground current A primary IG 3I0 IA IB IC Voltages VA B C S Phase to neutral voltage inputs kV primary wye connected a VAB BC CA S Phase to phase voltages kV prim...

Page 431: ...20 94 29 93 AB BC CA Vbase V MAG KV 25 452 25 448 25 790 0 000 V ANG DEG 29 89 89 23 150 34 A B C 3P MW 0 447 0 535 0 435 1 417 MVAR 0 016 0 018 0 010 0 044 PF 0 999 0 999 1 000 1 000 LAG LAG LAG LAG I1 3I2 3I0 V1 V2 3V0 MAG 32 036 6 196 7 526 14 759 0 131 0 212 ANG DEG 1 47 106 38 117 52 0 33 59 08 157 40 FREQ Hz 60 00 VDC V 125 6 MET D Demand Metering The MET D command displays the demand and pe...

Page 432: ...rgy metering values enter the command MET E Enter The output from an SEL 351A with wye connected voltage inputs is shown MET E Enter FEEDER 1 Date 08 10 99 Time 15 11 24 056 STATION A MWhA MWhB MWhC MWh3P MVARhA MVARhB MVARhC MVARh3P IN 0 0 0 0 0 0 0 0 0 0 0 0 0 0 0 0 OUT 36 0 36 6 36 7 109 2 5 1 5 2 5 3 15 6 LAST RESET 01 31 97 23 31 28 864 Reset the energy values using the MET RE command For mor...

Page 433: ...2 0 02 01 99 14 50 55 294 VA kV 11 7 02 01 99 15 01 01 576 3 4 02 01 99 15 00 42 545 VB kV 11 7 02 01 99 15 00 42 937 2 4 02 01 99 15 00 42 541 VC kV 11 7 02 01 99 15 00 42 578 3 1 02 01 99 15 00 42 545 VS kV 11 7 02 01 99 15 01 01 576 3 4 02 01 99 15 00 42 545 MW3P 6 9 02 01 99 15 00 44 095 0 4 02 01 99 15 00 42 545 MVAR3P 1 0 02 01 99 15 00 42 578 0 1 02 01 99 15 00 42 545 LAST RESET 01 27 99 15...

Page 434: ...ers are entered the relay responds Synchronized Phasor Measurement Data Will be Displayed at hh mm ss 000 One MET PM time command may be pending on a single port at any one time If a MET PM time command is entered while another command is pending the old request will be cancelled and the new request will be pending MET PM commands entered without the time parameter will not affect any pending MET ...

Page 435: ... settings Below are the SHO command options You may append a setting name to each of the commands to specify the first setting to display e g SHO 1 E50P displays the setting Group 1 relay settings starting with setting E50P The default is the first setting The SHO commands display only the enabled settings To display all settings including disabled hidden settings append an A to the SHO command e ...

Page 436: ...800 00 79RSLD 300 00 79CLSD 0 00 Press RETURN to continue DMTC 5 PDEMP 5 00 NDEMP 1 500 GDEMP 1 50 QDEMP 1 50 TDURD 9 00 CFD 60 00 3POD 1 50 50LP 0 25 SV1PU 12 00 SV1DO 2 00 SHO L Enter SELogic group 1 SELogic Control Equations TR OC 51PT 51GT 81D1T LB3 50P1 SH0 TRSOTF 0 DTT 0 ULTR 51P 51G 52A IN101 CL CC LB4 ULCL TRIP 79RI TRIP 79RIS 52A 79CY 79DTL OC IN102 LB3 79DLS 79LO 79SKP 0 79STL TRIP 79BRS...

Page 437: ...51CTC 1 51PTC 1 51NTC 1 51GTC 1 51G2TC 1 51QTC 1 SV1 TRIP SV2 0 SV3 0 SV4 0 SV5 0 SV6 0 Press RETURN to continue SV7 0 SV8 0 SV9 0 SV10 0 SV11 0 SV12 0 SV13 0 SV14 0 SV15 0 SV16 0 OUT101 TRIP OUT102 CLOSE OUT103 SV1T OUT104 0 OUT105 0 OUT106 0 OUT107 0 DP1 IN102 DP2 52A DP3 0 Press RETURN to continue DP4 0 DP5 0 DP6 0 DP7 0 DP8 0 DP9 0 DP10 0 DP11 0 DP12 0 DP13 0 DP14 0 DP15 0 DP16 0 SS1 0 SS2 0 S...

Page 438: ...ls NLB1 CLB1 SLB1 PLB1 NLB2 CLB2 SLB2 PLB2 NLB3 MANUAL TRIP CLB3 RETURN SLB3 PLB3 TRIP NLB4 MANUAL CLOSE CLB4 RETURN SLB4 PLB4 CLOSE NLB5 CLB5 SLB5 PLB5 NLB6 CLB6 SLB6 PLB6 NLB7 CLB7 SLB7 PLB7 NLB8 CLB8 SLB8 PLB8 NLB9 CLB9 SLB9 PLB9 NLB10 CLB10 SLB10 PLB10 NLB11 CLB11 SLB11 PLB11 NLB12 CLB12 SLB12 PLB12 NLB13 CLB13 SLB13 PLB13 NLB14 CLB14 SLB14 PLB14 NLB15 CLB15 SLB15 PLB15 NLB16 CLB16 SLB16 PLB16...

Page 439: ...t out of tolerance conditions To reset the self test statuses use the STA C command from Access Level 2 STA C Enter STA Command Response Definition FID FID is the firmware identifier string It identifies the firmware revision CID CID is the firmware checksum identifier OS OS Offset displays measured dc offset voltages in millivolts for the current and voltage channels The MOF master status is the ...

Page 440: ... control equations See Section 9 Setting the Relay and Appendix G Setting SELOGIC Control Equations The TAR command does not remap the front panel target LEDs as is done in some previous SEL relays But the execution of the equivalent TAR command via the front panel display does remap the bottom row of the front panel target LEDs see Figure 11 3 pushbutton OTHER only applicable to models with LCD T...

Page 441: ...AR 35 will report the same data since the SH1 bit is in Row 35 of the Relay Word Command TAR ROW LIST is executed in the following example SEL 351A with 0 2 A nominal neutral channel TAR LIST or TAR ROW LIST Shows all the Relay Word bits in all of the rows Adding ROW to the command displays the Relay Word Row number at the start of each line TAR R Clears front panel tripping target LEDs TRIP INST ...

Page 442: ...ock To set the clock type TIM and the desired setting then press Enter Separate the hours minutes and seconds with colons semicolons spaces commas or slashes To set the clock to 23 30 00 enter TIM 23 30 00 Enter 23 30 00 TRI Command Trigger Event Report Issue the TRI command to generate an event report TRI time Enter where time is an optional parameter to specify the exact time to trigger an event...

Page 443: ... 14 Enter Internal Current 0 0 999999 kA IA 0 0 32 4 Enter IB 0 0 18 6 Enter IC 0 0 22 6 Enter External Trip Counter 0 65000 0 2 Enter External Current 0 0 999999 kA IA 0 0 0 8 Enter IB 0 0 0 6 Enter IC 0 0 0 7 Enter Percent Wear 0 100 A phase 0 22 Enter B phase 0 28 Enter C phase 0 25 Enter Last Reset Date 03 26 02 11 12 00 Enter Time 13 57 42 09 25 14 Enter Save Changes Y N Y Enter FEEDER 1 Date...

Page 444: ...9 STATION A Rly Trips 0 IA 0 0 IB 0 0 IC 0 0 kA Ext Trips 0 IA 0 0 IB 0 0 IC 0 0 kA Percent wear A 0 B 0 C 0 LAST RESET 02 03 01 05 41 07 See Breaker Monitor on page 8 2 for further details on the breaker monitor CLO Command Close Breaker The CLO CLOSE command asserts Relay Word bit CC for 1 4 cycle when it is executed Relay Word bit CC can then be programmed into the CL SELOGIC control equation t...

Page 445: ...p may not be change with the GRO command SELOGIC control equations settings SS1 SS6 have priority over the GRO command in active setting group control For example assume setting Group 1 is the active setting group and the SS1 setting is asserted to logical 1 e g SS1 IN101 and optoisolated input IN101 is asserted An attempt to change to setting Group 2 with the GRO 2 command will not be accepted GR...

Page 446: ...or n the command is aborted The PUL command is supervised by the main board Breaker jumper see Table 2 5 and Table 2 6 If the Breaker is not in place Breaker jumper OFF the relay does not execute the PUL command and responds Aborted No Breaker Jumper The relay generates an event report if any of the OUT101 OUT107 contacts are pulsed The PULSE command is primarily used for testing purposes Access L...

Page 447: ...uts Outputs Timers and Other Control Logic For example to copy settings from Group 1 to Group 3 issue the following command COP 1 3 Enter Copy 1 to 3 Are you sure Y N Y Enter Please wait Settings copied PAS Command Change Passwords The relay is shipped with factory default passwords for Access Levels 1 B and 2 as listed below The PAS command allows you to change existing passwords at Access Level ...

Page 448: ...disable password protection for a specific access level even if the Password jumper is not in place Password jumper OFF simply set the password to DISABLE For example to disable password protection for Level 1 enter PAS 1 When the relay prompts for the new password and a confirmation of the new password enter DISABLE The relay will respond with Password Disabled Passwords may include as many as 12...

Page 449: ...w or change the relay settings see Table 9 1 VER Command Show Relay Configuration and Firmware Version The VER command provides relay configuration information such as nominal current input ratings An example printout of the VER command for an SEL 351A with an LCD follows VER Enter Partnumber 0351A00H24554X1 Mainboard 0311 Appearance Horizontal Conventional Data FLASH Size 1024 KBytes Analog Input...

Page 450: ...This page intentionally left blank Courtesy of NationalSwitchgear com ...

Page 451: ...601 Analytic Assistant EVE n D Show event report n with digital section only EVE n L Show event report n with 16 samples per cycle similar to EVE n S16 EVE n Ly Show first y cycles of event report n y 1 to global setting LER EVE n P Show event report n with synchrophasor level accuracy time alignment EVE n R Show event report n in raw unfiltered format with 16 samples per cycle resolution EVE n Sx...

Page 452: ...h as n name k and LIST TIM Show or set time 24 hour time Show current relay time by entering TIM Set the current time by entering TIM followed by the time of day e g set time 22 47 36 by entering TIM 22 47 36 TRI time Trigger an event report Enter time to trigger an event at an exact specified time in 24 hour format Access Level B Commands Access Level B commands primarily allow the user to operat...

Page 453: ... specified default is active port SET R Change SER settings SET T Change text label settings only on models with LCD SET TERSE For all SET commands TERSE disables the automatic SHO command after settings entry STA C Resets self test warnings failures and reboots the relay VER Show relay configuration and firmware version Key Stroke Commands Ctrl Q Send XON command to restart communications port ou...

Page 454: ...This page intentionally left blank Courtesy of NationalSwitchgear com ...

Page 455: ...E This section only applies to SEL 351A Relay models with an LCD Disregard this section for relays ordered with Targets Only no LCD This section describes how to get information make settings and execute control operations from the relay front panel It also describes the default displays Courtesy of NationalSwitchgear com ...

Page 456: ...setting FP_TO in Front Panel Display Operation only on models with LCD See Section 11 on page SET 20 relay shipped with FP_TO 15 minutes q See Figure 11 4 Figure 11 1 Front Panel Pushbuttons Overview Primary Functions Note that in Figure 11 2 and Figure 11 3 the front panel pushbutton primary functions correspond to serial port commands Both retrieve the same information or perform the same functi...

Page 457: ...asswords and for more information on changing passwords To enter the Access Level B and Access Level 2 passwords from the front panel if required use the Left Arrow and Right Arrow pushbuttons to underscore a password digit position Then use the Up Arrow and Down Arrow pushbuttons to change the digit Press the SELECT pushbutton once the correct Access Level B or Access Level 2 password is ready to...

Page 458: ...ont panel t Local control is not available through the serial port and does not require the entry of a password Figure 11 3 Front Panel Pushbuttons Primary Functions continued Secondary Functions After a primary function is selected see Figure 11 2 and Figure 11 3 the pushbuttons then revert to operating on their secondary functions see Figure 11 4 Use the Left Arrow and Right Arrow pushbuttons to...

Page 459: ...activated again see Figure 11 2 and Figure 11 3 Figure 11 4 Front Panel Pushbuttons Secondary Functions Provides Help Screen Information When Viewing or Changing Settings with Pushbutton SET SELECT CANCEL Select Displayed Option or Setting EXIT Exit Entirely and Return to Default Display Function Description The front panel display gives indication of the arrow button to use Displays symbols Cance...

Page 460: ... function 79 the following screen appears shown here with example settings or If the reclosing relay does not exist see Reclosing Relay on page 6 12 the following screen appears The corresponding text label settings shown with factory default settings are 79LL SET RECLOSURES Last Shot Label limited to 14 characters 79SL RECLOSE COUNT Shot Counter Label limited to 14 characters These text label set...

Page 461: ...anel RS LED illuminated the reclosing relay shot counter screen appears as The relay trips the breaker open and the reclosing relay goes to the reclose cycle state front panel CY LED illuminates The reclosing relay shot counter screen still appears as The first open interval 79OI1 30 times out the shot counter increments from 0 to 1 and the relay recloses the breaker The reclosing relay shot count...

Page 462: ... deasserts sets to logical 0 what are called local bits LB1 LB16 These local bits are available as Relay Word bits and are used in SELOGIC control equations see Rows 25 and 26 in Table 9 5 Local control can emulate the following switch types in Figure 11 5 Figure 11 7 Figure 11 5 Local Control Switch Configured as an ON OFF Switch Figure 11 6 Local Control Switch Configured as an OFF MOMENTARY Swi...

Page 463: ...RL pushbutton and the first set local control switch displays shown here with factory default settings Press the Right Arrow pushbutton and scroll to the next example local control switch The MANUAL TRIP RETURN TRIP and MANUAL CLOSE RETURN CLOSE switches are both OFF MOMENTARY switches see Figure 11 6 There are no more local control switches in the factory default settings Press the Right Arrow pu...

Page 464: ...UAL TRIP switch is shown to be in the TRIP position for 2 seconds long enough to be seen and then it returns to the RETURN position The MANUAL CLOSE switch is an OFF MOMENTARY type switch like the MANUAL TRIP switch and operates similarly See Local Control Switches Only on Models With LCD on page 7 5 for details on how local bit outputs LB3 and LB4 are set in SELOGIC control equation settings to r...

Page 465: ... before the power outage it will be in the same position after the outage when power is restored In the factory default settings the reclose enable disable function is provided by optoisolated input IN102 with the following SELOGIC control equation drive to lockout setting 79DTL IN102 LB3 NOT IN102 LB3 Local bit LB3 is the output of the previously discussed local control switch configured as a man...

Page 466: ...itch is operational It is a reminder of how to access the local control function See the preceding discussion in this section and Local Control Switches Only on Models With LCD on page 7 5 for more information on local control If display point labels e g 79 DISABLED and BREAKER OPEN are enabled for display they also enter into the display rotation Global setting SCROLD determines how long each mes...

Page 467: ...DP1 IN102 optoisolated input IN102 DP2 52A breaker status see Figure 7 2 Optoisolated input IN102 is used as a recloser enable disable 52A is set as a circuit breaker status input a 52a circuit breaker auxiliary contact is connected to input IN101 see Optoisolated Inputs on page 7 2 INST INST FAULT TYPE FAULT TYPE SERIAL SERIAL PORT F PORT F 9 9 1 1 A A B B C C TRIP TRIP EN EN 50 50 RS RS G G N N ...

Page 468: ...YPE FAULT TYPE SERIAL SERIAL PORT F PORT F 9 9 1 1 A A B B C C TRIP TRIP EN EN 50 50 RS RS G G N N COMM COMM SOTF SOTF 79 79 CY CY LO LO 51 51 81 81 Press CNTRL for Local Control 79 ENABLED BREAKER OPEN IA 50 IB 50 IC 50 IN 0 Display Points SELOGIC Control Equation Settings Example Display Point States Display Point Label Settings DP1 IN102 logical 0 DP1_1 79 ENABLED DP1_0 79 DISABLED DP2_1 BREAKE...

Page 469: ...Lock Control of Front Panel LCD The rotating default display can be locked on a single screen See Rotating Default Display Only on Models With LCD Access the scroll lock control with the OTHER pushbutton INST INST FAULT TYPE FAULT TYPE SERIAL SERIAL PORT F PORT F 9 9 1 1 A A B B C C TRIP TRIP EN EN 50 50 RS RS G G N N COMM COMM SOTF SOTF 79 79 CY CY LO LO 51 51 81 81 Press CNTRL for Local Control ...

Page 470: ... will appear for one second followed by the active screen Restart Scrolling Unlock The SELECT key unlocks the LCD and resumes the rotating display Single Step From the Scroll Locked state single step through the display screens by pressing the SELECT key twice Wait for the first press to display the next screen as the active display then press the SELECT key a second time to freeze scrolling Exit ...

Page 471: ...ing Default Display FPNGD IG FPNGD OFF Additional Rotating Default Display Example See Figure 5 4 and accompanying text in Section 5 Trip and Target Logic for an example of resetting a rotating default display with the TARGET RESET pushbutton IA 1 IB 1 IC 1 IG 1 IA 1 IB 1 IC 1 Courtesy of NationalSwitchgear com ...

Page 472: ...This page intentionally left blank Courtesy of NationalSwitchgear com ...

Page 473: ...ntinuous cycles The relay stores the most recent event report data in nonvolatile memory Twenty three 15 cycle or eleven 30 cycle reports are maintained if more reports are triggered the latest event report overwrites the oldest event report See Figure 12 3 for an example standard 15 cycle event report The relay adds lines in the sequential events recorder SER report for a change of state of a pro...

Page 474: ...tandard event report when any of the following occurs Relay Word bit TRIP asserts Programmable SELOGIC control equation setting ER asserts to logical 1 TRI Trigger Event Reports serial port command executed Output contacts OUT101 OUT107 pulsed via the serial port or front panel PUL Pulse Output Contact command Relay Word Bit TRIP Refer to Figure 5 1 If Relay Word bit TRIP asserts to logical 1 an e...

Page 475: ...serts and an event report is generated ER 51G logical 1 for one processing interval Even though the 51G pickup indicator will remain asserted for the duration of the ground fault the rising edge operator in front of 51G 51G causes setting ER to be asserted for only one processing interval If the fault is not interrupted after the relay trips then the relay outputs a breaker failure trip with outpu...

Page 476: ...xample Standard 15 Cycle Event Report near the end of this section for more information on the cosine filter and bipolar peak detector see CT Saturation Protection on page 1 4 The relay includes the event summary in the standard event report The identifiers date and time information is at the top of the standard event report and the other information follows at the end See Figure 12 3 The example ...

Page 477: ...ctors are required in your application use the highest numbered instantaneous overcurrent elements 50P5 50P6 50N5 50N6 50G5 50G6 50Q5 or 50Q6 because these are not used by the fault locator algorithm Targets The relay reports the targets at the rising edge of TRIP The targets include INST COMM S0TF 50 51 and 81 If there is no rising edge of TRIP in the report the Targets field is blank See Front P...

Page 478: ...4 or 16 defaults to 4 if not listed Ly Display y cycles of data 1 LER Defaults to LER value if not listed Unfiltered reports R parameter display an extra cycle of data L Display 16 samples per cycle same as the S16 parameter R Specifies the unfiltered raw event report Defaults to 16 samples per cycle unless overridden with the Sx parameter A Specifies that only the analog section of the event is d...

Page 479: ...ave a DT value of 0000 because the trigger time corresponds to the time display in the event report header The DT value for rows preceding the trigger point is referenced to the following row so they increment backwards in time The DT value for rows following the trigger point is referenced to the previous row so they increment forward in time If TSOK logical 0 this event report display option is ...

Page 480: ... 49 7 81 6 0 0 23 1046 476 497 1022 10 49 114 6 3 0 111 9 0 0 23 0000 5 165 759 956 10 32 80 6 50 6 130 7 0 0 23 1040 283 955 726 10 54 35 8 90 7 128 2 0 0 23 1043 580 982 424 9 22 16 5 121 5 103 6 0 0 23 1038 881 847 17 9 51 64 0 131 3 69 7 0 0 23 1043 Figure 12 2 Example Synchrophasor Level Precise Event Report 1 16 Cycle Resolution Compressed ASCII Event Reports The SEL 351A provides Compressed...

Page 481: ...es and corresponding standard event reports from nonvolatile memory See Section 10 Serial Port Communications and Commands for more information on the HIS Event Summaries History command Standard Event Report Column Definitions Refer to the example event report in Figure 12 3 to view event report columns This example event report displays rows of information each 1 4 cycle and was retrieved with t...

Page 482: ... 45 181 99 95 14 14 14 8 7 2 7 8 13 6 125 60 01 45 3 160 159 3 3 0 3 13 4 12 9 8 2 125 60 01 45 VBC Power system phase to phase voltage VBC primary kV PTCONN DELTA b VCA Power system phase to phase voltage VCA primary kV PTCONN DELTA b VS Voltage measured by channel VS primary kV c Vdc Voltage measured at power input terminals Z15 and Z16 Vdc d Freqe Frequency of channel VA or V1 if VA is not pres...

Page 483: ... 01 45 1 97 159 160 2 62 2 57 0 250 13 3 12 9 8 154 123 60 01 45 181 99 95 14 14 14 8 7 190 7 822 13 6 123 60 01 45 3 14 160 159 2 52 2 54 0 347 13 4 12 9 8 243 123 60 01 45 Output Input and Protection and Control Columns Table 12 3 summarizes the event report output input protection and control columns In addition see Table 9 5 for more information on Relay Word bits shown in Table 12 3 Some of t...

Page 484: ... ALARM asserted b Both OUT107 and ALARM asserted In 12 IN101 IN102 1 Optoisolated input IN101 asserted 2 Optoisolated input IN102 asserted b Both IN101 and IN102 asserted In 34 IN103 IN104 3 Optoisolated input IN103 asserted 4 Optoisolated input IN104 asserted b Both IN103 and IN104 asserted In 56 IN105 IN106 5 Optoisolated input IN105 asserted 6 Optoisolated input IN106 asserted b Both IN105 and ...

Page 485: ...p a 50AB_ and 50CA_ picked up b 50AB_ and 50BC_ picked up c 50BC_ and 50CA_ picked up 3 50AB_ 50BC_ and 50CA_ picked up 32 PQ F32P P Forward phase directional element F32P picked up R32P p Reverse phase directional element R32P picked up F32Q Q Forward negative sequence direc tional element F32Q picked up R32Q q Reverse negative sequence direc tional element R32Q picked up 32 NG F32QG Q Forward ne...

Page 486: ...ls 1 and 2 not picked up 2 Level 2 instantaneous element 67_2 picked up Level 1 not picked up 1 Level 1 instantaneous element 67_1 picked up DM PQ PDEM QDEM P Phase demand ammeter element PDEM picked up Q Negative sequence demand amme ter element QDEM picked up b Both PDEM and QDEM picked up DM NG NDEM GDEM N Neutral ground demand ammeter element NDEM picked up G Residual ground demand ammeter ele...

Page 487: ...nt 27AB2 picked up B BC phase to phase instantaneous undervoltage element 27BC2 picked up C CA phase to phase instantaneous undervoltage element 27CA2 picked up a 27AB2 and 27CA2 elements picked up b 27AB2 and 27BC2 elements picked up c 27BC2 and 27CA2 elements picked up 3 27AB2 27BC2 and 27CA2 ele ments picked up 27 S 27S Channel VS instantaneous under voltage element 27S picked up 59 P wye conne...

Page 488: ... up 59 PP2 delta connected 59AB2 59BC2 59CA2 A AB phase to phase instantaneous overvoltage element 59AB2 picked up B BC phase to phase instantaneous overvoltage element 59BC2 picked up C CA phase to phase instantaneous overvoltage element 59CA2 picked up a 59AB2 and 59CA2 elements picked up b 59AB2 and 59BC2 elements picked up c 59BC2 and 59CA2 elements picked up 3 59AB2 59BC2 and 59CA2 ele ments ...

Page 489: ... 59S1 and 59S2 picked up 59 V 59VP 59VS P Phase voltage window element 59VP picked up used in synchro nism check S Channel VS voltage window ele ment 59VS picked up used in syn chronism check b Both 59VP and 59VS picked up 25 SF SF Slip frequency element SF picked up used in synchronism check 25 A 25A1 25A2 1 Synchronism check element 25A1 element picked up 2 Synchronism check element 25A2 element...

Page 490: ...Shot SH0 SH1 SH2 SH3 SH4 0 Reclosing relay nonexistent shot 0 SH0 1 shot 1 SH1 2 shot 2 SH2 3 shot 3 SH3 4 shot 4 SH4 Zld ZLIN ZLOUT i Load encroachment load in ele ment ZLIN picked up o Load encroachment load out ele ment ZLOUT picked up LOP LOP Loss of potential element LOP picked up Vdc DCHI DCLO H Station battery instantaneous over voltage element DCHI picked up L Station battery instantaneous...

Page 491: ... and RB8 asserted Rem OC OC CC o OPE Open command executed c CLO Close command executed Ltch 12 LT1 LT2 1 Latch bit LT1 asserted 2 Latch bit LT2 asserted b Both LT1 and LT2 asserted Ltch 34 LT3 LT4 3 Latch bit LT3 asserted 4 Latch bit LT4 asserted b Both LT3 and LT4 asserted Ltch 56 LT5 LT6 5 Latch bit LT5 asserted 6 Latch bit LT6 asserted b Both LT5 and LT6 asserted Ltch 78 LT7 LT8 7 Latch bit LT...

Page 492: ...14T SV15 SV15T SV16 SV16T T d SELOGIC control equation variable timer input SV_ asserted timer timed out on pickup time timer output SV_T asserted SELOGIC control equation variable timer input SV_ not asserted timer previously timed out on pickup time timer output SV_T remains asserted while timer timing on dropout time a Output contacts can be a or b type contacts see Table 2 2 and Figure 7 26 Ta...

Page 493: ...he SER The other two SER factory settings SER2 and SER3 trigger rows in the SER event report for such things as optoisolated input IN101 output contact OUT101 OUT102 or OUT103 and lockout state 79LO The relay adds a message to the SER to indicate power up Relay newly powered up The relay adds a message to the SER to indicate a settings change has been made to the active setting group Relay setting...

Page 494: ...ered with a single number following it 17 in this example the first 17 rows are displayed if they exist They dis play with the oldest row row 17 at the beginning top of the report and the latest row row 1 at the end bottom of the report Chronological progression through the report is down the page and in descending row number SER 10 33 If SER is entered with two numbers following it 10 and 33 in t...

Page 495: ...2 17 97 chro nologically precedes date 3 23 97 in this example all the rows between and including dates 2 17 97 and 3 23 97 are dis played if they exist They display with the oldest row date 2 17 97 at the beginning top of the report and the latest row date 3 23 97 at the end bottom of the report Chronological progression through the report is down the page and in descend ing row number SER 3 16 9...

Page 496: ...that corresponds to the Date and Time values at the top of the event report The asterisk in the column following the Freq column identifies the row with the maximum phase current which is determined from the filtered values The maximum phase current is calculated from the row identified with the asterisk and the row one quarter cycle previous see Figure 12 5 and Figure 12 6 These currents are list...

Page 497: ...0 5 5 1 0 0 24 60 01 1 b 2317 31 193 1 2154 6 2 3 5 9 9 0 0 24 60 01 1 b 1484 208 80 1 1612 3 8 10 5 5 1 0 0 24 60 01 1 b 9 2317 30 194 1 2153 6 2 3 5 9 9 0 0 24 60 01 1 b 1483 207 80 0 1609 3 8 10 5 5 1 0 0 24 60 01 1 b 1965 41 160 0 1846 7 2 2 9 10 1 0 0 24 60 01 1 b 849 146 39 1 956 4 4 10 7 5 1 0 0 24 60 01 1 b 10 805 26 64 1 767 9 0 1 7 10 6 0 0 24 60 01 1 b 108 41 0 0 149 6 0 11 4 5 1 0 0 24...

Page 498: ...es Voltages are processed similarly Continued from previous page 5 p p R 0 p p A 1 C 0 p p p A 1 Cr0 p p p A 1 Cr0 p 6 p p A 1 Cr0 p p p A 1 Cr0 p p p A 1 Cr0 p p p A 1 Cr0 p 7 p p A 1 Cr0 p p p A 1 Cr0 p p p A 1 Cr0 p p p A 1 Cr0 p 8 p p A 1 Cr0 p p p A 1 Cr0 p p p A 1 Cr0 p p p A 1 Cr0 p 9 p p A 1 Cr0 p p p A 1 Cr0 p p p A 1 Cr0 p p p A 1 Cr0 p 10 p p Cr0 p p p Cr0 p r r Cr0 p r r Cr0 p 11 r r C...

Page 499: ... 0 23 59 99 Protection and Control Elements 51 50 32 67 Dm 27 59 25 81 TS Lcl Rem Ltch SELogic P P 5 2 ih ZLV Variable G P PN PN PP PPV 9S 7135 7mo lOd 13571357O1357 1111111 ABCPNG2QPP QG PNGQ QG P2SP21QS VFA B246 9et dPc 24682468C2468 1234567890123456 1 L 1 L 1 L 1 L 1 2 L 1 L 1 L 1 L 1 Event TRIG Location Shot 1 Frequency 59 99 Targets Currents A Pri ABCNGQ 191 173 229 0 68 88 Group 1 Group Sett...

Page 500: ...rm In Figure 12 5 note that any two rows of current data from the event report in Figure 12 3 1 4 cycle apart can be used to calculate rms current values Event Report Column 1474 2320 1479 2317 2317 1479 2320 1474 IA 1 2 2 2 Multiply by 1 Multiply by 2317 2320 1479 1474 2091 3281 2085 3277 t IA 1 4 cyc IApeak 3887 Apeak 3887 Apeak 2749 ARMS 1474 2 2320 2 2320 2 1479 2 1479 2 2317 2 2749 2751 2749 ...

Page 501: ...cycle apart can be used to calculate phasor rms current values In Figure 12 6 at the present sample the phasor rms current value is IA 2749 A 32 6 The present sample IA 2317 A is a real rms current value that relates to the phasor rms current value 2749 A cos 32 6 2317 A IA t IA 1474 2320 1479 2317 Event Report Column X Present Sample Magnitude X 2317 Y 1479 Angle Arctan Arctan Y X 1479 2317 30 0 ...

Page 502: ... OUT102 Asserted Figure 12 7 Example Sequential Events Recorder SER Event Report The SER event report rows in Figure 12 7 are explained in the following text numbered in correspondence to the column The boxed numbered comments in Figure 12 3 also correspond to the column numbers in Figure 12 7 The SER event report in Figure 12 7 contains records of events that occurred before and after the standar...

Page 503: ...d 51G drop out as the circuit breaker interrupts fault current 3 Input IN101 deasserts indicating that the circuit breaker opened 2 Trip output contact OUT101 deasserts after being asserted a minimum of 9 cycles Related settings TDURD 9 000 cycles Time difference 09 28 31 879 09 28 31 729 0 150 seconds 9 cycles Open interval 79OI1 does not start timing until trip output contact OUT101 deas serts R...

Page 504: ...This page intentionally left blank Courtesy of NationalSwitchgear com ...

Page 505: ...erview This section provides guidelines for determining and establishing test routines for the SEL 351A Relay Included are discussions on testing philosophies methods and tools Relay self tests and troubleshooting procedures are shown at the end of the section Courtesy of NationalSwitchgear com ...

Page 506: ...s and logic functions critical to the intended application SEL performs detailed acceptance testing on all new relay models and versions We are certain the relays we ship meet their published specifications It is important for you to perform acceptance testing on a relay if you are unfamiliar with its operating theory protection scheme logic or settings This helps ensure the accuracy and correctne...

Page 507: ...tioning correctly What to test Anything not shown to have operated during an actual fault within the past maintenance interval SEL relays use extensive self testing capabilities and feature detailed metering and event reporting functions that lower the utility dependence on routine maintenance testing 1 Use the SEL relay reporting functions as maintenance tools 2 Periodically verify that the relay...

Page 508: ...s of relay event reports Because SEL relays are microprocessor based their operating characteristics do not change over time Time overcurrent operating times are affected only by the relay settings and applied signals It is not necessary to verify operating characteristics as part of maintenance checks At SEL we recommend that maintenance tests on SEL relays be limited under the guidelines provide...

Page 509: ... power system frequency FREQ and the voltage input to the relay power supply terminals VDC Compare these quantities against other devices of known accuracy The METER command is available at the serial ports and front panel display See Section 10 Serial Port Communications and Commands and Section 11 Front Panel Interface Only on Models With LCD EVENT The relay generates a 15 or 30 cycle event repo...

Page 510: ...ing signals Apply low level test signal VAB to pin VA Apply low level test signal VBC equivalent to VCB to pin VC Do not apply any signal to pin VB Refer to Delta Connected Voltages Global setting PTCONN DELTA on page 2 14 for more information on the delta connection The relay contains devices sensitive to Electrostatic Discharge ESD When working on the relay with the front panel removed work surf...

Page 511: ...he bottom row of the LCD displays all elements asserted in Relay Word Row 6 The relay maps the state of the elements in Relay Word Row 6 on the bottom row of LEDs The 51PT element state is reflected on the LED labeled RS See Table 9 5 for the correspondence between the Relay Word elements and the TAR command Testing With the Serial Port TAR Command To view the 51PT element status from the serial p...

Page 512: ...nd SER To test the phase time overcurrent element 51PT with the SER make the following setting SER1 51P 51PT Element 51P asserts when phase current is above the pickup of the phase time overcurrent element Element 51PT asserts when the phase time overcurrent element times out The assertion and deassertion of these elements is time stamped in the SER report Use this method to verify timing associat...

Page 513: ...ched The relay generates automatic STATUS reports at the serial port for warnings and failures The relay displays failure messages on the relay LCD display for failures Use the serial port STATUS command or front panel STATUS pushbutton to view relay self test status Table 13 3 Relay Self Tests Sheet 1 of 2 Self Test Condition Limits Protection Disabled ALARM Output Description IA IB IC IN VA VB V...

Page 514: ...econds EEPROM Failure checksum Yes Latched Performs a checksum test on the nonvolatile copy of the relay settings every 10 seconds The following self tests are performed by dedicated circuitry in the microprocessor and the SEL 351A main board Failures in these tests shut down the microprocessor and are not shown in the STATUS report Microprocessor Crystal Failure Yes Latched The relay monitors the...

Page 515: ...to see if the ALARM contact is closed 2 LCD contrast is out of adjustment Use the following steps to adjust the contrast a Remove the relay front panel by removing the six front panel screws b Press any front panel pushbutton The relay should turn on the LCD back lighting c Locate the contrast adjust potentiometer adjacent to the serial port connector d Use a small screwdriver to adjust the potent...

Page 516: ...nput cable between transformer secondary and main board loose or defective 5 Failed relay self test Relay Meter Command Does Not Respond as Expected 1 Global settings PTCONN VSCONN NFREQ or PHROT not set correctly 2 Group Settings CTR CTRN PTR or PTRN not set correctly 3 Relay analog inputs not connected correctly Courtesy of NationalSwitchgear com ...

Page 517: ...n Manual SEL 351A Relay Testing and Troubleshooting Relay Calibration Relay Calibration The SEL 351A is factory calibrated If you suspect that the relay is out of calibration please contact the factory Courtesy of NationalSwitchgear com ...

Page 518: ...ory Assistance We appreciate your interest in SEL products and services If you have questions or comments please contact us at Schweitzer Engineering Laboratories Inc 2350 NE Hopkins Court Pullman WA 99163 5603 USA Tel 1 509 332 1890 Fax 1 509 332 7990 Internet www selinc com Courtesy of NationalSwitchgear com ...

Page 519: ... model lists the firmware versions a description of modifications and the instruction manual date code that corresponds to firmware versions The most recent firmware version is listed first Relay Model Revision History SEL 351A Table A 1 SEL 351A 1 Table A 2 Table A 1 SEL 351A Firmware Revision History Sheet 1 of 5 Firmware Part Revision No Description of Firmware Manual Date Code This firmware ap...

Page 520: ...A R110 V0 Z006005 D20041210 Manual update only See Table A 3 20050518 This firmware differs from the previous version as follows SEL 351A R110 V0 Z006005 D20041210 Added E79 setting options for enhanced recloser supervision applications 20041210 Allow phase and negative sequence time overcurrent element pickups to be set more sensitively Improve accuracy of voltage elements Improve password securi...

Page 521: ...onnected PTs 20020618 Added global setting VSCONN to allow the relay VS NS termi nals to be connected to a synchronism check voltage source as before or a broken delta zero sequence voltage source Added ground directional element options for low impedance Petersen coil and ungrounded high impedance grounded sys tems expanded setting options for setting ORDER S P and U These new directional element...

Page 522: ...ating thresholds for unlatch logic Added variable scaling of analog quantities in event reports i e variable number of digits behind the decimal point depending on magnitude Added additional event report fault types for Petersen coil and ungrounded high impedance grounded sys tems Added capability to frequency track with positive sequence voltage V1 if VA too low VA 20 V Revised demand peak demand...

Page 523: ... monitor data to dis play points Redesigned Maximum Minimum Metering Logic Added support for ACSELERATOR QuickSet SEL 5030 soft ware This firmware differs from the previous version as follows SEL 351A R103 V0 Z002002 D20001005 Internal changes to support Flash memory revision and battery backed clock hardware change 20001006 Added SEL DTA2 Display Transducer Adapter compatibility Target LEDs can n...

Page 524: ...ction functions 20071226 This firmware differs from the previous version as follows SEL 351A 1 R401 V0 Z001001 D20070725 Manual update only See Table A 3 for description of updates 20071219 This firmware differs from the previous version as follows SEL 351A 1 R401 V0 Z001001 D20070725 Corrected problem that caused intermittent 50G element opera tion Problem only manifests on systems with load curr...

Page 525: ...revious version as follows 20071226 Section 1 Clarified overcurrent element setting ranges in Specifications Section 3 Added second residual ground time overcurrent element 51G2T for SEL 351A only Clarified figure captions related to SEL 351A 1 exclusions Section 7 Added 51G2P to Table 7 10 and Table 7 11 for SEL 351A only Section 9 Updated Table 9 5 and Table 9 6 with new Relay Word bits 51G2 51G...

Page 526: ...y Word bit definitions TSOK and TIRIG to IRIG B section Added new SEL Fast Message Synchrophasor protocol to communications protocol list Added MET PM command explanation Added time parameter to TRI command Command Summary Updated to include all commands Section 12 Added P parameter to EVE command Added Synchrophasor Level Accuracy in Event Reports section Added P parameter note and DT column info...

Page 527: ...on of E79 setting which affects how the relay reacts to Reclose Supervision Failure Settings Sheets Modification to ranges of E79 Z1ANG Z0ANG 51PP 51AP 51BP 51CP and 51QP settings Section 10 Updated subsection PAS Command Change Passwords on page 10 37 Section 12 Updated subsection Example Standard 15 Cycle Event Report on page 12 24 Appendix A Updated for firmware version R110 Command Summary Upd...

Page 528: ...fore SET L command information Corrected Fast Operate reset description string for A5CD Fast Operate Reset Definition Block This manual differs from the previous version as follows 20020618 Reissued entire manual The changes in this revision relate to the new global setting PTCONN that allows the relay to be configured for either wye or delta connected PTs new global setting VSCONN that allows the...

Page 529: ...g ranges for neutral ground overcurrent elements operating from the 0 2 A nomi nal neutral channel IN current input Added lower pickup setting ranges for residual ground overcurrent elements Added Table 3 11 and Table 3 12 Added Figure 3 24 and Figure 3 25 Updated subsection Voltage Input VS Connected Phase to Phase or Beyond Delta Wye Transformer on page 3 36 Updated Table 3 9 and Table 3 13 Adde...

Page 530: ... Figure 4 17 Added Figure 4 15 Figure 4 28 Added subsection 59RES Wattmetric 3V0 Overvoltage Pickup Petersen Coil Grounded System on page 4 49 Added subsection 32WFP and 32WRP Wattmetric Forward and Reverse Pickups Petersen Coil Grounded System on page 4 49 Added subsection Settings Considerations for Petersen Coil Grounded Systems on page 4 52 Added Table 4 5 Section 5 Added information on fault ...

Page 531: ...and Added Delta voltage information to MET Command Metering Data on page 10 18 Updated the SHO G screen display in SHO Command Show View Settings on page 10 25 to include the new settings PTCONN and VSCONN Updated TAR commands in subsection TAR Command Display Relay Element Status on page 10 30 to include TAR ROW and TAR LIST and an example Updated BRE W command to allow trip counters and accumula...

Page 532: ...eference Updated Terminal Connections information Section 2 Added vertical rear panel diagram to Figure 2 5 Added Forward to Tripping Direction label on Figure 2 6 Figure 2 13 Section 8 Add Figure 2 5 reference Section 9 Corrected setting range for Voltage Elements See Figure 3 22 Figure 3 23 Figure 3 24 Figure 3 25 and Figure 3 26 on page SET 10 This manual differs from the previous version as fo...

Page 533: ...PAS Command Change Passwords on page 10 37 Updated Command Summary to include MET X command Section 11 Updated password information Section 12 Added note in Fault Location on page 12 5 Updated Make Sequential Events Recorder SER Settings With Care on page 12 22 Appendix A Updated Firmware Version information Appendix B Updated password information Appendix J Added new Appendix J ACSELERATOR QuickS...

Page 534: ...escription Added details to COP m n command description Revised SEL 351A Relay Command Summary Section 11 Corrected Rotating Default Display on page 11 12 example Section 12 Minor change to Overview on page 12 1 Added cautionary note on SER settings Appendix A Updated Firmware Version information Appendix B Added Step 16 for Breaker Wear Monitor data Appendix D Changes to A5CO Relay Definition Blo...

Page 535: ...o time SEL issues firmware upgrades for this relay The instructions which follow explain how you can install new firmware in your SEL 300 series relay In addition SEL issues firmware upgrades for the optional Ethernet ports Ethernet Port Firmware Upgrade Instructions on page B 19 Courtesy of NationalSwitchgear com ...

Page 536: ...tion do not attempt to load the firmware into the relay through an SEL communications processor Perform the firmware upgrade process in the following sequence A Prepare the Relay B Establish a Terminal Connection C Save Settings and Other Data D Start SELBOOT E Download Existing Firmware F Upload New Firmware G Check Relay Self Tests H Verify Settings Calibration Status Breaker Wear and Metering I...

Page 537: ...utton to scroll through the port settings write down the value for each setting Step 10 At the EXIT SETTINGS prompt select Yes and press the SELECT pushbutton Step 11 Connect an SEL Cable C234A or equivalent serial communications cable to the relay serial port selected in Step 6 above B Establish a Terminal Connection To establish communication between the relay and a personal computer you must be...

Page 538: ...th the relay Figure B 2 and click OK This port matches the port connection that you made in Step 1 under B Establish a Terminal Connection Figure B 2 Determining the Computer Serial Port Step 6 Establish serial port communications parameters The settings for the computer Figure B 3 must match the relay settings you recorded earlier a Enter the serial port communications parameters Figure B 3 that ...

Page 539: ...hoose Properties b Select the Settings tab in the Firmware Upgrade Properties dialog box Figure B 4 c Select VT100 from the Emulation list box and click OK Figure B 4 Setting Terminal Emulation Step 8 Confirm serial communication Press Enter In the terminal emulation window you should see the Access Level 0 prompt similar to that in Figure B 5 If this is successful proceed to C Save Settings and O...

Page 540: ...s to reattempt a connection Step 9 From the Call menu choose Disconnect to terminate communication Step 10 Correct the port setting a From the File menu choose Properties You should see a dialog box similar to Figure B 6 b Select a different port in the Connect using list box Figure B 6 Correcting the Port Setting Step 11 Correct the communications parameters a From the filename Properties dialog ...

Page 541: ...he Access Level 2 password and press Enter You will see the Access Level 2 prompt Backup Relay Settings The relay preserves settings and passwords during the firmware upgrade process However interruption of relay power during the upgrade process can cause the relay to lose settings Make a copy of the original relay settings in case you need to reenter the settings Use either the SEL 5010 Relay Ass...

Page 542: ...he Transfer menu in HyperTerminal select Capture Text and click Stop The computer saves the text file you created to the directory you specified in Step 2 under Backup Relay Settings Step 6 Write down the present relay data transmission setting SPEED This setting is SPEED in the SHO P relay settings output The SPEED value should be the same as the value you recorded in A Prepare the Relay on page ...

Page 543: ...e number following the R is the SELBOOT revision number This number is different from the relay firmware revision number After SELBOOT loads the computer will display the SELBOOT prompt Step 4 Press Enter to confirm that the relay is in SELBOOT You will see another SELBOOT prompt Commands Available in SELBOOT For a listing of commands available in SELBOOT type HELP Enter You should see a screen si...

Page 544: ... Relay Parameters E Download Existing Firmware Copy the firmware presently in the relay in case the new firmware upload is unsuccessful To make a backup of the existing firmware the computer will need as much as 3 MB of free disk space This backup procedure takes 5 10 minutes at 38400 bps Step 1 Type SEN Enter at the SELBOOT prompt to initiate the firmware transfer from the relay to the computer S...

Page 545: ...n If Xmodem times out before the download completes repeat the process from Step 1 on page B 10 NOTE HyperTerminal stored any pathname you entered in Step 3 and any filename you entered in Step 6 during the earlier download attempt this saves you from reentering these on a subsequent attempt For a successful download you should see a dialog box similar to Figure B 13 After the transfer the relay r...

Page 546: ...Y N Y Enter Step 3 Type Y to erase the existing firmware and load new firmware To abort type N or press Enter The relay responds with the following Erasing Erase successful Press any key to begin transfer then start transfer at the PC Enter Step 4 Press Enter to start the file transfer routine Step 5 Send new firmware to the relay a From the Transfer menu in HyperTerminal choose Send File Figure B...

Page 547: ...successful uploads can result from Xmodem time out a power failure loss of communication between the relay and the computer or voluntary cancellation Check connections reestablish communication and start again at Step 2 on page B 12 If you want to reload the previous firmware begin at Step 2 on page B 12 and use the firmware you saved in E Download Existing Firmware on page B 10 Contact the factor...

Page 548: ...tware settings to the values you recorded in A Prepare the Relay Step 3 From the Call menu choose Connect to rees tablish communication Step 4 Press Enter to check for the Access Level 0 prompt indicating that serial com munication is successful Step 5 If you get no response proceed to Match Computer Communications Speed to the Relay The restart was successful but the relay data transmission rate ...

Page 549: ...Check for Access Level 0 prompt c Use the ACC and 2AC commands and type the corresponding passwords to reenter Access Level 2 d Enter the SHO n command to view relay settings and verify that these match the settings you saved see Backup Relay Settings on page B 7 Step 2 If the settings do not match reenter the settings you saved earlier a If you have SEL 5010 Relay Assistant software or ACSELERATO...

Page 550: ...s Level 0 prompt indicating that serial communication is successful Step 5 Use the ACC and 2AC commands and type the corresponding passwords to reenter Access Level 2 Step 6 Restore the original settings a If you have SEL 5010 Relay Assistant software or ACSELERATOR QuickSet restore the original settings by following the instructions for the respective software b If you do not have the SEL 5010 Re...

Page 551: ...cation string FID to verify download of the correct firmware a From the File menu choose Properties b Select the Settings tab in the Firmware Upgrade Properties dialog box Figure B 4 c Click ASCII Setup You should see a dialog box similar to Figure B 16 d Under ASCII Receiving select the check box to Append line feeds to incoming line ends Figure B 16 Preparing HyperTerminal for ID Command Display...

Page 552: ...e signals are correct Step 9 Use the TRIGGER and EVENT commands to verify that the magnitudes of the current and voltage signals you applied to the relay match those displayed in the event report If these values do not match check the relay settings and wiring I Return the Relay to Service Step 1 Follow your company procedures for returning a relay to service Step 2 Autoconfigure the SEL communica...

Page 553: ...puter FTP client software e g Microsoft Internet Explorer Disk containing the communications card firmware upgrade s19 file Firmware upgrade instructions these instructions Upgrade Procedure A Prepare the Relay Step 1 If the relay is in use follow your company practices for removing a relay from service Typically these include changing settings or disconnecting external voltage sources or output c...

Page 554: ...thernet network and another cable from the personal computer Ethernet port to the same Ethernet network Step 2 From the computer open Internet Explorer On a personal computer running Windows you would typically click Start Programs Internet Explorer Step 3 In the Address bar enter the user name default for FTPUSER setting is 2AC 2AC password and the FTP IP address of the relay Figure B 17 at the s...

Page 555: ...nnection Step 6 Right click on the file that you would like to copy Step 7 Click Copy to Folder Figure B 19 Step 8 Browse for folder Step 9 Click OK Figure B 19 Read Open File If a window opens with the message The page cannot be displayed as shown in Figure B 20 you might have logged on improperly Retry the login process described in the steps above Courtesy of NationalSwitchgear com ...

Page 556: ...ow The Copying dialog box appears until the upload is complete If the Confirm File Replace dialog box appears click on Yes and the file will transfer D Establish a Telnet Connection To establish a Telnet to card connection perform the following steps Step 1 Click Start Run Step 2 Type cmd in the dialog box and press Enter to launch a DOS command window Step 3 Type Telnet IP Address port at the pro...

Page 557: ...Upgrade Instructions Ethernet Port Firmware Upgrade Instructions Step 3 Verify that the STA report includes Device Enabled at the end of the report Step 4 Verify that the STA report FID matches the FID of the firmware you transferred Courtesy of NationalSwitchgear com ...

Page 558: ...This page intentionally left blank Courtesy of NationalSwitchgear com ...

Page 559: ...ch Protocol Overview SEL Distributed Port Switch Protocol LMD permits multiple SEL relays to share a common communications channel It is appropriate for low cost low speed port switching applications where updating a real time database is not a requirement Courtesy of NationalSwitchgear com ...

Page 560: ...e following settings PREFIX One character to precede the address This should be a character that does not occur in the course of other communications with the relay Valid choices are one of the following The default is ADDR Two character ASCII address The range is 01 to 99 The default is 01 SETTLE Time in seconds that transmission is delayed after the request to send RTS line asserts This delay ac...

Page 561: ...ters while the external transmitter is warming up 4 Until the relay connection terminates you can use the standard commands that are available when PROTO is set to SEL 5 The QUIT command terminates the connection If no data are sent to the relay before the port timeup period it automatically terminates the connection 6 Enter the sequence CTRL X QUIT CR before entering the prefix character if not a...

Page 562: ...This page intentionally left blank Courtesy of NationalSwitchgear com ...

Page 563: ...inue This mechanism allows a single communications channel to be used for ASCII communications e g transmission of a long event report interleaved with short bursts of binary data to support fast acquisition of metering data The device connected to the other end of the link requires software that uses the separate data streams to exploit this feature The binary commands and ASCII commands can also...

Page 564: ... Block A5D2 Demand Fast Meter Data Message A5C3 Peak Demand Fast Meter Configuration Block A5D3 Peak Demand Fast Meter Data Message A5B9 Fast Meter Status Acknowledge A5CE Fast Operate Configuration Block A5E0 Fast Operate Remote Bit Control A5E3 Fast Operate Breaker Control Table D 2 ASCII Configuration Message List Request to Relay ASCII Response From Relay ID ASCII Firmware ID String and Termin...

Page 565: ... A5D2 Fast demand message A5C3 Fast peak configuration A5D3 Fast peak message 0004 Settings change bit A5C100000000 Reconfigure Fast Meter on settings change 0300 SEL protocol with Fast Operate and fast message unsolicited SER messaging 0301 LMD protocol with Fast Operate and fast message unsolicited SER messaging 0005 DNP3 0006 MIRRORED BITS protocol no Fast Operate 00 Reserved xx Checksum Table ...

Page 566: ... type FF Scale factor type 0000 Scale factor offset in Fast Meter message 564200000000 Analog channel name VB or VBC for delta connected voltages 01 Analog channel type FF Scale factor type 0000 Scale factor offset in Fast Meter message 564300000000 Analog channel name VC or VCA for delta connected voltages 01 Analog channel type FF Scale factor type 0000 Scale factor offset in Fast Meter message ...

Page 567: ...lta 06 VC channel index VCA for delta 00 Reserved checksum 1 byte checksum of all preceding bytes Table D 4 A5C1 Fast Meter Configuration Block Sheet 3 of 3 Data Description Table D 5 A5D1 Fast Meter Data Block Data Description A5D1 Command 9E Length 1 byte 1 Status Byte 80 bytes X and Y components of IA IB IC IN VA VAB VB VBC VC VCA VS Freq and Vbatt in 4 byte IEEE FPS 8 bytes Time stamp 63 bytes...

Page 568: ...nalog channel name IN 02 Analog channel type FF Scale factor type 0000 Scale factor offset in Fast Meter message 494700000000 Analog channel name IG 02 Analog channel type FF Scale factor type 0000 Scale factor offset in Fast Meter message 334932000000 Analog channel name 3I2 02 Analog channel type FF Scale factor type 0000 Scale factor offset in Fast Meter message 50412B000000 Analog channel name...

Page 569: ...t Meter message 51332B000000 Analog channel name Q3 02 Analog channel type FF Scale factor type 0000 Scale factor offset in Fast Meter message 50412D000000 Analog channel name PA 02 Analog channel type FF Scale factor type 0000 Scale factor offset in Fast Meter message 50422D000000 Analog channel name PB 02 Analog channel type FF Scale factor type 0000 Scale factor offset in Fast Meter message 504...

Page 570: ...type FF Scale factor type 0000 Scale factor offset in Fast Meter message 51432D000000 Analog channel name QC 02 Analog channel type FF Scale factor type 0000 Scale factor offset in Fast Meter message 51332D000000 Analog channel name Q3 02 Analog channel type FF Scale factor type 0000 Scale factor offset in Fast Meter message 00 Reserved checksum 1 byte checksum of preceding bytes Table D 6 A5C2 A5...

Page 571: ...remote bit RB3 22 Operate code set remote bit RB3 42 Operate code pulse remote bit RB3 03 Operate code clear remote bit RB4 23 Operate code set remote bit RB4 43 Operate code pulse remote bit RB4 04 Operate code clear remote bit RB5 24 Operate code set remote bit RB5 44 Operate code pulse remote bit RB5 05 Operate code clear remote bit RB6 25 Operate code set remote bit RB6 45 Operate code pulse r...

Page 572: ...4B Operate code pulse remote bit RB12 0C Operate code clear remote bit RB13 2C Operate code set remote bit RB13 4C Operate code pulse remote bit RB13 0D Operate code clear remote bit RB14 2D Operate code set remote bit RB14 4D Operate code pulse remote bit RB14 0E Operate code clear remote bit RB15 2E Operate code set remote bit RB15 4E Operate code pulse remote bit RB15 0F Operate code clear remo...

Page 573: ...opout time is 30 cycles via the SET L command SV4 RB4 SV4 input is RB4 OUT104 SV4T route SV4 timer output to OUT104 To pulse the contact send the A5E006430DDB command to the relay A5E3 Fast Operate Breaker Control The external device sends the message shown in Table D 10 to perform a fast breaker open close The relay performs the specified breaker operation if the following conditions are true 1 C...

Page 574: ... message is available from Access Level 0 and higher DNA Message In response to the DNA command the relay sends the names of the Relay Word bits transmitted in the A5D1 message The first name is associated with the MSB the last name with the LSB These names are listed in the Relay Word Bits table for the appropriate model in Section 9 Setting the Relay The DNA command is available from Access Leve...

Page 575: ...T 81D4T 81D5T 81D6T VPOLV LOP yyyy CR LF SFAST SSLOW IN106 IN105 IN104 IN103 IN102 IN101 yyyy CR LF LB1 LB2 LB3 LB4 LB5 LB6 LB7 LB8 yyyy CR LF LB9 LB10 LB11 LB12 LB13 LB14 LB15 LB16 yyyy CR LF RB1 RB2 RB3 RB4 RB5 RB6 RB7 RB8 yyyy CR LF RB9 RB10 RB11 RB12 RB13 RB14 RB15 RB16 yyyy CR LF LT1 LT2 LT3 LT4 LT5 LT6 LT7 LT8 yyyy CR LF LT9 LT10 LT11 LT12 LT13 LT14 LT15 LT16 yyyy CR LF SV1 SV2 SV3 SV4 SV1T ...

Page 576: ...n the SER settings The name string starts with SER1 followed by SER2 and SER3 For example if SER1 50A1 OUT101 SER2 67P1T 81D1T SER3 OUT102 52A the name string will be 50A1 OUT101 67P1T 81D1T OUT102 52A If there are more than eight settings in SER the SNS message will have several rows Each row will have eight strings followed by the checksum and carriage return The last row may have fewer than eig...

Page 577: ...om the relay in a format which directly imports into spreadsheet or database programs and which can be validated with a checksum NOTE VS and VDC values are removed from the SEL 351A 1 Compressed ASCII commands Inactive Relay Word bits are shown as The SEL 351A provides the following Compressed ASCII commands Command Description CASCII Configuration message CSTATUS Status message CHISTORY History m...

Page 578: ...pressed ASCII command as sent by the requesting device The naming convention for the Compressed ASCII commands is a C preceding the typical command For example CSTATUS abbreviated to CST is the Compressed STATUS command ll is the minimum access level at which the command is available H identifies a header line to precede one or more data lines is the number of subsequent ASCII names For example 21...

Page 579: ...nds CASCII Command General Format If a Compressed ASCII request is made for data that are not available e g the history buffer is empty or an invalid event request the relay responds with the following message STX No Data Available 0668 CR LF ETX Courtesy of NationalSwitchgear com ...

Page 580: ...kV VS kV VDC FREQ TRIG Names of elements in the relay word rows 2 62 separated by spaces yyyy CR LF 60D F F F F F F F F F I F 2S 122S yyyy CR LF CEV C 1 yyyy CR LF 1H FID yyyy CR LF 1D 45S yyyy CR LF 7H MONTH DAY YEAR HOUR MIN SEC MSEC yyyy CR LF 1D I I I I I I I yyyy CR LF 14H FREQ SAM CYC_A SAM CYC_D NUM_OF_CYC EVENT LOCATION SHOT TARGETS IA IB IC IN IG 3I2 yyyy CR LF 1D F I I I 6S F I 22S I I I...

Page 581: ...EC MSEC yyyy CR LF xxxx xxxx xxxx xxxx xxxx xxxx xxxx yyyy CR LF IA IB IC IN VA VB VC VS MOF 5V_PS 5V_REG 5V_REG 12V_PS 12V_PS 15V_PS 15V_PS TEMP RAM ROM A D CR_RAM EEPROM IO_BRD yyyy CR LF xxxx xxxx xxxx xxxx xxxx xxxx xxxx xxxx xxxx xxxx xxxx xxxx xxxx xxxx xxxx xxxx xxxx xxxx xxxx xxxx xxxx xxxx xxxx yyyy CR LF ETX where xxxx are the data values corresponding to the first line labels and yyyy i...

Page 582: ...ONTH DAY YEAR HOUR MIN SEC MSEC EVENT LOCATION CURR FREQ GROUP SHOT TARGETS yyyy CR LF xxxx xxxx xxxx xxxx xxxx xxxx xxxx xxxx xxxx xxxx xxxx xxxx xxxx xxxx xxxx yyyy CR LF ETX the last line is then repeated for each record If the history buffer is empty the relay responds STX No Data Available yyyy CR LF ETX where xxxx are the data values corresponding to the first line labels yyyy is the 4 byte ...

Page 583: ... event number 1 to 29 if LER 15 1 to 15 if LER 30 defaults to 1 Sx x samples per cycle 4 or 16 defaults to 4 If Sx parameter is present it overrides the L parameter Ly y cycles event report length 1 to LER for filtered event reports 1 to LER 1 for raw event reports defaults to LER if not specified L 16 samples per cycle overridden by the Sx parameter if present R specifies raw unfiltered data defa...

Page 584: ...32PF 32PR 32QF 32QR 32GF 32GR 27A1 27B1 27C1 27A2 27B2 27C2 59A1 59B1 59C1 59A2 59B2 59C2 27AB 27BC 27CA 59AB 59BC 59CA 59N1 59N2 59Q 59V1 27S 59S1 59S2 59VP 59VS SF 25A1 25A2 3P27 3P59 81D1 81D2 81D3 81D4 81D5 81D6 27B81 50L 81D1T 81D2T 81D3T 81D4T 81D5T 81D6T VPOLV LOP SFAST SSLOW IN106 IN105 IN104 IN103 IN102 IN101 LB1 LB2 LB3 LB4 LB5 LB6 LB7 LB8 LB9 LB10 LB11 LB12 LB13 LB14 LB15 LB16 RB1 RB2 R...

Page 585: ...0000000000000000000000000000000000001F0000 Each bit in the HEX ASCII Relay Word reflects the status of a Relay Word bit The order of the labels in the Names of elements in the relay word separated by spaces field matches the order of the HEX ASCII Relay Word In the example above the first two bytes in the HEX ASCII Relay Word are 10 In binary this evaluates to 00010000 Mapping the labels to the bi...

Page 586: ...This page intentionally left blank Courtesy of NationalSwitchgear com ...

Page 587: ... for negative sequence definite time overcurrent element 67Q1T Refer to Figure 3 12 and Figure 3 13 for more information on negative sequence instantaneous and definite time overcurrent elements Negative sequence instantaneous overcurrent elements 50Q5 and 50Q6 do not have associated timers compare Figure 3 13 to Figure 3 12 If 50Q5 or 50Q6 need to be used for tripping run them though SELOGIC cont...

Page 588: ...1QT To avoid having negative sequence time overcurrent element 51QT with such low time dial settings trip for this transient negative sequence current condition make settings similar to the following SV6PU 1 50 cycles minimum response time transient condition lasts less than 1 5 cycles SV6 51Q run pickup of negative sequence time overcurrent element 51QT through SELOGIC control equation variable t...

Page 589: ...r coordination This is usually the phase overcurrent device with the longest clearing time Step 3 Consider the negative sequence overcurrent element as an equivalent phase overcurrent element Derive pickup time dial lever curve type or time delay settings for this equivalent element to coordinate with the downstream phase overcurrent device as any phase coordination would be performed Load conside...

Page 590: ... sensitivity of the feeder phase overcurrent element 51F to a pickup of 600 A The feeder relay cannot back up the line recloser for phase faults below 600 A where IF Maximum load current through feeder relay 450 A IR Maximum load current through line recloser 150 A 51F Feeder relay phase time overcurrent element 51QF Feeder relay negative sequence time overcurrent element 51R Line recloser phase t...

Page 591: ... 300 A has twice the sensitivity of the 51F element pickup of 600 A The 51EP element speed of operation for phase to phase faults below about 2000 A is faster than that for the 51F element Convert Equivalent Phase Overcurrent Element Settings to Negative Sequence Overcurrent Element Settings Guideline Step 4 The equivalent phase overcurrent element 51EP element in Figure F 4 converts to true negat...

Page 592: ...emergency load conditions The bus phase overcurrent element pickup is often set at least four times greater than the pickup of the feeder phase overcurrent element it backs up Thus sensitivity to both bus and feeder phase faults is greatly reduced Feeder relay backup by the bus relay is limited Negative sequence overcurrent elements at the distribution bus can be set significantly below distributi...

Page 593: ...oordinating Negative Sequence Overcurrent Elements element whether it operates faster or slower than its complementary ground overcurrent element will operate faster than the upstream negative sequence overcurrent element for all faults including those that involve ground Courtesy of NationalSwitchgear com ...

Page 594: ... guidelines and example given in this appendix The paper also contains analyses of system unbalances and faults and the negative sequence current generated by such conditions A F Elneweihi Useful Applications for Negative Sequence Overcurrent Relaying 22nd Annual Western Protective Relay Conference Spokane Washington October 24 26 1995 This conference paper gives many good application examples for...

Page 595: ...shows how to set the protection and control elements Relay Word bits in the SELOGIC control equations Additional SELOGIC control equation setting details are available in Section 9 Setting the Relay see also SELOGIC Control Equation Settings Serial Port Command SET L on page SET 15 See the SHO Command Show View Settings on page 10 25 for a list of the factory settings the SEL 351A Relay ships with...

Page 596: ... Figure 3 14 Table 3 3 and following text The following Relay Word bits are the logic outputs of the phase time overcurrent element Phase Time Overcurrent Element 51PT Pickup Indication If the maximum phase current is at or below the level of the phase time overcurrent pickup setting 51PP Relay Word bit 51P is in the following state 51P 0 logical 0 If the maximum phase current is above the level o...

Page 597: ...ther Relay Word Bits The preceding example was for a phase time overcurrent element demonstrating Relay Word bit operation for pickup time out and reset conditions Other Relay Word bits e g those for definite time overcurrent elements voltage elements frequency elements behave similarly in their assertion or deassertion to logical 1 or logical 0 respectively The time overcurrent elements like the ...

Page 598: ...lean algebra logic combining Relay Word bits together using one or more of the six SELOGIC control equation operators listed in Table G 1 Operators in a SELOGIC control equation setting are processed in the order shown in Table G 1 SELOGIC Control Equation Parentheses Operator More than one set of parentheses can be used in a SELOGIC control equation setting For example the following SELOGIC contr...

Page 599: ... a 52b contact connected if the circuit breaker is closed the 52b contact is open and input IN101 is de energized IN101 0 logical 0 52A IN101 NOT IN101 NOT 0 1 Thus the SELOGIC control equation circuit breaker status setting 52A sees a closed circuit breaker With a 52b contact connected if the circuit breaker is open the 52b contact is closed and input IN101 is energized IN101 1 logical 1 52A IN10...

Page 600: ...e are When setting ER sees a logical 0 to logical 1 transition it generates an event report if the relay is not already generating a report that encompasses the new transition The rising edge operators in the above factory setting example allow setting ER to see each transition individually Suppose a ground fault occurs and a breaker failure condition finally results Figure G 1 demonstrates the ac...

Page 601: ...T103 the ER setting would not see the assertion of OUT103 because 51G and 51P would continue to be asserted at logical 1 as shown in Table G 1 SELOGIC Control Equation Falling Edge Operator The falling edge operator is applied to individual Relay Word bits only not to groups of elements within parentheses The falling edge operator operates similarly to the rising edge operator but looks for Relay ...

Page 602: ...OTF 0 not used set directly to logical 0 ULTR 51P 51G discussed in preceding subsection Analysis of SELOGIC Control Equation Trip Setting TR Again the example trip equation is TR 51PT 51GT 50P1 SH0 The Relay Word bit definitions are In the trip equation the AND operator is executed before the OR operators Table G 1 50P1 SH0 Element 50P1 can only cause a trip if the reclosing relay shot counter is ...

Page 603: ...e delayed trip results from residual ground time overcurrent element 51GT Set an Output Contact for Tripping To assert output contact OUT101 to trip a circuit breaker make the following SELOGIC control equation output contact setting see Output Contacts on page 7 31 OUT101 TRIP All SELOGIC Control Equations Must Be Set All SELOGIC control equations must be set one of the following ways they cannot...

Page 604: ...y Word bits that can be combined together with the SELOGIC control equation operators listed in Table G 1 If this limit must be exceeded use a SELOGIC control equation variable SELOGIC control equation settings SV1 SV16 as an intermediate setting step For example assume that the trip equation SELOGIC control equation trip setting TR needs more than 15 Relay Word bits in its equation setting Instea...

Page 605: ... changes have been made and the settings are saved the SEL 351A responds with the following message xxx Elements and yy Edges remain available indicating that xxx Relay Word bits can still be used and yy rising or falling edge operators can still be applied in the SELOGIC control equations for the particular settings group Courtesy of NationalSwitchgear com ...

Page 606: ...es RB8 RB1 RB16 RB9 Section 7 Miscellaneous Instantaneous Overcurrent Elements 50A1 50A4 50B1 50B4 50C1 50C4 50A 50B 50C 50AB1 50AB4 50BC1 50BC4 50CA1 50CA4 50L 50P5 50P6 50QF 50QR 50Q5 50Q6 50GF 50GR 50G5 50G6 50N5 50N6 Section 3 Open Breaker Logic 52A 52A 52A 3PO Section 5 Loss of Potential LOP V1GOOD Section 4 Fault Identification Logic FSA FSB FSC Section 5 Load Encroachment ZLOAD ZLOUT ZLIN S...

Page 607: ...LO 79CY 79RS RCSF RSTMN OPTMN CLOSE CF SH0 SH1 SH2 SH3 SH4 Section 6 Breaker Monitor BKMON BKMON BCWA BCWB BCWC BCW Section 8 SELOGIC Control Equation Variables Timers SV1 SV16 SVn SVn SVnT where n 1 to 16 Section 7 OUT101 OUT107 OUT201 OUT212 extra I O board OUT101 OUT107 Section 7 Display Points DP1 DP16 DP1 DP16 Section 7 Setting Group control SS1 SS6 SS1 SS6 Section 7 Event Report Trigger ER E...

Page 608: ...This page intentionally left blank Courtesy of NationalSwitchgear com ...

Page 609: ...l DNP3 L2 Slave protocol This includes access to metering data protection elements Relay Word contact I O targets sequential events recorder breaker monitor relay summary event reports settings groups and time synchronization The SEL 351A supports DNP point re mapping Two modes of operation both of which are detailed in this appendix are available Standard for backwards and cross platform compatib...

Page 610: ...3 1 DECPLV Voltages Scaling Decimal Places 0 3 1 DECPLM Misc Data Scaling Decimal Places 0 3 1 STIMEO Seconds to Select Operate Time out 0 0 30 1 0 DRETRY Data Link Retries 0 15 3 DTIMEO Seconds to Data Link Time out 0 5 1 MINDLY Minimum Seconds from DCD to Tx 0 00 1 0 05 MAXDLY Maximum Seconds from DCD to Tx 0 00 1 0 10 PREDLY Settle Time from RTS ON to Tx OFF 0 00 30 sec 0 00 PSTDLY Settle Time ...

Page 611: ...Time from RTS ON to Tx OFF 0 00 30 sec 0 00 PSTDLY Settle Time from Tx to RTS OFF 0 00 30 sec 0 00 ANADBA Amps Reporting Dead Band Counts 0 32767 100 ANADBV Volts Reporting Dead Band Counts 0 32767 100 ANADBM Misc Data Reporting Dead Band Counts 0 32767 100 UNSOL Enable Unsolicited Reporting Y N N PUNSOL Enable Unsolicited Reporting at Power up Y N N REPADR DNP Address to Report to 0 65534 0 NUMEV...

Page 612: ...re the external transceiver does not support DCD When the SEL 351A transmits a DNP message it delays transmitting after asserting RTS by at least the time in the PREDLY setting After transmitting the last byte of the message the SEL 351A delays for at least PSTDLY milliseconds before deasserting RTS If the PSTDLY time delay is in progress RTS still high following a transmission and another transmi...

Page 613: ...rupted Thus the number of retries should be set higher on noisy channels Set the data link time out long enough to allow for the worst case response of the master plus transmission time When the SEL 351A decides to transmit on the DNP link it has to wait if the physical connection is in use The SEL 351A monitors physical connections by using CTS input treated as a Data Carrier Detect and monitorin...

Page 614: ...value Set UNSOL N Set CLASSA to a non zero value Set CLASSB to a non zero value Set CLASSC to a non zero value Set UNSOL N Unsolicited Report by Exception The slave devices send unsolicited event data to the master and the master occasionally sends integrity polls for static data Set ECLASS to a non zero value Set UNSOL Y Set NUMEVE and AGEEVE according to how often messages are desired to be sent...

Page 615: ...layer retries None Requires application layer confirmation When reporting Event Data Data link confirm time out Configurable Complete application fragment time out None Application confirm time out Configurable Complete Application response time out None Executes control WRITE binary outputs Always Executes control SELECT OPERATE Always Executes control DIRECT OPERATE Always Executes control DIREC...

Page 616: ...es within the device profile that an item is configurable it is controlled by SEL 351A settings Default counter object variation Object 20 Variation 6 Counter roll over 16 bits Sends multifragment responses No Table H 4 SEL 351A DNP3 Device Profile Sheet 2 of 2 Parameter Value Courtesy of NationalSwitchgear com ...

Page 617: ...ut Change with Rela tive Time 1 6 7 8 129 17 28 10 0 Binary Output All Variations 1 0 1 6 7 8 10 1 Binary Output 10 2e Binary Output Status 1 0 1 6 7 8 129 0 1 12 0 Control Block All Variations 12 1 Control Relay Output Block 3 4 5 6 17 28 129 echo of request 12 2 Pattern Control Block 12 3 Pattern Mask 20 0 Binary Counter All Variations 1 0 1 6 7 8 20 1 32 Bit Binary Counter 20 2 16 Bit Binary Co...

Page 618: ...nt without Time 1 6 7 8 129 130 17 28 22 3 32 Bit Delta Counter Change Event without Time 22 4 16 Bit Delta Counter Change Event without Time 22 5 32 Bit Counter Change Event with Time 1 6 7 8 129 17 28 22 6 16 Bit Counter Change Event with Time 1 6 7 8 129 17 28 22 7 32 Bit Delta Counter Change Event with Time 22 8 16 Bit Delta Counter Change Event with Time 23 0 Frozen Counter Event All Vari ati...

Page 619: ...h Time of Freeze 31 4 16 Bit Frozen Analog Input with Time of Freeze 31 5 32 Bit Frozen Analog Input without Flag 31 6 16 Bit Frozen Analog Input without Flag 32 0 Analog Change Event All Vari ations 1 6 7 8 32 1 32 Bit Analog Change Event without Time 1 6 7 8 129 17 28 32 2e 16 Bit Analog Change Event without Time 1 6 7 8 129 130 17 28 32 3 32 Bit Analog Change Event with Time 1 6 7 8 129 17 28 3...

Page 620: ...a tions 51 1 Time and Date CTO 51 2 Unsynchronized Time and Date CTO 07 quantity 1 52 0 Time Delay All Variations 52 1 Time Delay Coarse 52 2 Time Delay Fine 129 07 quantity 1 60 0 All Classes of Data 1 20 21 6 60 1 Class 0 Data 1 6 60 2 Class 1 Data 1 20 21 6 7 8 60 3 Class 2 Data 1 20 21 6 7 8 60 4 Class 3 Data 1 20 21 6 7 8 70 1 File Identifier 80 1 Internal Indications 2 0 1 index 7 81 1 Stora...

Page 621: ... Coded Decimal 101 3 Large Packed Binary Coded Decimal No object 13 14 23 a Supported in requests from master b May generate in response to master c Decimal d Hexadecimal e Default variation Table H 5 SEL 351A DNP Object Table Sheet 5 of 5 Object Requesta Responseb Obj Var Description Func Codesc Qual Codesd Func Codesc Qual Codesd Courtesy of NationalSwitchgear com ...

Page 622: ...iagnostic warning 01 02 1023 An unread relay event is available 01 02 1024 Settings change or relay restart 01 02b 1025 A more recent unread relay event is available 10 12 00 15 Remote bits RB1 RB16 10 12 16 Pulse Open command OC 10 12 17 Pulse Close command CC 10 12 18 Reset demands 10 12 19 Reset demand peaks 10 12 20 Reset energies 10 12 21 Reset breaker monitor 10 12 22 Reset front panel targe...

Page 623: ... 32 58 63 Demand IA IB IC IN IG and 3I2 magnitudes 30 32a 64 67 A B C and 3 phase demand MW in 30 32a 68 71 A B C and 3 phase demand MVAR in 30 32a 72 75 A B C and 3 phase demand MW out 30 32a 76 79 A B C and 3 phase demand MVAR out 30 32 80 85 Peak demand IA IB IC IN IG and 3I2 magnitudes 30 32a 86 89 A B C and 3 phase peak demand MW in 30 32a 90 93 A B C and 3 phase peak demand MVAR in 30 32a 94...

Page 624: ...e g if DECPLM is 3 then the value is multiplied by 1000 Analog inputs 58 63 80 85 107 115 119 and the even numbered points in 0 7 and 16 21 current magnitudes are scaled according to the DECPLA setting The even numbered points in 8 15 and 22 27 voltage magnitudes are scaled according to the DECPLV setting Analog inputs 36 41 108 and the odd numbered points in 0 27 angles are scaled by 100 and inpu...

Page 625: ... 1 Control Relay Output Blocks object 12 variation 1 are supported The control relays correspond to the remote bits and other functions as shown above The Trip Close bits take precedence over the control field The control field is interpreted as in Table H 9 Table H 7 Analog 105 Upper Byte Definitions Value Event Cause 1 Trigger command 2 Pulse command 4 Trip element 8 ER element Table H 8 Analog ...

Page 626: ...when binary input point 1023 is off the relay event type analog point 105 will be loaded with zero With the FIFO method the relay event summaries will always be collected in chronological order In extended mode DNPE only the LIFO method is available To use the LIFO method the master should monitor binary input point 1023 which will be set when there is an unread relay event summary To read the new...

Page 627: ...stributed Network Protocol Data Map successfully binary output 23 must be pulsed no faster than once every two seconds If binary output 23 is pulsed faster some data may not be recognized and processed by the DNP event scanner Courtesy of NationalSwitchgear com ...

Page 628: ...ommand is issued with an S parameter the relay displays only the analog map likewise a T causes the relay to display only the binary map If the map checksum is determined to be invalid the map will be reported as corrupted during a display command as follows DNP T STX Binaries Map Corrupted ETX If the map is determined to be corrupted DNP will respond to all master data requests with an unknown po...

Page 629: ...ng Decimal Places 0 3 DECPLM Seconds to Select Operate Time out 0 0 30 0 STIMEO Data Link Retries 0 for no confirm 1 15 DRETRY Seconds to Data Link Time out interval 0 5 DTIMEO Minimum Seconds from DCD to Tx 0 00 1 00 MINDLY Maximum Seconds from DCD to Tx 0 00 1 00 MAXDLY Settle Time from RTS ON to Tx OFF 0 00 30 00 sec PREDLY Settle Time from Tx to RTS OFF 0 00 30 00 sec PSTDLY Analog Reporting D...

Page 630: ... Decimal Places 0 3 DECPLM Seconds to Select Operate Time out 0 0 30 0 STIMEO Data Link Retries 0 for no confirm 1 15 DRETRY Seconds to Data Link Time out interval 0 5 DTIMEO Minimum Seconds from DCD to Tx 0 00 1 00 MINDLY Maximum Seconds from DCD to Tx 0 00 1 00 MAXDLY Settle Time from RTS ON to Tx OFF 0 00 30 00 sec PREDLY Settle Time from Tx to RTS OFF 0 00 30 00 sec PSTDLY Amps Reporting Deadb...

Page 631: ...EL 351A has terminal markings that are compatible with these relays They are wire alike as shown in Figure 2 2 Figure 2 5 and Figure 2 6 Several internal differences between the products require an understanding of their respective settings and features Refer to a copy of the Instruction Manual for the SEL 200 series relay a copy of the settings for the relay and this SEL 351A Instruction Manual T...

Page 632: ... Line Impedance Parameters SEL 251 3 and SEL 267 5 relays R1 X1 R0 X0 ohms primary These impedance values have to be converted to ohms secondary magnitude and angle for the SEL 351A Equation I 1 Equation I 2 Equation I 3 Equation I 4 Phase Overcurrent and Time Overcurrent Pickup Settings SEL 251 3 Enter directly into SEL 351A phase elements e g 50P1P 51PP SEL 267 5 Convert setting to secondary uni...

Page 633: ...351A 51QC setting See Phase Time Overcurrent Element Curve Settings for example SEL 267 5 No negative sequence time overcurrent elements More Advanced Relay Functions Undervoltage Elements for the SEL 251 3 Only Use SELOGIC control equations to simulate any or all of the three modes of the 27 element Refer to Section 2 Specifications in the SEL 251 3 Instruction Manual for element logic Directiona...

Page 634: ...torque control SELOGIC control equation setting in the SEL 351A Reclosing Relay Program the four shot recloser in the SEL 351A to simulate the four shot recloser in the SEL 251 3 or the three shot recloser in the SEL 267 5 Programmable Inputs and Outputs SELOGIC control equations give the SEL 351A extremely flexible input and output capabilities Use them to program the schemes of the SEL 251 3 and...

Page 635: ...have the built in high side blown fuse detection setting that the SEL 251 3 has but this feature is easy to implement in SELOGIC control equations using the extra over and undervoltage elements that are available Compared to the SEL 251 3 the SEL 351A has More overvoltage and undervoltage elements Directional elements NOTE The SEL 351A 1 does not include directional elements Compared to the SEL 26...

Page 636: ... Relay Settings in the SEL 351A Relay Other Differences Between the SEL 351A and the SEL 251 3 and SEL 267 5 Relays The SEL 351A does not restrict the use of SS1 SS2 SS3 settings group switch inputs to certain optoisolated inputs like the SEL 251 3 does Courtesy of NationalSwitchgear com ...

Page 637: ...f ASCII character commands and reports that are intelligible to people using a terminal or terminal emulation package The binary data streams can interrupt the ASCII data stream to obtain information and then allow the ASCII data stream to continue This mechanism allows a single communications channel to be used for ASCII communications e g transmission of a long event report interleaved with shor...

Page 638: ...r any change of state in any one of the elements listed in the SER1 SER2 or SER3 trigger settings Nonvolatile memory is used to store the latest 512 rows of the SER event report so they can be retained during power loss The nonvolatile memory is rated for a finite number of writes Exceeding the limit can result in an EEPROM self test failure An average of one state change every three minutes can b...

Page 639: ...Step 3 When SER records are triggered in the SEL 351A the relay responds with an unsolicited binary Fast SER message If this message has a valid checksum it must be acknowledged by sending an acknowledge message with the same response number as contained in the original message The relay will wait approximately 100 ms to 500 ms to receive an acknowledge message at which time the relay will resend ...

Page 640: ...re more than nn new records available or if the first and last record are separated by more than 16 seconds the relay will break the transmission into multiple messages so that no message contains more than nn records and the first and last record of each message are separated by no more than 16 seconds If the function to enable is not 18 or the function code is not recognized the relay responds w...

Page 641: ... code is also passed as data in the Enable Unsolicited Data Transfer and the Disable Unsolicited Data Transfer messages to indicate which type of unsolicited data should be enabled or disabled The message format for function code 18 is in Table J 3 Table J 2 Message Format for Function Code 02 Data Description A546 Message header 10 Message length 16 decimal 0000000000 Five bytes reserved for futu...

Page 642: ...ast element in microseconds since time indicated in the time of day field FFFFFFFE Four byte end of records flag ssssssss Packed four byte element status for as many as 32 elements LSB for the 1st element cccc Two byte CRC 16 checkcode for message Table J 4 Message if SER Records Are Lost Sheet 1 of 2 Data Description A546 Message header 22 Message length 34 decimal 0000000000 Five bytes reserved ...

Page 643: ... Unsolicited Fast SER Data Transfer message from a relay with all of SER1 SER2 and SER3 set to NA A5 46 0E 00 00 00 00 00 00 81 02 XX cc cc XX is as same as the response number in the Enable Unsolicited Data Transfer message to which it responds 3 Disable Unsolicited Fast SER Data Transfer message acknowledge requested A5 46 10 00 00 00 00 00 01 02 C0 XX 18 00 cc cc XX 0 1 2 3 00000000 Element sta...

Page 644: ... indicates that the element identified in this SER record is no longer in the SER trigger settings When the relay sends an SER message packet it will put a sequential number 0 1 2 3 0 1 into the response number If the relay does not receive an acknowledge from the master before approximately 500 mS the relay will resend the same message packet with the same response number until it receives an ack...

Page 645: ...egrated Waveform and Harmonic Analysis tools Communicate with SEL devices via an HMI interface with integrated Meter and Control functions Create manage copy merge and read relay settings with a settings database manager This document gives instructions for installing ACSELERATOR QuickSet software A Quick Tour guide is available as part of the online help After installation the Quick Tour will sho...

Page 646: ...essor Microsoft Windows 2000 or Windows XP with 256 MB RAM 200 MB hard disk space Microsoft Internet Explorer 5 0 or greater Default printer installed for printing settings VGA 800 x 600 or higher resolution monitor Mouse or other pointing device Administrative privileges required for installation Serial or Ethernet connection to allow communication to SEL devices Courtesy of NationalSwitchgear co...

Page 647: ...enu b Type the following command D SETUP substitute D with the CD ROM drive letter for your PC Step 3 Follow the steps that appear on the screen The installation program will perform all the necessary steps to load ACSELERATOR QuickSet onto your PC It is necessary to have the correct comctl32 dll file installed on your computer in order to see the toolbar buttons If you do not see the toolbar butt...

Page 648: ...TOR QuickSet Starting ACSELERATOR QuickSet You can start ACSELERATOR QuickSet the following ways Step 1 Double click the ACSELERATOR QuickSet icon if you have a desktop shortcut Step 2 Choose Programs SEL Applications and select the ACSELERATOR QuickSet icon to start the program Courtesy of NationalSwitchgear com ...

Page 649: ...he SEL 351A provides Phasor Measurement Control Unit PMCU capabilities when connected to an IRIG B time source with an accuracy of 10 μs or better Synchrophasor data are available via the MET PM ASCII command and the SEL Fast Message Unsolicited Write message Courtesy of NationalSwitchgear com ...

Page 650: ... system disturbance analysis The SEL 351A Global settings class contains the synchrophasor settings including the choice of transmitted synchrophasor data set The Port settings class selects which serial port s can be used for synchrophasor protocol use See Settings on page L 8 Synchrophasor measurement cannot be enabled if global setting PTCONN DELTA The SEL 351A timekeeping function generates st...

Page 651: ...the C37 118 standard During steady state conditions the SEL 351A synchrophasor values can be directly compared to values from other phasor measurement units that conform to C37 118 Synchrophasor values are available for the full frequency range of the SEL 351A Figure L 1 Phase Reference The TSOK Relay Word bit asserts when the SEL 351A has determined that the IRIG B time source has sufficient accu...

Page 652: ...r angles in order to create the corrected phasor angles as shown in Figure L 2 The VCOMP and ICOMP settings may be positive or negative in value Figure L 2 Waveform at Relay Terminals May Have Phase Shift If the shift of the measured signal is known in the time domain it can be converted into an angular shift using Equation L 1 Equation L 1 Figure L 3 Correction of Measured Phase Angle 94 851 94 8...

Page 653: ...Format Field Description Hex Data Header Synchrophasor Fast Message A546 Frame Size Synchrophasor Data Sizea a The synchrophasor data size is dependent on the PHDATAV and PHDATAI settings as shown in Table L 8 XX Routing Must be 0000000000 for this application 0000000000 Status Byte Must be 00 for this application 00 Function Code 20h Code for unsolicited write messages 20 Sequence C0 for single f...

Page 654: ...t Message commands including commands to start and stop synchrophasor data transmission Table L 2 Unsolicited Fast Message Enable Packet Field Description Hex Data Header Synchrophasor Fast Message A546 Frame Size 18 bytes 12 Routing Must be 0000000000 for this application 0000000000 Status Byte YY 00 acknowledge is not requested YY 01 acknowledge is requested YY Function Code 01h Enable unsolicit...

Page 655: ... Hex Fast Messages Sent This Number of Seconds After the Top of Each Minute Number of Fast Messages per Minute 0064h 0 1 2 3 4 5 59 60 00C8h 0 2 4 6 8 10 58 30 012Ch 0 3 6 9 12 15 57 20 0190h 0 4 8 12 15 56 15 01F4h 0 5 10 15 20 55 12 0258h 0 6 12 18 24 54 10 03E8h 0 10 20 30 40 50 6 05DCh 0 15 30 45 4 07D0h 0 20 40 3 0BB8h 0 30 2 1770h 0 1 Courtesy of NationalSwitchgear com ...

Page 656: ...global setting PTCONN DELTA Enable Synchronized Phasor Measurement Y N Nb b Set EPMU Y to access the remaining settings PMID PMU Hardware ID 1 PHDATAV Phasor Data Set Voltages V1 ALL V1 VCOMP Voltage Angle Compensation Factor 179 99 to 180 degrees 0 00 PHDATAIc c Setting hidden when PHDATAV V1 Phasor Data Set Currents ALL NA NA ICOMP Current Angle Compensation Factor 179 99 to 180 degrees 0 00 TS_...

Page 657: ... PHDATAV and PHDATAI determine the minimum port SPEED necessary to support the synchrophasor data packet rate and size see Table L 8 PHDATAV V1 will transmit only positive sequence voltage V1 PHDATAV ALL will transmit V1 VA VB and VC Table L 8 describes the order of synchrophasors inside the data packet The VCOMP setting allows correction for any steady state voltage phase errors from the potentia...

Page 658: ...n TS_TYPE is set to IEEE the IRIG message is expected to conform to the IEEE C37 118 standard Note that time sources conforming to IEEE C37 118 may be marked as IEEE 1344 compliant The IRIG message includes a UTC offset time quality information a year and a parity bit The SEL 351A qualifies the IRIG field to ensure that the time is valid checks for a time quality value better than or equal to 10 u...

Page 659: ...RIG B on page 10 2 Table L 7 Time Synchronization Relay Word Bits Name Description TIRIG Asserts while relay time is based on IRIG B time source TSOK Time Synchronization OK Asserts while time accuracy is of sufficient accu racy for synchrophasor measurement and satisfies TS_TYPE requirements PMDOK Phasor Measurement Data OK Asserts when the SEL 351A is enabled syn chrophasors are enabled Global s...

Page 660: ...tings PHDATAV and PHDATAI The MET PM command can function even when no serial ports are sending fast message synchrophasor data The MET PM command only displays data when the Relay Word bit TSOK logical 1 Figure L 4 shows a sample MET PM command response The synchrophasor data are also available in ACSELERATOR QuickSet and have a similar format to Figure L 4 The MET PM time command can be used to ...

Page 661: ... DEG 129 896 10 262 111 764 129 485 Phase Currents Pos Sequence Current IA IB IC I1 MAG A 195 146 192 614 198 090 195 283 ANG DEG 114 930 2 786 120 238 117 338 FREQ Hz 60 029 Digitals SV3 SV4 SV5 SV6 SV7 SV8 SV9 SV10 0 0 0 0 0 0 0 0 SV11 SV12 SV13 SV14 SV15 SV16 0 0 0 0 0 0 Figure L 4 Sample MET PM Command Response The Maximum time synchronization error field is take directly from the TQUAL status...

Page 662: ...n of synchrophasor data will add to the byte requirements Each synchrophasor quantity will add eight bytes to the message length Table L 8 shows the effect that adding synchrophasor quantities has on the minimum allowed SPEED setting The number of interleaved protocols sharing the same physical port will also impact the minimum allowed SPEED setting Table L 8 shows the setting if the Fast Message ...

Page 663: ...601 Analytic Assistant EVE n D Show event report n with digital section only EVE n L Show event report n with 16 samples per cycle similar to EVE n S16 EVE n Ly Show first y cycles of event report n y 1 to global setting LER EVE n P Show event report n with synchrophasor level accuracy time alignment EVE n R Show event report n in raw unfiltered format with 16 samples per cycle resolution EVE n Sx...

Page 664: ...h as n name k and LIST TIM Show or set time 24 hour time Show current relay time by entering TIM Set the current time by entering TIM followed by the time of day e g set time 22 47 36 by entering TIM 22 47 36 TRI time Trigger an event report Enter time to trigger an event at an exact specified time in 24 hour format Access Level B Commands Access Level B commands primarily allow the user to operat...

Page 665: ... specified default is active port SET R Change SER settings SET T Change text label settings only on models with LCD SET TERSE For all SET commands TERSE disables the automatic SHO command after settings entry STA C Resets self test warnings failures and reboots the relay VER Show relay configuration and firmware version Key Stroke Commands Ctrl Q Send XON command to restart communications port ou...

Page 666: ...This page intentionally left blank Courtesy of NationalSwitchgear com ...
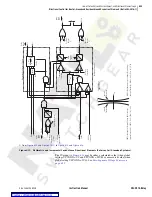
Reviews: