32
6mm
X4
3.
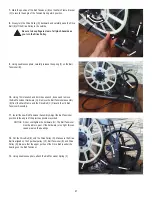
Flex the edges of the Upper Shroud to disengage the inside tabs from
the Main Assembly, and slide it up the Console Mast.
4.
Using a 6mm hex wrench, remove the indicated hardware from the
Console Mast. Slightly pull the Console Mast upward, and disconnect the
cables. Set the hardware, Shroud Cap, and Upper Shroud safely aside for
reassembly. Discard the old Console Mast.
NOTICE:
Do not pinch or cut the cables.
This step may require two people.
5.
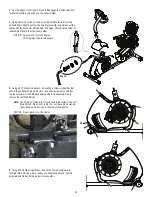
Using a #2 Phillips Screwdriver, remove the 6 screws (indicated) that
secure the Left Main Shroud. Remove the bottom screws fi rst, and then
the top screws. Set the hardware safely aside for reassembly. Slowly
remove the Left Main Shroud.
Note:
The Power Inlet Cable (A1) is attached to the inside of the Left
Main Shroud. Be sure not to pinch or cut the cable by placing
the Left Main Shroud close to the side of the machine.
NOTICE:
Do not pinch or cut the cables.
A1
A
6.
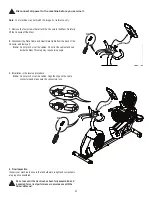
Using a #2 Phillips Screwdriver, remove the 2 screws that secure
the Right Main Shroud. Slowly remove the Right Main Shroud. Set the
hardware and Shroud safely aside for reassembly.
A


