34
9.
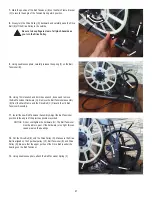
Loosen and remove the hex head bolt (J), nut (G) and washer (H) that
attach the Brake Assembly (C) to the Main Frame bracket (K).
NOTICE:
Hold the Brake Assembly so that it does not fall.
Do not pinch or cut the cables.
10.
Remove the Brake Assembly (C). Remove the cardboard. Discard
the old Brake Assembly.
11.
Installation of the new Brake Assembly is the reverse procedure.
Tape the cardboard to the new Brake Magnet. Be sure the cardboard will
completely cover the new Brake Magnet before installation.
12.
Turn the power on again.
Machine is on. Current is active. There is risk of electrical
shock.
13.
Use the console to set the resistance to the highest level. This
moves the Brake Magnet Arm (D) forward. After the Brake Magnet Arm
stops at the highest resistance level, turn power off.
Disconnect all power and allow to sit for 5 minutes.
14.
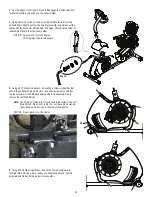
If correctly calibrated, the Brake Magnet should be within 3.0 mm
(1/8”) of the Flywheel. If not, it will need to be adjusted. To adjust the
Brake, loosen the 2 hex head bolts (M) and move the Servo Motor as-
sembly (L) until the closest point on the Brake Magnet (C) is within 3.0
mm (1/8”) of the Flywheel (B). Tighten the bolts.
Note:
If the cardboard is not 3mm (1/8”) thick, you can use
the pages of a paperback book to measure the gap.
Approximately 36 pages (sheets) = 3mm.
15.
Turn the power on again. Use the console to check the resistance
adjustment.
Machine is on. Current is active. There is risk of electrical
shock.
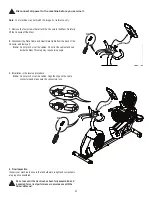
Note:
Before fully attaching the Shrouds, remove the cardboard
from between the Brake Magnet (C) and the Flywheel (B).
Power up the machine to verify that the Magnet Arm can
move freely, and that the Brake Magnet and Flywheel do not
touch.
B
C
K
H
J
G
C
B
M
L
D


