background image

27

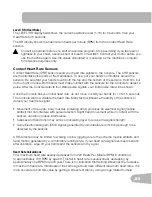
If you select the User profile option, you have two options: VIEW STATS and WORKOUT. Use the 

Increase/Decrease buttons to look at the menu options, and push START/ENTER to make your 
selection. The Stats option lets you see a summary of your workout data. The Workout option 
goes to the Program Menu.

User Setup Mode

The Schwinn

®

 20 Series console lets you store and use 1 User profile in addition to a Guest User 

with no setup data stored. The User profile automatically records your workout results in your User 
profile, and lets you edit data.
The User profile stores the following data:

• 

 Name—up to 19 characters

• 

 Total number of workouts

• 

 Total  hours

• 

 Average  speed

• 

 Total  distance

• 

 Total  calories

• 

 Age

• 

 Weight

• 

 Gender

• 

 Custom Workout (program profile, time)

From the Power-Up Mode screen, push START/ENTER and hold for 3 seconds to go to User Setup 
Mode. If no User profile is set up, you can add a User. If there is a User profile, you can edit or delete 
the User profile.

Note:

 Push the STOP button to go back to the previous screen or character.

Add User

1.   From the Power-Up Mode screen, push START/ENTER and hold for 3 seconds to go to User 

Setup Mode. If no User profile is set up, the Console will show the Name prompt.


Note:

   Use the Increase/Decrease buttons to move through the alphabet. To record each letter, 

push the START/ENTER button. Push START/ENTER for a space.


 Push and hold START/ENTER to complete the entry and go to the next data prompt. Or you 
can tap the START/ENTER button to add spaces until the next data screen appears.

2.   Enter your User data on each data screen—Age, Weight, Gender. Use the Increase/Decrease 

buttons to adjust the default value, and push START/ENTER to complete each entry and go to 

the next prompt.


Note:

   The default age is 30. The default weight is 150 (lbs). 

Summary of Contents for 220 Recumbent Bike

Page 1: ...ASSEMBLY MANUAL OWNER S MANUAL Manual en Espa ol Latino Americano http www schwinnfitness com...

Page 2: ...US 800 628 8458 www NautilusInc com Customer Service North America 800 605 3369 csnls nautilus com outside U S 01 360 859 5180 technics APLA nautilus com Printed in China 2011 Nautilus Inc All rights...

Page 3: ...do steps that involve heavy lifting or awkward movements on your own Set up this machine on a solid level horizontal surface Do not try to change the design or functionality of this machine This could...

Page 4: ...y has been tested and found to comply with the limits for a Class B digital device pursuant to Part 15 of the FCC Rules These limits are designed to provide reasonable protection against harmful inter...

Page 5: ...ough the bolt holes to help insert the bolt through the holes 5 The assembly requires 2 people Maximum User Weight 300 lbs 136 kg Power Requirements Operational Voltage Operational Voltage 9VDC Operat...

Page 6: ...Left Pedal 3 1 Rear Frame 12 1 Right Pedal 4 1 Seat Back 13 1 Front Stabilizer 5 1 Seat Bottom 14 1 Rear Stabilizer 6 1 Seat Frame 15 1 Seat Rail Bracket 7 1 Handlebar Side 16 1 Water Bottle Holder 8...

Page 7: ...t Head Hex Screw M8 x 16 E 4 Curved Washer M8 B 13 Button Head Hex Screw M8 x 16 F 8 Button Head Hex Screw M8 x 45 C 4 Button Head Hex Screw M8 x 20 G 4 Cap D 21 Flat Washer M8 A B D E F G C 6 mm HARD...

Page 8: ...8 1 Attach Stabilizers to Frame Note Make sure the Schwinn decal on the Rear Stabilizer faces outward from the machine ASSEMBLY A 6 mm X4 1 13 3 14...

Page 9: ...9 2 Connect Rear Frame to Main Frame Note Hardware is pre installed and not on the Hardware Card NOTICE Do not crimp Console Cable 6 mm X5...

Page 10: ...10 4 Attach Seat Back and Bottom to Seat Assembly F D 6 mm X8 4 5 3 Attach Handlebar to Seat Frame B D 6 mm X4 6 7...

Page 11: ...11 5 Slide the Seat Assembly onto the Seat Rail Note Lock the Adjustment Knob into one of the Seat Rail locking holes NOTICE Do not crimp Heart Rate Cable 2 6 Connect Heart Rate Cable to Seat Assembly...

Page 12: ...12 8 Install Seat Rail Assembly to Frame Assembly NOTICE Do not crimp Heart Rate Cables 7 Attach Seat Rail Bracket to Seat Rail B 6 mm X2 D 15 6 mm 6 mm C D X4 B D X3...

Page 13: ...and Attach Console Mast to Frame Assembly NOTICE Align the clips on the cable connectors and make sure the connectors lock Do not crimp Console and Heart Rate Cables Note Do not fully tighten the har...

Page 14: ...nsole Note Remove the pre installed screws from the back of the console before you connect the cables 9 X4 11 Attach Console to Console Mast NOTICE Do not crimp the cables Note Use the screws from Ste...

Page 15: ...15 12 Adjust the Console and Console Mast and Tighten Hardware Note To install the Media Support slide it into the holes at the top of the console 17 9...

Page 16: ...16 13 Attach Pedals to Frame Assembly 12 11...

Page 17: ...ur machine to ensure that all hardware is tight and components are properly assembled Be sure to record the serial number in the field provided at the front of this manual Do not use or put the machin...

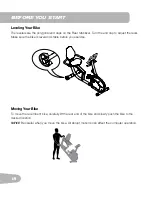
Page 18: ...the level Make sure the bike is level and stable before you exercise Moving Your Bike To move the recumbent bike carefully lift the rear end of the bike and slowly push the bike to the desired locatio...

Page 19: ...nd in this condition Monitor the Seat Pedals and Crank Arms closely Contact Nautilus Customer Service for repair information Maximum user weight limit 300 lbs 136 kg Do not use if you are over this we...

Page 20: ...dals B Handlebars Upright H Leveler C Shrouded Main Frame I Adjustable Seat D Transport Wheel J Contact Heart Rate CHR Sensors E Stabilizer K Handlebars Side F AC Adapter Plug L Water Bottle Holder B...

Page 21: ...kout STOP Pauses an active workout and if pushed again will end the workout FAN button Controls 3 speed fan Increase Increases a value age time distance calories or workout resistance level Decrease D...

Page 22: ...ximum time is 99 59 If the workout has a preset time the display starts at the preset value and counts down to zero The display shows the total time count for the workout Speed Distance The SPEED DIST...

Page 23: ...10 to 15 seconds The Console will now validate the heart rate Many factors influence the ability of the sensors to detect your heart rate signal Movement of the upper body muscles including arms produ...

Page 24: ...ng your heart rate in that target zone for over 20 minutes The longer you maintain your target heart rate the more fat your body will burn The graph is a brief guideline describing the generally sugge...

Page 25: ...your foot over the center of it Your leg should be bent slightly at the knee 2 If your leg is too straight or your foot cannot touch the Pedal move the seat forward on the recumbent bike If your leg i...

Page 26: ...ER to set The Console goes back to the Power Up Mode screen To change these settings refer to the Console Setup Mode section in this manual Quick Start Manual Program The Quick Start Manual program le...

Page 27: ...T ENTER and hold for 3 seconds to go to User Setup Mode If no User profile is set up you can add a User If there is a User profile you can edit or delete the User profile Note Push the STOP button to...

Page 28: ...er Setup Mode If a User profile is set up the Console will show a prompt to edit the user EDIT Name or delete the user DELETE Name Use the Increase Decrease buttons to move through the Edit menu optio...

Page 29: ...ofile or not delete the user and go back to the Edit and Delete options Push START ENTER to make your selection 3 After you delete the user the Console will go back to the Power Up Mode screen Custom...

Page 30: ...ill produce more power at a given heart rate You can start the Fitness Test from the FITNESS TEST option in the Program Menu The Fitness Test program first prompts you to select your fitness level Beg...

Page 31: ...e automatically goes into Sleep Mode Pausing or Stopping The Console will go into Pause Mode if the user stops pedaling and pushes STOP during a workout or there is no RPM signal for 5 seconds user no...

Page 32: ...he RESET TOTALS option will clear the accumulated workout values 4 Use the Increase Decrease buttons to move between the menu options and push START ENTER to make your selection 5 If you go to the Tot...

Page 33: ...er Statistics the statistics change to the new units 3 Push START ENTER to set 4 The Console display shows the Machine Type prompt Push START ENTER to start Machine Type option Push the Increase Decre...

Page 34: ...R IMMEDIATE ACTION REQUIRED C AU T I O N To reduce the risk of electrical shock always unplug the power cord and wait 5 minutes before cleaning maintaining or repairing this machine Daily Before each...

Page 35: ...bly C Pedals K HR Cables S RPM Sensor D Crank Arms L Data Cable T Speed Sensor Magnet E Seat M Handlebars Upright U Servo Motor F Seat Slider N AC Adapter Plug V Drive Belt G Adjustment Knob O Shrouds...

Page 36: ...should line up and snap into place Check console display for damage Check for visual sign that console dis play is cracked or otherwise damaged Replace Console if damaged Console Display If Console on...

Page 37: ...Electronics If tests reveal no other issues Console should be replaced No speed RPM reading Console displays E3 error code Check data cable integrity All wires in cable should be intact If any are cut...

Page 38: ...h on connector should line up and snap into place Reset Machine if equipped with reset button Unplug unit from electrical outlet for 3 minutes Reconnect to outlet Unit rocks does not sit level Check l...

Page 39: ...39...

Page 40: ...Nautilus Bowflex Schwinn Fitness Universal 004 4608 080511 C...

Reviews: