background image

4

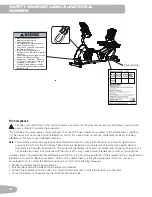
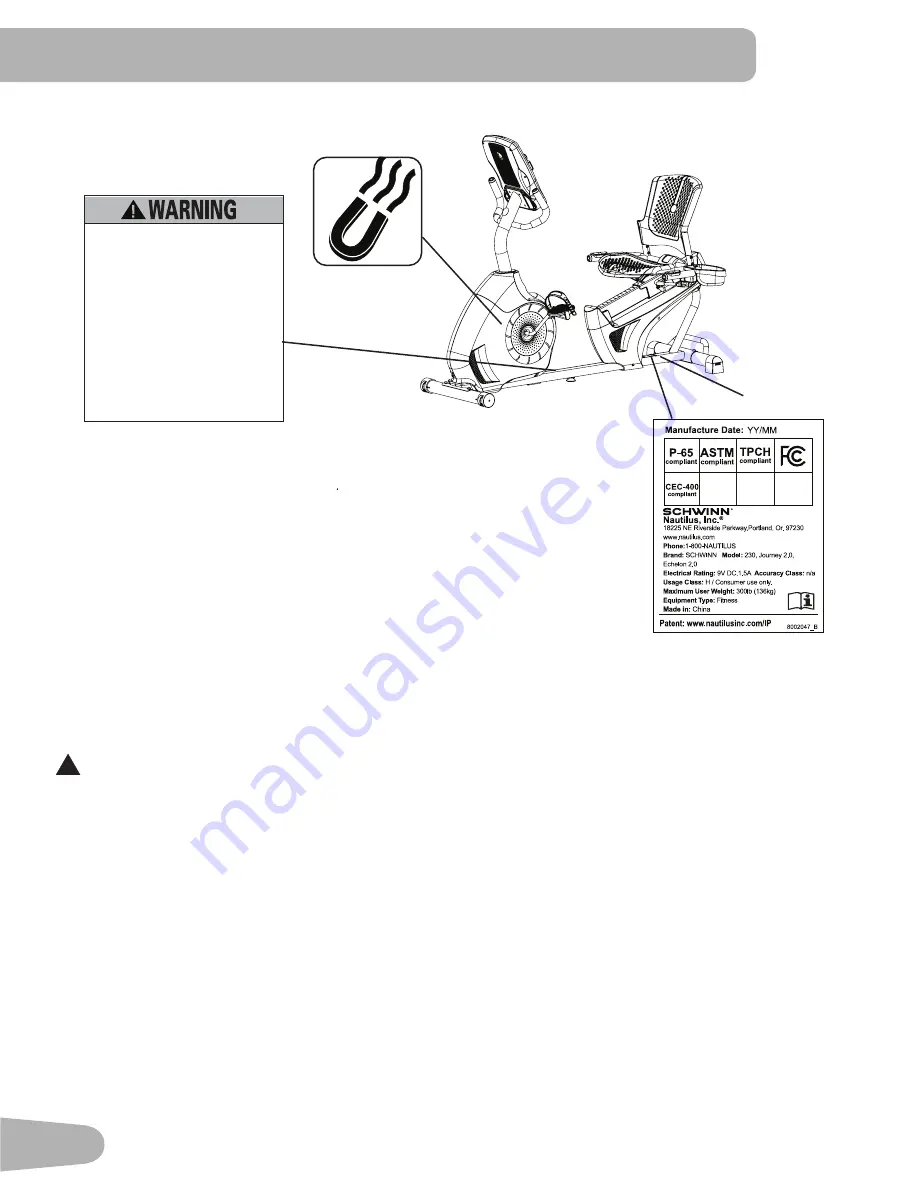
safeTy WarnIng labels and serIal 

number

FCC Compliance

!

Changes or modifications to this unit not expressly approved by the party responsible for compliance could void the 
user’s authority to operate the equipment.

The machine and power supply comply with part 15 of the FCC rules. Operation is subject to the following two conditions: 

(1) This device may not cause harmful interference, and (2) this device must accept any interference received, including 
interference that may cause undesired operation.

Note:

   This machine and power supply have been tested and found to comply with the limits for a Class B digital device, 

pursuant to Part 15 of the FCC Rules. These limits are designed to provide reasonable protection against harmful 
interference in a residential installation. This equipment generates, uses and can radiate radio frequency energy and, if 

not installed and used in accordance with the instructions, may cause harmful interference to radio communications.

However, there is no guarantee that interference will not occur in a particular installation. If this equipment does cause harmful 

interference to radio or television reception, which can be determined by turning the equipment off and on, the user is 

encouraged to try to correct the interference by one or more of the following measures:
•  Reorient or relocate the receiving antenna.

•  Increase the separation between the equipment and receiver.

•  Connect the equipment into an outlet on a circuit different from that to which the receiver is connected.

•  Consult the dealer or an experienced radio/TV technician for help.

Serial Number

REVISIONS

ECO

REVISION

REV DESCRIPTION

APPROVED

DATE

TITLE.

PART NO.

REV.

SHEET 1 OF 1

SCALE:  1:1

DO NOT SCALE DRAWING

1. ALL ITEMS MUST BE RoHS COMPLIANT

2. ALL DIMENSIONS APPLY BEFORE PLATING OR COATING.

3. REMOVE ALL BURRS, BREAK SHARP EDGES 0.5 MM MAX.

4. ALL MACHINES SURFACES Ra 3.2 uM.

5. ALL APPLICABLE NAUTILUS STANDARDS AND 

    SPECIFICATIONS APPLY.

6. ALL DIMENSIONS ARE IN MILLIMETERS

7. ALL DUAL DIMENSIONS ARE IN INCH

UNLESS OTHERWISE SPECIFIED:

METRIC

THIRD ANGLE 

PROJECTION

INTERPRET DIMENSIONS AND TOLERANCES 
PER ASME Y14.5M - 1994

 2.5

 1.5

 0.75

 0.25

 1°

X.

X.X

X.XX

X.XXX

ANGULAR

C

SIZE

This document is the property of Nautilus, Inc.  It may not be reproduced in whole or part, provided to third parties, or used for any purposes other than the performance of work for Nautilus, Inc. without written authorization. All rights are reserved, including copyrights. 

TOLERANCES.

DRAWN

DESIGNED

DATE

METRIC_C_REV G

NAUTILUS, INC.

16400 SE NAUTILUS DRIVE, VANCOUVER, WA 98683

LIFECYCLE

- -

APPROVALS

- -

- -

- -

WARRANTY ITEM:

L.SEVIER

3/29/2013

L.SEVIER

A

8002739

 GWl BIKE AND ELLIPTICAL 300lb 2013  

MATERIAL.

COLOR.

DIE LINE

PMS 152


PMS 109

BLACK

WHITE


Labels must be created from an agency approved tamper proof labeling system  

such as "UL Recognized component marking and labeling system (example:  UL  PGGU2) or equivalent.  

Label and adhesive  must be rated for surface it is applied to (painted metal or ABS plastic), 

Label and adhesive must be rated for 60 degrees C minimum. Labels must meet UL 1647 Permanence of Marking Test.

50mm

117.7mm

A

RELEASE

3/29/2013

LSEVIER

xxxxxxx

•  Lisez et assimilez tous les avertissements  

  apposés sur cet appareil.

•  Gardez les enfants et les animaux de  

  compagnie éloignés de cette machine en  

  tout temps

• 

Déconseillé aux enfants âgés de    

  moins de 14 ans.

•  Lisez et familiarisez-vous avec le Manuel  

  du propriétaire et avec tous les    

  avertissements avant d’utiliser cette  

  machine.

•  Soyez prudent lorsque vous utilisez cet  

  équipement pour ne pas vous infliger de  

  graves blessures.

•  Cette machine supporte un poids   

  maximal de 300lbs. (136kg).

•  Remplacez toute étiquette  


  d’avertissement endommagée, illisible  

  ou manquante.

•  La fréquence cardiaque qui s’affiche  

  sur la console peut être inexact et  

  doit être utilisée seulement à titre  

  indicatif.

•  Read, understand and obey all  


  warnings on this machine.

•  Keep children away.

• 

Not intended for use by anyone  

  under 14 years of age.

•  Prior to use, read and understand  

  the Owner’s Manual.

•  Injury or death is possible if    

  Caution is not used while using this  

  machine.

•  The maximum user weight for this  

  machine is 300 lbs (136 kg).

•  Replace any “Caution”,  “Warning”  

  or “Danger” label that is illegible,  

  damaged, or removed.

•  The heart rate displayed may be  

  inaccurate and should be used for  

  reference only.

8002739_A

Summary of Contents for 230 / Journey 2.0

Page 1: ...ASSEMBLY MANUAL OWNER S MANUAL Manual en Espa ol Latino Americano http www schwinnfitness com 230 430 470...

Page 2: ...aintenance 37 Maintenance Parts 38 Troubleshooting 40 Warranty 43 Nautilus Inc 800 NAUTILUS 800 628 8458 www NautilusInc com Customer Service North America 800 605 3369 csnls nautilus com outside U S...

Page 3: ...promise the safety of this machine and will void the warranty If replacement parts are necessary use only genuine Nautilus replacement parts and hardware Failure to use genuine replacement parts can c...

Page 4: ...more of the following measures Reorient or relocate the receiving antenna Increase the separation between the equipment and receiver Connect the equipment into an outlet on a circuit different from th...

Page 5: ...less instructed otherwise When attaching 2 pieces lightly lift and look through the bolt holes to help insert the bolt through the holes The assembly can require 2 people Maximum User Weight 300 lbs 1...

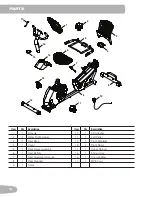
Page 6: ...er 11 1 Left Pedal 3 1 Seat Back 12 1 Front Stabilizer 4 1 Cover 13 1 Right Pedal 5 1 Seat Frame Assembly 14 1 Upper Shroud 6 1 Seat Bottom 15 1 Shroud Cap 7 1 Seat Adjustment Handle 16 1 Console Mast...

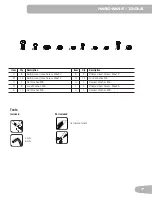
Page 7: ...s Head Screw M5x12 B 10 Button Head Hex Screw M6x12 G 14 Lock Washer M6 C 4 Flat Washer M8 H 4 Curved Washer M6 D 8 Lock Washer M8 I 4 Phillips Head Screw M6x25 E 10 Flat Washer M6 J 4 Curved Washer M...

Page 8: ...8 ASSEMBLY 1 Attach Stabilizers to Frame Note Hardware is pre installed and not on the Hardware Card 6mm 12 8 9 X2 6mm X2...

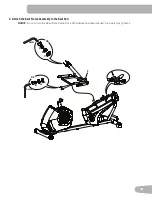
Page 9: ...9 2 Attach the Seat Frame Assembly to the Seat Rail NOTICE Do not crimp the Heart Rate Cable Once all hardware has been inserted be sure to fully tighten it B E G 4mm X2 5 A C D 6mm X4...

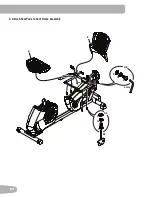
Page 10: ...10 3 Attach Seat Pads to Seat Frame Assembly 3 6 X8 4mm B E G H X4 2 G I...

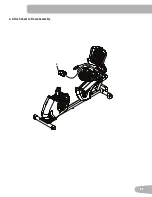
Page 11: ...11 4 Attach Cover to Frame Assembly 4...

Page 12: ...12 5 Attach Seat Adjustment Handle to Frame Assembly 7...

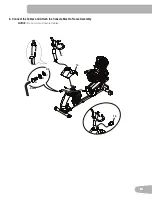
Page 13: ...13 6 Connect the Cables and Attach the Console Mast to Frame Assembly NOTICE Do not crimp Console Cables 15 A J 6mm X4 16 14 D...

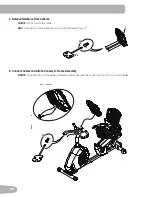
Page 14: ...not crimp the cable Note Hardware is pre installed and not on the Hardware Card X4 8 Connect Cables and Attach Console to Frame Assembly NOTICE Align the clips on the cable connectors and make sure th...

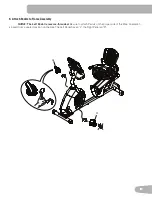
Page 15: ...Frame Assembly NOTICE The Left Pedal is reverse threaded Be sure to attach Pedals on the proper side of the Bike Orientation is based from a seated position on the bike The Left Pedal has an L the Ri...

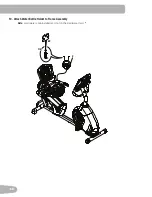
Page 16: ...16 10 Attach Water Bottle Holder to Frame Assembly Note Hardware is pre installed and not on the Hardware Card 2 X2 F 2...

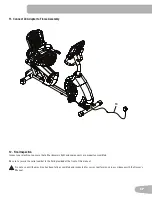
Page 17: ...sure that all hardware is tight and components are properly assembled Be sure to record the serial number in the field provided at the front of this manual Do not use until the machine has been fully...

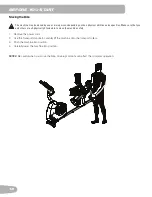
Page 18: ...e all physically fit and able to move the machine safely 1 Remove the power cord 2 Use the Transport Handle to carefully lift the machine onto the transport rollers 3 Push the machine into position 4...

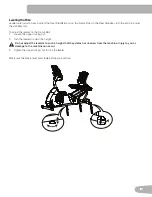
Page 19: ...ot To adjust the leveler on the Frame Rail 1 Loosen the upper locking nut 2 Turn the leveler to adjust the height Do not adjust the levelers to such a height that they detach or unscrew from the machi...

Page 20: ...tilus Customer Service for repair information Maximum user weight limit 300 lbs 136 kg Do not use if you are over this weight This machine is for home use only Do not wear loose clothing or jewelry Th...

Page 21: ...nt Knob D Media Tray N Water Bottle Holder E Fan O Adjustable Seat F Speakers P Contact Heart Rate CHR Sensors G Fully Shrouded Flywheel Q Handlebar Side H Power Connector R Pedal I Transport Wheel S...

Page 22: ...nce level Resistance Decrease button Decreases the workout resistance level QUICK START button Begins a Quick Start workout PROGRAMS button Selects a category and workout program PAUSE END button Paus...

Page 23: ...heart rate value falls into for the current User These Heart Rate Zones can be used as a workout guide for a certain target zone anaerobic aerobic or fat burn Consult a physician before you start an e...

Page 24: ...its to English Imperial or metric refer to the Console Setup Mode section in this manual Level The LEVEL display shows the current resistance level in the workout RPM The RPM display field shows the p...

Page 25: ...rference If your heart rate signal ever seems erratic after validation wipe off your hands and the sensors and try again Heart Rate Calculations Your maximum heart rate usually decreases from 220 Beat...

Page 26: ...itness regimens always use your best judgment when you increase your exercise time or intensity 20 24 FAT BURNING TARGET HEART RATE Heart Rate BPM beats per minute Age 25 29 0 50 100 150 200 250 30 34...

Page 27: ...cannot touch the Pedal move the seat forward If your leg is bent too much move the seat toward the back Step off the bike before you adjust the seat 3 Push down on the Seat Adjustment Handle and adju...

Page 28: ...r more than 30 minutes the active column is fixed on the farthest column on the right and pushes the previous columns off the display 1 Sit on the machine 2 Push the Increase Decrease button to select...

Page 29: ...EDIT HEIGHT EDIT GENDER use the Increase Decrease buttons to adjust and push OK to set each entry 6 The Console display shows the SCAN prompt This option controls how the workout values are displayed...

Page 30: ...ode screen Changing Resistance Levels Push the Resistance Level Increase or Decrease buttons to change the resistance level at any time in a workout program To rapidly change the resistance level push...

Page 31: ...l for your workout Distance Time or Calories and set the Goal value 1 Sit on the machine 2 Push the Increase or Decrease buttons to select the correct User profile 3 Push the Programs button 4 Push th...

Page 32: ...nsole must be able to read the heart rate information from the CHR sensors or HRM for the HRC program to work correctly The Target Heart Rate programs use your age and other User information to set th...

Page 33: ...hree channels a TIME total DISTANCE total and CALORIES total b SPEED average RPM average and HEART RATE average c TIME average LEVEL average and CALORIES average Push the Left or Right buttons to move...

Page 34: ...ght value is current The BMI Measurement is a useful tool that shows the relationship between weight and height that is associated with body fat and health risk The table below gives a general rating...

Page 35: ...oad your workout results using a USB Flash Drive and then view and track your achievements over time www SchwinnConnect com also works with MyFitnessPal Simply follow the prompts from the Link to MyFi...

Page 36: ...st the currently active value flashing Push the Left Right buttons to change which segment is the currently active value hour minute AM or PM 5 Push OK to set 6 The Console display shows the Units pro...

Page 37: ...hine Place the power cord in a secure location Daily Before each use examine the exercise machine for loose broken damaged or worn parts Do not use if found in this condition Repair or replace all par...

Page 38: ...38 Maintenance Parts A CC Z Y B D C E F H I J K M G X W O P S U T V N Q R AA BB L...

Page 39: ...ter Bottle Holder N Heart Rate Cable Lower X Pedal Right E Handlebar Side O Speed Sensor Magnet Y Shroud Upper F Seat Bottom P Speed Sensor Z Shroud Cap G Seat Adjustment Handle Q Crank Arm AA Console...

Page 40: ...from handlebars and cable to Console are secure and undamaged Sensor grip Be sure hands are centered on HR sensors Hands must be kept still with relatively equal pressure applied to each side Dry or c...

Page 41: ...t to outlet Check magnet position requires shroud removal Magnet should be in place on pulley Check Speed Sensor re quires shroud removal Speed sensor should be aligned with magnet and connected to da...

Page 42: ...42...

Page 43: ...ges A machine placed or used in a commercial or institutional setting This includes gyms corporations work places clubs fitness centers and any public or private entity that has a machine for use by i...

Page 44: ...Nautilus Bowflex Schwinn Fitness Universal 8002152 080113 B EN...

Reviews: