

35
Results / Cool Down Mode
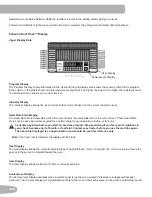
After a workout the GOAL display shows 03:00 and then starts to count down. During this Cool Down period, the Console
shows the Workout Results. All workouts except Quick Start have a 3-minute Cool Down period.
After a workout the GOAL display shows 03:00 and then starts to count down. During this Cool Down period, the Console
shows the Workout Results. All workouts except Quick Start have a 3-minute Cool Down period.
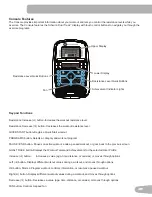
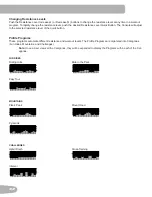
The LCD display shows the Current Workout values in three channels:
a.)
TIME (total), DISTANCE (total), and CALORIES (total)
b.)
SPEED (average), RPM (average), and HEART RATE (average)
c.)
TIME (average), LEVEL (average), and CALORIES (average).
Push the Left(
) or Right(
) buttons to move through the result channels manually.
During the Cool Down period, the Resistance Level will adjust to a third of the average Level of the workout. The Cool
Down resistance level can be adjusted with the Resistance Increase and Decrease buttons, but the Console will not dis-
play the value.
You can push PAUSE/END to stop the Results / Cool Down period and go back to Power-Up Mode. If there is no RPM or
HR signal, the Console automatically goes into Sleep Mode.
GOAL TRACK Statistics (and Achievements)
The statistics from every workout are recorded to a User Profile.
The Schwinn Dual Track
™
Console shows the Goal Track workout Statistics on the Lower Display in three channels:
a.)
TIME (total), DISTANCE (total), and CALORIES (total)
b.)
SPEED (average), RPM (average), and HEART RATE (average)
c.)
TIME (average), DISTANCE (average) / or LEVEL (average) *, and CALORIES (average)
* If the Goal Track Statistic is a single workout, LEVEL (average) is displayed. If the Goal Track Statistic is a
combination of multiple workouts, DISTANCE (average) is displayed instead of LEVEL (average).
To view the GOAL TRACK statistics of a User Profile:
1. From the Power-Up screen, push the
Increase(
) and Decrease(
) buttons to s
elect a User Profile.
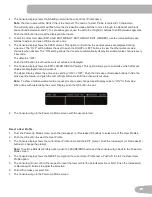
2. Push the GOAL TRACK button. The Console will display the LAST WORKOUT values and activate the corresponding
Achievement light.
Note:
Goal Track statistics can be viewed even during a workout. Push GOAL TRACK and the LAST WORKOUT
values will be displayed. The workout values for the current workout will be hidden except for the GOAL display. Push
GOAL TRACK again to return to the Power-Up screen.
3. Push the
Increase(
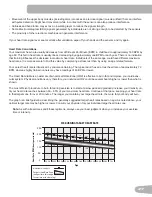
) button to move to the next GOAL TRACK statistic, “LAST 7 DAYS”. The Console will display the
calories burnt on the display (50 calories per segment) for the previous seven days, along with the workout value totals.
Use the
Left(
) or Right(
) buttons to move through all the workout statistic channels.
4. Push the
Increase(
) button
to move to “BMI”, or
Body Mass Index
. The Console will display the BMI value based on
the User settings.
Be sure the height value is correct for your User Profile, and the weight value is current.


