Bravo G4 17 / Bravo G4 22 / Bravo G4 28
EN
75
16. APPENDIX
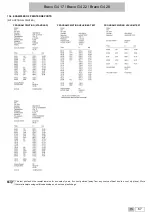
– ALARMS
If the problem persists, contact the technical service (see APPENDIX) communicating the steriliser model and serial number.
These data are indicated on the registration plate on the rear side of the device, on the declaration of conformity and can also be viewed by
means of the “steriliser information” command.
Every time an
anomalous condition
occurs during the operation of the steriliser, an alarm is generated, identified by a specific code (consisting of a letter
followed by a 3-digit number).
Alarm codes are divided into
four categories:
E = ERROR/WARNING
Incorrect handling and/or use or a cause outside the device.
The problem can normally be solved by the user.
Code format:
Exxx
(xxx = identification number 000 ÷ 999)
A = ALARM
First level fault
The problem can normally be solved on site by a specialised technician.
Code format:
Axxx
(xxx = identification number 000 ÷ 999)
H = HAZARD
Second level fault
The problem can normally be solved by the Technical Service Centre.
Code format:
Hxxx
(xxx = identification number 000 ÷ 999)
S = SYSTEM ERROR
Electronic system error (HW-FW).
Code format:
Sxxx
(xxx = identification number 000 ÷ 999)
In case of alarm, switch off the device only after having followed the indications displayed and having carried out the reset
(see “Resetting the
system” paragraph).
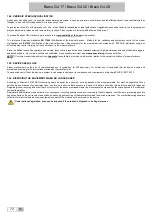
16.1. ALARM INTERVENTION
The alarm intervention causes the cycle interruption (or the normal operation interruption), the display of the relevant
alarm code
and
message
and
an
audible warning
.
16.2. ALARM DURING A CYCLE
The alarm procedure is designed in order not to give the user any possibility to
confuse
an anomalous cycle with an efficiently carried out one, and
therefore to
unintentionally use not sterilised materials
; it is structured to guide the user to the
RESET
of the steriliser and the following use.
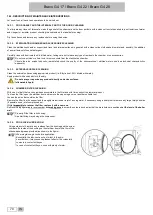
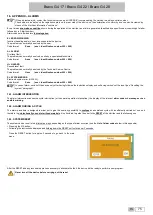
16.3. SYSTEM RESET
The system can be reset in two alternative ways, depending on the type of alarm occurred (see the
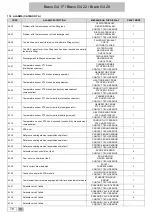
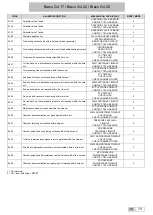
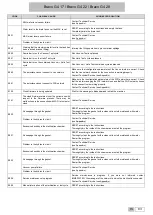
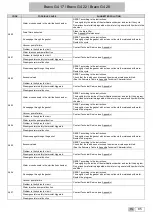
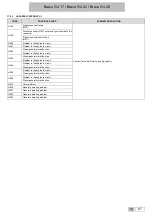
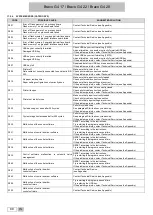
List of alarm codes
below in this appendix):
•
Pressing the OK button;
•
Following the instructions displayed and holding down the RESET button for about 3 seconds.
Press the RESET button for approx. 3 seconds to go back to the main
menu.
After the RESET and any technical operation necessary to eliminate the fault, the device will be ready to perform a new program.
Never turn off the device before carrying out the reset.

