background image


STATCLAVE G4 Service Manual 

1.  UNIT OVERVIEW ............................................................................................................................................ 4 

Introduction ...................................................................................................................................................... 4 
Principles of operation ...................................................................................................................................... 4 

Steps in a typical cycle ................................................................................................................................... 4 

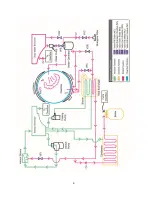
Diagram of key systems and components ........................................................................................................ 5 
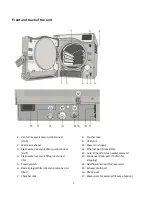
Front and back of the unit................................................................................................................................. 7 
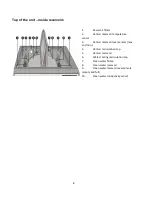
Top of the unit – inside reservoirs .................................................................................................................... 8 
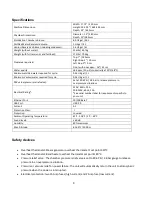
Specifications .................................................................................................................................................... 9 
Safety devices .................................................................................................................................................... 9 
Water supply ................................................................................................................................................... 10 
Safety information .......................................................................................................................................... 10 
Safe operation ................................................................................................................................................. 11 
Safe servicing................................................................................................................................................... 11 
Tools and hardware ........................................................................................................................................ 12 
Shipping instructions ....................................................................................................................................... 13 

2.  LOCATION AND INSTALLATION ................................................................................................................... 15 

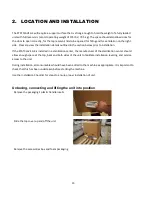
Unboxing, connecting and lifting the unit into position ................................................................................. 15 
Checking package contents ............................................................................................................................. 17 
Positioning a unit ............................................................................................................................................ 18 
Unit dimensions and operating environment ................................................................................................. 18 
Electrical connections and power ................................................................................................................... 19 
Connecting the exhaust tubes ........................................................................................................................ 19 

Direct to drain connection (recommended) ............................................................................................... 20 
Connecting to a waste bottle ...................................................................................................................... 21 

Connecting to the Internet ............................................................................................................................. 22 

Connecting to a wired network................................................................................................................... 22 
Connecting to a wireless network ............................................................................................................... 22 

Connecting to an external water supply ......................................................................................................... 24 

Connecting a Vista Pure Specialized Water Filtration System .................................................................... 24 

Summary of Contents for STATCLAVE G4

Page 1: ...ipping instructions 13 2 LOCATION AND INSTALLATION 15 Unboxing connecting and lifting the unit into position 15 Checking package contents 17 Positioning a unit 18 Unit dimensions and operating environ...

Page 2: ...g Cycle Information Using the USB Data Back Up 38 Adjusting unit settings 39 Using the user menu 39 Using the service menu 43 Setting up load traceability with USER ID PIN and Process Enforced Usage 4...

Page 3: ...73 Investigating a leak how to perform a positive pressure test 76 Method 1 Using the air intake tube 77 Method 2 Using the test port 78 Method 3 Using a solenoid valve 78 Step by step troubleshootin...

Page 4: ...m uses a Venturi device instead of a vacuum pump to remove air from the chamber as it fills with steam to ensure efficient air removal and steam penetration into the load 4 Water from the clean water...

Page 5: ...5 Diagram of key systems and components...

Page 6: ...6...

Page 7: ...onnect IN 5 Power switch 6 Bacteriological filter bacteria retentive air filter 7 Chamber rack 8 Touchscreen 9 USB port 10 Power cord input 11 Ethernet port not visible 12 Auto fill port for clean wat...

Page 8: ...perature sensor 3 Venturi reservoir level sensors max and min 4 Venturi recirculation tap 5 Venturi reservoir 6 Water cooling recirculation tap 7 Clean water fill tap 8 Clean water reservoir 9 Clean w...

Page 9: ...6 PSI 2 8 bar to release pressure in overpressure situations Electrical Rating 120V 60Hz 12 A 208 240V 60Hz 12A See serial number label for requirements specific to your unit Ethernet Port 10 100 Base...

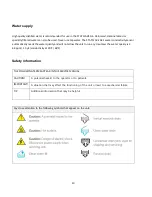
Page 10: ...lity and will not allow the unit to run a cycle unless the water quality is 6 4ppm 10 S conductivity at 20 C 68 F Safety information THE FOLLOWING TERMS APPEAR IN THIS SERVICE MANUAL CAUTION A potenti...

Page 11: ...state and national regulations regarding the servicing of this class of device and safety requirements must be observed When the panels are removed Hazardous voltages are accessible Disconnect the pow...

Page 12: ...bent material according to biological waste disposal regulations Tools and hardware Tools required for servicing include Needle nose pliers Wrench Nut driver Hose clamp pliers Screwdriver Philips Wire...

Page 13: ...13 Shipping instructions The unit should be serviced on site If it is necessary to send the unit back to the dealer follow these instructions 1 Drain water from the unit Follow these steps...

Page 14: ...hole and pull residual water from the system 3 Screw in the leveling legs 4 Specify upright heated and insured shipping 5 Ensure unit is returned on a pallet with at least two banding straps securing...

Page 15: ...LAVE G4 is installed in a sterilization center the manufacturer of the sterilization center should allow enough space at the top back and both sides of the unit to facilitate installation leveling and...

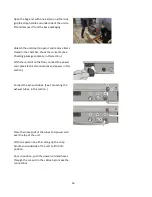
Page 16: ...ction With the unit still on the floor connect the power cord See Electrical connections and power in this section Connect the exhaust tubes See Connecting the exhaust tubes in this section Place the...

Page 17: ...17 Checking package contents...

Page 18: ...18 Positioning a unit Unit dimensions and operating environment...

Page 19: ...zer is 1 440 Watts for 120V and 2 250 3 000 Watts for 208 240V Connecting the exhaust tubes IMPORTANT For the unit to function BOTH reservoirs must be full and BOTH drain tubes must be connected The S...

Page 20: ...20 Direct to drain connection recommended...

Page 21: ...21 Connecting to a waste bottle...

Page 22: ...22 Connecting to the Internet Connecting to a wired network Connecting to a wireless network...

Page 23: ...23...

Page 24: ...uch as a Vista Pure specialized water filtration system or external water tank and auxiliary pump make sure your unit is set to the AUTOMATIC filling mode To change this setting from the home screen s...

Page 25: ...25 Connecting an auxiliary pump...

Page 26: ...instrument processing An additional custom cycle can be configured using one of three temperature settings but this cycle must be validated by the user Touchscreen overview The home screen default se...

Page 27: ...27 System icons and what they mean The home screen contains four system icons Press these icons to access additional functions and information...

Page 28: ...28...

Page 29: ...29 Unlocking the door power on The STATCLAVE G4 will lock the chamber door when you select a cycle To unlock the door go to the home screen and follow these steps...

Page 30: ...30 Starting and stopping a cycle...

Page 31: ...Cycle chart and descriptions When selecting a sterilization cycle users are instructed to choose according to the recommendations of leading infection control authorities and local regulatory guidelin...

Page 32: ...nd empty trays in the chamber IMPORTANT Vacuum tests must be conducted when the unit is cool Running a vacuum test on a hot chamber may cause the test to fail Running a vacuum test can take a minimum...

Page 33: ...remaining in the chamber can compromise sterilization Using an FDA approved Bowie Dick test pack the Bowie Dick test runs a cycle at 134 C for 3 5 minutes to evaluate the correct air removal To perfor...

Page 34: ...ments with hollow areas that require more steam penetration The following is a description of what devices are ON OFF and OPEN CLOSED at each stage of a Hollow Wrapped cycle which is a cycle that incl...

Page 35: ...VVC CLOSED 5 VACUUM DRAW PULSE phase included only on some cycles Band Heaters OFF Water Pump and VFB OFF Steam Generator OFF VDB CLOSED VEC OPEN Venturi Pump and VEV ON Blower for Heat Exchanger ON...

Page 36: ...Exchanger ON Cooling Pump ON VVC CLOSED 9 VACUUM DRAW Band Heaters ON Water Pump and VFB OFF Steam Generator ON VDB OPEN VEC OPEN Venturi Pump and VEV ON Blower for Heat Exchanger ON Cooling Pump ON V...

Page 37: ...k during the initial installation follow the instructions in the Location and Installation section Connecting your STATCLAVE G4 to a network The STATCLAVE G4 web portal is a direct connection to the S...

Page 38: ...he activity light on the USB storage device stops blinking or the USB icon on the LCD turns from a flashing green to a solid grey remove the USB storage device and transfer the information to your com...

Page 39: ...one Select zone Time Update Select automatic or manual Time 12 24 Select 12 hour or 24 hour format Date Format Select how date is displayed Country Type name to select country Units Select metric or i...

Page 40: ...connection Automatic IP DHCP Network connection Renew IP Network connection SOUND Button Beep Turn the beep On Off Beep Volume Adjust sound INSTRUCTIONS Water Reservoir Filters Slide show on how to cl...

Page 41: ...the unit OFF The start up screen and connection wizard will begin when the unit is next powered ON Remote Access Use to generate a token that can be sent to a technician who can access your unit remot...

Page 42: ...42 Sterilization time Adjust the custom cycle s sterilization hold time Drying time Adjust the custom cycle s drying time...

Page 43: ...ity Setup DIAGNOSTIC TOOLS This menu contains a number of tools technicians can use to more accurately diagnose problems Device Status Test Repeater Mode Use to run a series of cycles in succession Ca...

Page 44: ...To enable the use of a static IP address for your unit select OFF Renew IP Use to renew the unit s IP address in case of a network error Additionally you can scan the QR code on this screen with a han...

Page 45: ...er their units to display only the most common cycles used Press on a cycle icon to remove it from the home screen menu Press on the icon to reinstate it Select the cycle icons you wish to display on...

Page 46: ...46 To turn Process Enforced Usage ON OFF or to activate DOCUMENTATION mode select SETTINGS then USER and follow these steps...

Page 47: ...and the load type When starting a cycle with Process Enforced Documentation mode turned ON you will be prompted to identify the general contents of the load to be processed by selecting from a list as...

Page 48: ...pending by showing this icon Pressing this button will lead you to a screen that allows you to input the Biological Indicator results Setting drying time Use this setting to lengthen or shorten dryin...

Page 49: ...ance between keeping the chamber at 70 C and using a minimum of electricity STAND BY HIGH For high use Optimizes the STATCLAVE G4 for speed by keeping the chamber at 120 C This is the unit s default s...

Page 50: ...50 Registering for online access...

Page 51: ...51 First start up...

Page 52: ...52...

Page 53: ...arts DON T use abrasive cloths metal brushes or metal cleaning products whether solids or liquids to clean the device or sterilization chamber Maintenance message WHEN A MAINTENANCE MESSAGE APPEARS th...

Page 54: ...rack and trays EVERY 6 MONTHS or 500 cycles Message appears at intervals Perform all the cleaning tasks listed in the monthly schedule above Replace the bacteriological filter Replace the door seal TE...

Page 55: ...hen the unit loses power The unit will take approximately 2 minutes to depressurize Without power the door lock will remain engaged CAUTION Risk of Injury Do not force the door handle If the unit is l...

Page 56: ...remotely access your STATCLAVE G4 you will need to provide a security token to the person requesting access To obtain this code from the home screen select SETTINGS then USER and follow these steps Th...

Page 57: ...leaning the chamber rack and trays IMPORTANT When cleaning the chamber be careful not to damage the temperature probe on the inside back wall of the chamber Cleaning and disinfecting the external surf...

Page 58: ...58 Draining the unit for cleaning and shipping...

Page 59: ...ters Cleaning the external water reservoir tank 1 Disconnect the external tank from the sterilizer and close the tank valve 2 Fill the tank with a solution of distilled water and alcohol 10 such as is...

Page 60: ...e any residual alcohol solution 6 Reconnect the tank to the sterilizer and refill with distill water Cleaning the chamber filters Over time the chamber s three filters will collect enough debris to sl...

Page 61: ...61 Replacing the bacteriological filter Replacing the door seal...

Page 62: ...ogical filter replace if required Inspect and clean right cover air filter Check door seal replace if required Inspect chamber filters replace if required Review error history Software upgrade if requ...

Page 63: ...nents of the protective earthing system are changed or if connections are broken and remade perform a protective bonding impedance test ground continuity Perform both a second Hi Pot test and a second...

Page 64: ...ion reference meters temperature and pressure are important for accurately setting the STATCLAVE G4 unit so that the correct sterilization conditions temperature and pressure occur in accordance with...

Page 65: ...00 probe as follows Meter without data logging capabilities PTEC X X 4 4A Pressure Module HQS2 B A A 400 kPa A Temperature Module HQS RT1 PT 100 RTD Probe Pt 100 PT5 How to calibrate the unit STAGE 1...

Page 66: ...it with either the 1 4 inch knurled nut pressure port B for 1 4 inch Teflon tubing or the 3 8 inch knurled nut pressure port C for 3 8 inch Teflon tubing 4 Connect the assembled calibration fitting t...

Page 67: ...e pressure meter is set to kPa and the temperature meter is in C 8 Close the chamber door 9 Connect one end of the pressure meter tube to your reference meter 10 Connect the other end of the pressure...

Page 68: ...on cycle the following screen will appear IMPORTANT When this screen appears the POA field will be highlighted and you will have 30 seconds to complete the POA calibration before the cycle continues t...

Page 69: ...lready 00 NOTE Offset adjustment arrows DON T have to be highlighted to change values STAGE 4 Adjusting the pressure at vacuum 15 The cycle then continues to the vacuum phase The POV field on the disp...

Page 70: ...19 When the reference meter reaches 125 C you can verify that the steam saturation level is correct by checking the temperature and pressure values on your reference meters against the table below Ch...

Page 71: ...le 25 Once you have set the unit values verify that the steam saturation level is correct by checking the temperature and pressure values on the unit against the steam saturation table from Step 19 If...

Page 72: ...door and switch off the unit Calibration is now complete How to back up the calibration data To back up the calibration data which is saved automatically for future references using the Backup NVRAM f...

Page 73: ...an be seen on the device screen a diagnostic tool found in the service menu The display section of this screen shows you what the current values are for these sensors The button on the interactive sec...

Page 74: ...rature and then watch the corresponding reading in Section A to see if the component successfully reaches the target temperature Section C is for checking the individual functioning of valves pumps an...

Page 75: ...75...

Page 76: ...nents of the protective earthing system are changed or if connections are broken and remade perform a protective bonding impedance test ground continuity Perform both a second Hi Pot test and a second...

Page 77: ...ase the pressure in the chamber 6 On the device screen you will see sensor readings on left side of the display The Pressure Chamber PC value is the current pressure in the chamber 7 Raise the Pressur...

Page 78: ...valves to find the leak 8 When you have found the leak you may simply need to tighten a connection If you need to remove a valve or component you will need to depressurize the chamber From the device...

Page 79: ...nd the leak you may simply need to tighten a connection If you need to remove a valve or component you will need to depressurize the chamber Use the bleed valve on the regulator to depressurize the ch...

Page 80: ...m Test If water drips from the underside of the unit during the test call your SciCan dealer Cycle interrupted NOT STERILE Cycle aborted NOT STERILE and CYCLE FAULT messages The STOP button was presse...

Page 81: ...e zone See Section X Setting up your STATCLAVE G4 for time and date instructions Touchscreen is blank white Power interruption Power was interrupted during a firmware upgrade Power off the unit and po...

Page 82: ...new cable if possible Make sure your router assigns IP addresses automatically Renew the IP address by following these steps 1 Scroll through the setup menu to NETWORK SETUP and select 2 Select RENEW...

Page 83: ...ICON This screen will show if the chamber is under pressure or vacuum and whether it can be opened Door will not open power Lock status still engaged Press LOCK ICON to go to the door lock status scr...

Page 84: ...the test was initiated Ensure stand by chamber warming system is turned OFF See Section 7 4 Setting the Stand by Mode Attempt a second Vacuum Test making sure the chamber is cooled to room temperature...

Page 85: ...f water level is too low Refill the reservoir Refer to the steps described in section 3 4 Filling the Reservoir If the water quality is inadequate You have likely used water that is not steam process...

Page 86: ...al minutes Reduce the warm up time between cycles or set the unit to warm up at a specific time in the morning See sections 3 13 Setting Preheating and 3 14 Setting Stand by Time Instruments are black...

Page 87: ...d any excess lubricant should be removed before loading Contact between instruments made of different metals Separate instruments made of different metals See Section 4 3 Unwrapped Instruments for ins...

Page 88: ...r pressure balance issue Leave the door open for 1 minute and try again Handle in closed position but door not showing locked The door will lock once a cycle is selected Press a cycle button to initia...

Page 89: ...e Check Chamber Thermocouple CF 13 Faulty Boiler Thermocouple Check Boiler Thermocouple CF 15 Chamber temperature is too high for this phase Blocked exhaust valve Miscalibration CF 16 Boiler is too ho...

Page 90: ...turi water reservoir overflow Water reservoir exhaust blocked Overflow switch malfunction stuck ON CF 50 Chamber temperature LESS than 121 C for 121 C cycles Pressure and or temperature sensor miscali...

Page 91: ...id valve STERILIZATION CF 62 Measured pressure LESS than calculated pressure 291 kPa for 132 C cycle 309 kPa for 134 C cycle Pressure and or temperature sensor miscalibration STERILIZATION CF 63 Measu...

Page 92: ...e Exhaust Chamber Valve Drain Boiler Water Pump Venturi VACUUM RELIEF CF 76 Vacuum relief phase II Unit fails to relief the vacuum and reach atmospheric pressure less 5kPa Exhaust blockage Valve Vent...

Page 93: ...ard failure CF 90 Corrupted not initialized chamber thermocouple calibration Corrupted not initialized chamber thermocouple calibration CF 91 Corrupted not initialized pressure calibration Corrupted n...

Page 94: ...he unit If components of the protective earthing system are changed or if connections are broken and remade perform a protective bonding impedance test ground continuity Perform both a second Hi Pot t...

Page 95: ...e panel to the rear to disengage the tabs at the top and bottom of the panel Figure 6 1 1 6 2 Removing and reinstalling the right panel 1 Remove the 2 screws 2 Slide the panel to the rear to disengage...

Page 96: ...denser service port to completely drain the condenser 2 Loosen the 2 screws in keyhole slots 3 Remove the 4 other screws 4 Lift the panel and use the steel cable to hang it in the service position 5 D...

Page 97: ...A Chamber door adjustment screw factory set N A 5 N A Chamber door adjustment locking screw N A 6 01 115452S Door lock mechanism assembly Door Locking Mechanism 7 01 115431S Venturi water front drain...

Page 98: ...tch not visible Door Latching Microswitch 13 01 115545S Door closed microswitch not visible Microswitch W Roller 14 01 115408S USB port not visible Cable Extension USB 15 01 115438S LCD touchscreen Fa...

Page 99: ...1 01 115413S I O board IO PCB STATCLAVE 2 01 115408S USB port Cable Extension USB STATCLAVE 3 01 115546S Door latch microswitch Door Latching Microswitch 4 01 115403S Heat exchanger Heat Exchanger 5 0...

Page 100: ...e VEC exhaust chamber Valve Exhaust Chamber Kit 10 01 115470S Solenoid valve VFW clean water fill Valve Fill Water Kit 11 01 115417S Band heater relay switch not visible Relay Kit 120V 11 01 115418S B...

Page 101: ...valve Check Valve Barb AF No Spg 3 01 115401S Water cooling pump Water Cooling Pump Comp STATCLAVE 4 01 115393S Steam generator Steam Generator 120V STATCLAVE 4 01 115394S Steam generator Steam Gener...

Page 102: ...mp Comp STATCLAVE 8 01 115392S Vacuum check valve Check Valve Barb Af No Spg 9 01 115385S Test port Fitting Sprint Plug Flush G1 4 10 01 115469S Solenoid valve VVC vacuum relief Valve Vent Chamber Kit...

Page 103: ...uctivity STATCLAVE 3 01 108567S Pressure transducer Pressure Transducer 68 PSI 4 01 115385S Test port Fitting Sprint Plug Flush G1 4 5 01 115397S Steam generator water pump not visible Ulka Pump 120V...

Page 104: ...STATCLAVE 13 01 115411S RS232 port for external printer Cable RS232 Kit STATCLAVE 14 01 115455S Chamber thermocouple Thermocouple Chamber STATCLAVE 15 See Left side Steam generator Steam Generator 16...

Page 105: ...turi recirculation spout Venturi Silicone Tube STATCLAVE 3 01 115448S Venturi water reservoir float switch high Float Sensor Reservoir STATCLAVE 4 01 115448S Venturi water reservoir float switch low F...

Page 106: ...y sensor Sensor Conductivity STATCLAVE 9 01 115448S Clean water reservoir float switch empty Float Sensor Reservoir STATCLAVE 10 01 115448S Clean water reservoir float switch full Float Sensor Reservo...

Page 107: ...107 APPENDIX A STATCLAVE G4 plumbing diagram...

Page 108: ...108 APPENDIX B STATCLAVE G4 electrical schematic...

Reviews: