71
If your values DO NOT match the values, stop the procedure, tighten all the calibration fittings and
start a new calibration.
STAGE 6. Adjusting the unit pressure and temperature
21.
Wait until the cycle reaches the sterilization phase (temperature above 132°C).
22.
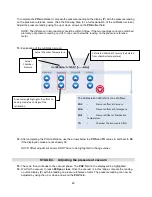
First, compare the temperature readings between temperature reference meter and the STATCLAVE
G4’s temperature display (
T
). Adjust the temperature reading using up or down arrows on the
TO
field
to match the two temperatures within 0.1°C.
23.
Next compare the pressure readings between the pressure reference meter and the pressure reading
(
P
) on the unit’s display. Adjust the pressure reading using up or down arrows on the
POS
field. The
difference in the two readings should be within
0.5Kpa
. If the two readings cannot be matched precisely,
set the pressure reading on the unit to one count below the reading on pressure reference meter.
24.
The measured pressure indicated on the display (
P
) should match the calculated pressure on the display
(shown as
[XXX.X Kpa]
) within
3Kpa
. If not, verify the temperature and pressure readings once again
against the reference meter readings and make the necessary adjustments. The pressure reading on
the display (
P
) should be within
1KPa
of the pressure reference meter reading.
STAGE 7. Checking the unit readings with the steam saturation table
25.
Once you have set the unit values, verify that the steam saturation level is correct by checking the
temperature and pressure values on the unit against the steam saturation table from Step 19.
If the unit values
DO
show that your temperature and pressure values match with the steam saturation
table, continue to the next step.
If the unit values
DO NOT
match the table values, stop the procedure, tighten all the calibration fittings
and start a new calibration.
STAGE 8. Adjusting the pressure at vacuum again
26.
On completion of the sterilization phase, the cycle will go back to the vacuum phase. Wait for the vacuum
to reach
20Kpa or less
. At this stage, verify the pressure reading (
P
) on display with the pressure
reference meter display. The two readings should be within
0.5Kpa
. Adjust the
POV
offset, if required.
NOTE: The difference in two readings should be within 0.5Kpa. If the two readings cannot be matched
precisely, set pressure reading on unit to one count below the reading on the pressure reference meter.
STAGE 9. Finishing calibration
27.
The calibration procedure is now complete. You can press STOP to abort the cycle.
28.
The offset values will be automatically saved, but you will still need to back up these values using the
Backup NVRAM function. See the following section: How to back up your calibration data.
29.
Wait for the unit to equalize its pressure to atmosphere before disconnecting any calibration equipment
and fittings.
CAUTION!
Do not attempt to remove the equipment if the unit is under pressure or vacuum.
Summary of Contents for STATCLAVE G4
Page 5: ...5 Diagram of key systems and components...
Page 6: ...6...
Page 17: ...17 Checking package contents...
Page 18: ...18 Positioning a unit Unit dimensions and operating environment...
Page 20: ...20 Direct to drain connection recommended...
Page 21: ...21 Connecting to a waste bottle...
Page 22: ...22 Connecting to the Internet Connecting to a wired network Connecting to a wireless network...
Page 23: ...23...
Page 25: ...25 Connecting an auxiliary pump...
Page 28: ...28...
Page 30: ...30 Starting and stopping a cycle...
Page 50: ...50 Registering for online access...
Page 51: ...51 First start up...
Page 52: ...52...
Page 58: ...58 Draining the unit for cleaning and shipping...
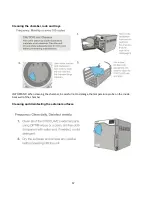
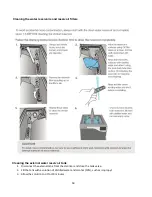
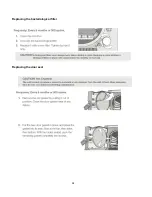
Page 61: ...61 Replacing the bacteriological filter Replacing the door seal...
Page 75: ...75...
Page 107: ...107 APPENDIX A STATCLAVE G4 plumbing diagram...
Page 108: ...108 APPENDIX B STATCLAVE G4 electrical schematic...

