Page 209
STAT
IM 2000/2000S
Service Guide
96-106775 Rev 5.0
10. Armature, Isoplate, and Probe Bracket and Chamber Thermocouple
STAT
IM
5000/5000S/5000 G4 Service Guide
Reinstalling the armature and isoplate
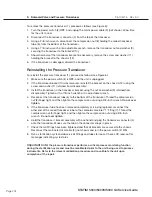
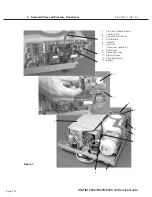
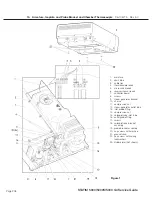
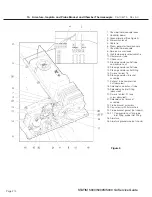
To reinstall the armature (1), proceed as follows (see Figure 1):
1. Align the armature (1) with the chassis (13). Tilt the unit sideways with the reservoir and PCB
facing upwards, insert and tighten the four cap screws with spring lockwashers (22) retained
from the removal procedure. Ensure that the armature drain tube exits through the hole in the
chassis.
IMPORTANT: Be careful not to cross-thread the cap screws in the tapped holes of the
armature.
Be careful not to damage the armature drain tube, the thermocouple in the probe bracket
assembly, the ground strap or the bubble level (23).
2. Install the probe bracket assembly (19). Partially insert the two bottom cap screws and attach
the ground strap (21) to the bottom right hand position of the probe bracket assembly before
proceeding.
3. When the lower screws securing the probe bracket assembly are installed, tighten the cap
screws with washers holding the armature to the chassis.
4. CAREFULLY bend the thermocouple leads back into position.
5. Complete installation of the probe bracket assembly (19). (See, Probe Bracket and Chamber
Thermocouple Subassembly below).
6. Secure the solenoid valve assembly (18).
7. Tighten the two screws (11) holding the steam generator bracket (12) to the chassis (13).
8. Bundle the microswitch leads (5), thermocouple leads (4) and the reservoir sensor leads (6)
together using cable ties every 2-3 inches. Secure the wires and thermocouples to the top of
the armature using the cable tie anchors provided on top of the armature.
9. A dielectric strength test (Hi-Pot) and a protective bonding impedance test (ground continuity)
should be performed on the STAT
im
unit at this stage.
NOTE:
These tests must be performed on the STAT
im
again once the work is completed and
the cover has been returned to the unit.
10. Check that the bubble level (23) on the front right top corner of the armature is not damaged
and that the bubble moves freely.
11. Refill the reservoir using steam process distilled water.
12. Calibrate the thermocouples appropriate to the unit type.
13. Run a sterilization cycle and observe all fittings and tubes for leaks. Check LCD read-outs for
messages indicating cycle status.


