background image

Connecting the Set-top

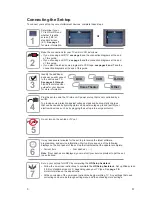
To connect your set-top to your entertainment devices, complete these steps.

Identify the additional 

devices you will connect 

to the set-top and TV. 

See pages 

8

 through 

1

2

 and the related user 

guides for your devices 

for more information.

VCR

DVD

D-VCR

Determine if your 

TV is HD or SD and 

whether it is wide 

screen (16:9) or 

standard screen 

(4:3). 

See page 

7


for more information.

Home Theater

4

3

16

9

or

Make the connections for your TV and/or VCR as follows:
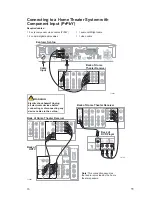
•  If you are using an HDTV, 

see page 

5

 and the connection diagrams at the end   

  of  this guide.

•  If you are using an SDTV, 

see page 

5

 and the connection diagrams at the end   

  of  this guide.

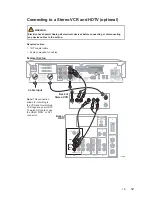
•  If you want to archive some programs to VCR tape, 

see pages 6 and 7

 and the  

  connection diagrams at the end of this guide.

!

3

1

2

4

Plug the set-top and the TV into an AC power source that is not controlled by a 
switch.
To provide some protection against voltage surges and built-up static charges 
that can be caused by lightning storms and power outages, ground (earth) your 
electronic devices, such as by plugging the set-top into a surge protector.

5

Do not turn on the set-top or TV yet.

POWER

6

It may take several minutes for the set-top to receive the latest software, 

programming, and service information. Wait until you see one of the following 

displays on the front panel of the set-top that indicates that the update is complete:
•  Current time 

•  Four dashes (- - - -) 

Note

: If four dashes are displayed, you must call your service provider to get the set-

top authorized.

7

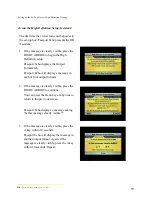
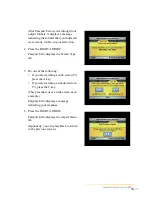
Set up your set-top for HDTV by completing the 

HD Setup Assistant

•  Follow the on-screen instructions to 

complete the 

HD

 Setup Assistant. 


Set up W

ide screen    

  (16:9) or standard screen (4:3) depending upon your TV type. See 

page 

7

 for   

  more information on the a

spect

 rat

io

•  At the conclusion of the on-screen instructions,

begin watching TV.  Any settings that need


correcting can be made through setting menu and then choosing more settings.

Other

4

Summary of Contents for 4240HDCTM

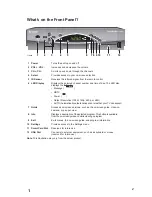
Page 1: ...SETTINGS EXIT GUIDE INFO CH CH VOL VOL SELECT EXPLORER 4250HDC POWER SETTINGS Explorer Digital Set Top User s Guide Models 4240HDC TM and 4250HDC TM with Multi Stream CableCARDTM Interface...

Page 2: ...he following Message HDTV Power Output Resolution 1080i 720p 480p or 480i AUTO Automatically outputs native scan rates that your TV can accept 7 Guide Accesses on screen services such as the on screen...

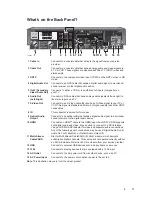
Page 3: ...inputs composite on Video Audio Out your TV 6 Audio Out Connects to RCA cables that send analog audio signals left and right to Left Right the stereo inputs on a TV 7 S Video Out Connects to an S Vid...

Page 4: ...provide some protection against voltage surges and built up static charges that can be caused by lightning storms and power outages ground earth your electronic devices such as by plugging the set top...

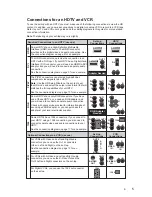
Page 5: ...s of your HDTV See the connection diagram on page 10 for an example The HDMI connector can provide the connection to an HDTV with a DVI input If your HDTV has a Digital Visual Interface DVI connector...

Page 6: ...ify that the current TV program is broadcast in color Adjust the TV color controls If you are using a component video connection PrPbY check that all connectors are completely plugged into the set top...

Page 7: ...cture displays Resolution is identi ed by the number of display lines on the screen The techniques that an HDTV uses to paint the picture on the screen are referred to as progressive and interlaced Wi...

Page 8: ...Dolby Digital decoder or you can connect the baseband audio outputs OUT 1 Audio Left and Right to the TV Digital content is encrypted with High Bandwidth Content Protection HDCP on the DVI HDMI port...

Page 9: ...re connecting or disconnecting any device cables to the set top T12969 Explorer Set top IR THIS DEVICE IS INTENDED TO BE ATTACHED TO A RECEIVER THAT IS NOT USED TO RECEIVE OVER THE AIR BROADCAST SIGNA...

Page 10: ...E TO RADIO COMMUNICATIONS AND IS IN VIOLATION OF THE FCC RULES PART 15 120 VAC 60HZ 400W LISTED 14H1 CABLE EQUIP 120 VAC 60HZ 40W CABLE IN 1394 S VIDEO OUT OPTICAL AUDIO OUT USB CABLE OUT VIDEO OUT DI...

Page 11: ...S VIDEO VIDEO 1 S VIDEO OUT VIDEO OUT MONITOR VIDEO L R AUDIO S VIDEO OUT IN OUT IN T11135 Connecting to a Home Theater System with Component Input PrPbY Required cables 3 sets component video cables...

Page 12: ...OUVRIR CATV CONVERTER MADE IN MEXICO CAUTION RISK OF ELECTRIC SHOCK DO NOT OPEN Back of Stereo VCR RF OUT RF IN R L AUDIO IN VIDEO IN R L AUDIO OUT VIDEO OUT Back of HDTV DVI HDCP IN AUDIO CENTER CHAN...

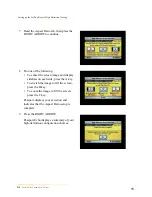
Page 13: ...ort Echo displays the Output Formats tab Passport Echo will display a message in each of four output formats 2 If the message is clearly visible press the RIGHT ARROW to continue You can press the Bac...

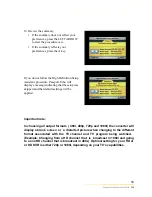
Page 14: ...W Passport Echo displays the Screen Type tab 5 Do one of the following If you are watching a wide screen TV press the A key If you are watching a standard screen TV press the C key This procedure uses...

Page 15: ...wing To center the screen image and display sidebars on each side press the A key To stretch the image to fill the screen press the B key To zoom the image to fill the screen press the C key Passport...

Page 16: ...ing that the setup was skipped and that default settings will be applied Important note In choosing all output formats 480i 480p 720p and 1080i the converter will display a blank screen or a distorted...

Reviews: