8
What If None of the Codes Work?
If none of the codes listed for your brand of device operate the device correctly, you can
search through the code library for a valid code.
Improving Your Reaction Time
When you search the code library, you need to be ready to press SELECT as soon as the
remote turns off your device. Therefore, make sure you are familiar with the location of the
SELECT key before you begin this procedure.
Sizing Up The Libraries
The mode keys blink twice when the remote reaches the last code in a library. You
do not need to count codes. However, knowing the size of each library will help you
determine how long it will take to cycle through all of the codes in the library. Each
library contains the following number of codes:
•
CBL mode: 22
• TV mode: 219
•
DVD mode: 206
• AUX mode: 37
Searching the Code Library
(Program Code 9 9 1)
1. Turn on the device.
2. Press and hold SELECT and the appropriate mode key (CBL, TV, DVD, or AUX) until
the mode keys blink twice. For example, to search for a TV code, press and hold
SELECT and TV at the same time.
Note: If you reassigned mode keys, you may, for example, press SELECT and
DVD to search for a TV code to assign to the DVD mode key.
3. Press 9 9 1. The mode key you selected in step 2 blinks twice.
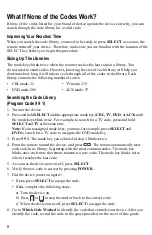
4. Point the remote toward the device, and press
. The remote automatically tests
each code in its library, beginning with the most common codes. The mode key
blinks once each time the remote transmits a new code. The mode key blinks twice
when it reaches the last code.
5. As soon as the device powers off, press SELECT.
6. Verify the new code is correct by pressing POWER.
7. Did the device power on again?
• If yes, press SELECT to assign the code.
• If no, complete the following steps:
a) Turn the device on.
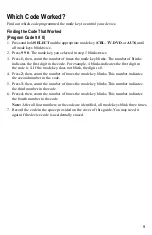
b) Press
or
to step forward or back to the correct code.
c) When the device turns off, press SELECT to assign the code.
8. Go to Which Code Worked to identify the code that controls your device. After you
identify the code, record the code in the space provided on the cover of this guide.


