background image

ASSEMBLY

SCIFIT   •   

S

cientific 

Solutions for Fi

tness   •   SCI

FIT   


S

cientific 

Solutions for Fi

tness   •

   SCI FI T

7

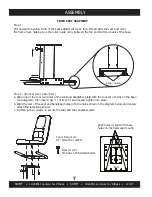
FIXED SEAT ASSEMBLY

Step 1: 

Pull upward the yellow knob of the seat adjustment lever, then lift and slide the seat post onto

the frame track making sure the roller guide rail is between the top and bottom wheels of the base.

Roller Guides

Tools Required:
1/2” Wrench or socket

Item #1 (x 4)

5/16-18 x 1.25 Serrated Screw

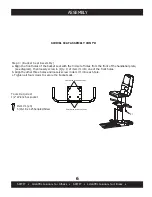
Step 2: (Bucket Seat Assembly)

a. Align one of the rear two holes of the seat and handlebar plate with the rear set of holes on the base  


    (see diagram), then insert (Qty. 1) of item #1 


and loosely tighten into place.

b. Align the rest of the seat and handlebar holes with the holes shown in the diagram below and loosely  

c. Tighten all four screws to secure the seat and the handlebar plate.

Align holes of seat with these 

holes on the fixed seat mount.

Front

Rear

 attach the remaining screws.

Summary of Contents for RST7000

Page 1: ...Users Operations Manual Before using this product read this manual and follow all safety rules and operating instructions RST7000 Recumbent Stepper...

Page 2: ...This page left blank purposely...

Page 3: ...MATION 1 INTRODUCTION 2 SPECIFICATIONS 3 SET UP INSTALLATION 4 ASSEMBLY 5 8 PRODUCT OVERVIEW 9 KEYPAD FUNCTIONS 10 BIOMECHANICAL POSTIONING 11 ADJUSTMENTS 12 13 ACCESSORIES 14 HEART RATE TRANSMITTER S...

Page 4: ...e water is present i e pool or spa areas Failure to obey a safety warning can result in an injuryto yourself and others Always follow the safety precautions to reduce the risk of personal injury The p...

Page 5: ...ligently To ensure a future of good health you should always eat well balanced meals drink plenty of uid water during a workout and stay fit by exercising intelligently Always follow training guide th...

Page 6: ...ing w auto recharge battery back up Low Voltage AC adapter standard Resistance System Electromagnetic Self Generating Resistance Programs Manual 7 pre programmed Hills profiles Heart Rate and Random A...

Page 7: ...vascular Machine vel the unit is equipped with leveling end caps The end caps are designed with the recess end diameter off centered This allows you to rotate the endcap s to a position that will leve...

Page 8: ...t onto the frame track making sure the roller guide rail is between the top and bottom wheels of the base 3 16 Hex wrench 1 2 Wrench or socket Roller guide Step 2 Attach the handlebar plate to the sea...

Page 9: ...bucket seat with the 3rd set of holes from the front of the handlebar plate see diagram then loosely screw in Qty 1 of item 1 into one of the front holes b Align the other three holes and loosely scre...

Page 10: ...ired 1 2 Wrench or socket Item 1 x 4 5 16 18 x 1 25 Serrated Screw Step 2 Bucket Seat Assembly a Align one of the rear two holes of the seat and handlebar plate with the rear set of holes on the base...

Page 11: ...on the seat base item 8 b Have another person align the mounting holes of the handlebar item 4 from under the base mounting plate and loosely secure to the seat mount plate with items 2 3 and 4 c Loos...

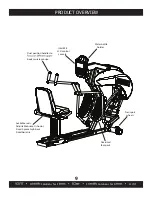
Page 12: ...S Solutions for Fi SCIFIT 9 Available seats Adjustable bucket shown Fixed 2 piece high back Fixed bariatric Oversized foot pads LCD control console Water bottle holder Dual position handles to body mu...

Page 13: ...reen The Work Level Status LCD Screen gives a progressive real time indication of the current work level of any and all programs Select Workout or Insert Fitkey Manual Hills Heart Rate Profile Selecti...

Page 14: ...aller individuals will find the rear handle more accommodating while shorter users will find the front handle ideal These dual handles also allow most users to change muscle groups during use The rear...

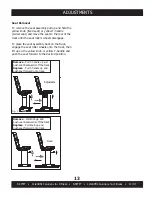
Page 15: ...and is held in place with a spring loaded pin The seat may be adjusted in one of two ways 1 Fig A Push down on the foot assist pedal located at the bottom of the seat assembly 2 Fig B Pull up on the...

Page 16: ...t rollers wheels disengage To place the seat assembly back on the track engage the seat roller wheels onto the track then lift up on the yellow knob or yellow T handle and push the seat forward to the...

Page 17: ...C Adapter P4861 Domestic P3733 Int l Optional Heart Rate Belt 65190 Provides a continual real time heart rate tracking during a workout Optional Wheel Chair Platforms 1181 Platforms with tethers to ho...

Page 18: ...Transmitter Straps come in a variety of styles and manufacturers To properly activate secure strap to the chest and to deactivate follow the instructions that come with the Transmitter Strap Calculat...

Page 19: ...p which will keep the screen illuminated for a short period after a completed workout or in the pause mode This varies between 0 to 3 minutes and can be changed within the Set Up mode function If you...

Page 20: ...ve Multi Peaks and Ramp Time mm ss 15 00 Level 1 0 Select 1 of 7 profiles with the keys then press Level 1 0 Adjust workout time maximum 99 min with the keys then press Time mm ss 15 00 Level 1 0 Adju...

Page 21: ...50 Time mm ss 15 00 Adjust the Target Heart Rate with the keys then press Target Heart Rate 120 Weight lbs 150 Time mm ss 15 00 Enter the user weight with the keys then press and begin exercise Target...

Page 22: ...19 Adjust the workout time maximum 99 min with the the keys then press Adjust the level intensity range 1 20 with the keys then press Random Cont d Level 1 0 Time mm ss 15 00 Level 1 0 Time mm ss 15 0...

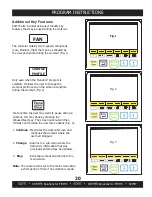
Page 23: ...g 1 If at anytime the user may want to pause during a workout this may done by pressing the Pause Clear key The screen workout will then minimize and provide the user three options Fig 3 1 Continue Ma...

Page 24: ...ents After making adjustments the user may press Quick Start to save and exit the Set Up mode at anytime NOTE If you pass the category wanted you cannot go backwards Press Quick Start and re enter int...

Page 25: ...ht units preferred US or Metric Press ENTER to advance BAUD RATE Default 19200 The console may be connected via the COMM port on the back of the console to an external monitoring device that can be us...

Page 26: ...backwards to different categories Use the Up or Down arrow keys to make adjustments within the category Use the Quick Start key to save Note Pressing the ENTER key while in the CAROUSEL format will t...

Page 27: ...needed it may be adjusted here Note Default Level range is 1 20 Press ENTER to advance THE FOLLOWING CATEGORIES ONLY PERTAIN TO THE FIT QUIK ROTARY PRESETTINGS R FIT QUIK CARDIO WORKOUT Default MANUAL...

Page 28: ...workout for those machines that are bidirectional compatible Press ENTER to advance Note The banner will appear approximately every 27 seconds during the 1st stage only FIT QUIK RPM TARGET Default Ma...

Page 29: ...Forward Fast Slow Reverse Fast Slow 4 Forward Fast Slow Reverse Fast Slow Workout ends Press Enter to advance REVERSE BANNER Rotary only Default Disabled Allows option to enable or disable the displa...

Page 30: ...seconds Fast Forward displayed 15 seconds Reverse Fast displayed 15 seconds ISO SLOW TIME Default 0 15 When the ISO banner is enabled it allows the option to set a length of time to show Slow at the t...

Page 31: ...tenance The RST7000 is virtually maintenance free After training always wipe down your SCIFIT exercise product Perspiration that continuously settles on the frame uphol stery casing and console may ev...

Page 32: ...card has not been returned by user then date of shipment from factory Note Original purchaser must register their purchased products either by warranty card return website registration or fax to acti...

Page 33: ...ill drive system inclusive of motor inverter 5 years Treadmill handrails Handles 3 years Treadmill heart rate grips 12 months Treadmill water bottle holders 90 days Treadmill trays 90 days Accessories...

Page 34: ...intenance will NOT be covered under warranty To clean upholstery use mild soap and warm water Dry with a clean towel Refer to the machine s maintenance schedule SCIFIT is not responsible for the repai...

Page 35: ...equest technical support and to order replacement parts Our goal is to return every voicemail call within 30 minutes of when it is placed during our normal business hours Please have the following inf...

Page 36: ...re received and inspected at the factory a credit will be issued for the original parts invoiced Attention service companies labor invoices will NOT be paid until the defective parts are returned to t...

Page 37: ...tity Purchased From City State Please rank the following reasons 1 through 6 for selecting SCIFIT with 1 being most important ____Features ____ Quality ____Price ____Dealer ___User Friendly ___Appeara...

Page 38: ...SCIFIT Systems Inc 5151 South 110th East Avenue Tulsa OK 74146 From_____________________________ _________________________________ _________________________________...

Page 39: ...ge for your records Model Number _________________________________ Serial Number _________________________________ Date of Purchase _________________________________ Manufactured By SCIFIT Systems Inc...

Page 40: ...Order online 24 7 at www SCIFIT com Sales 800 278 3933 or 918 359 2000 Customer Service 800 745 1373 5151 South 110th East Avenue Tulsa Oklahoma 74146 USA...

Reviews: