background image

10

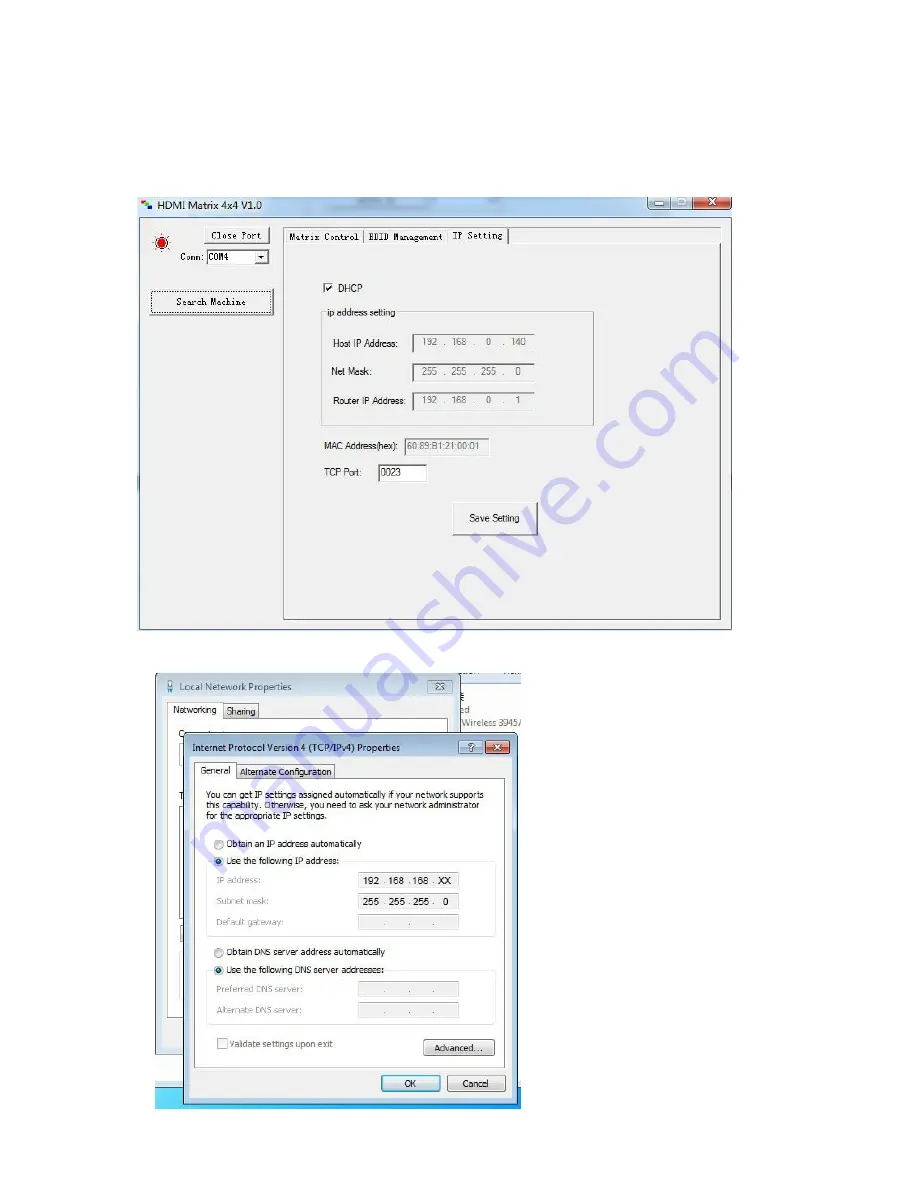
9. IP Control

1).  Click  “DHCP”,  then  the  switch  will  assign  IP  address  automatically.  You
can also set the IP address manually.

2). If you set a static IP, you need set the IP of the computer to:-

Summary of Contents for SC04.1404

Page 1: ...DMI2 0 4K50 60Hz YUV420 Resolutions 4K 60Hz 4K 30Hz 1080P 1080i 720P Supports 3D HDCP 2 2 1 4 compliant 4xHDMI Input 4xHDMI output with SPDIF Audio Allows up to four 4 source devices to be independently switched to 4 HDMI monitors HDTVs or projectors Support Panel Button Local IR RS232 Control IP Control Via Telnet 1U rack design easy installment Notice Our company reserves the right to make chang...

Page 2: ...k or fire hazard due to overheating do not obstruct the unit s ventilation openings with newspapers tablecloths curtains and similar items 4 Do not install near any heat sources such as radiators heat registers stoves or other apparatus including amplifiers that produce heat 5 Do not place sources of naked flames such as lighted candles on the unit 7 Unplug this apparatus during lightning storms o...

Page 3: ...ng Humidity Range 5 to 90 RH no condensation Input Video Signal 0 5 1 0 volts p p Input DDC Signal 5 volts p p TTL Signaling Rate 3 0Gbit s Video Format Supported 4K 60Hz 4k 30Hz 1080P 1080i 720P 576P 480P 576i 480i HDCP Compliant HDCP2 2 and HDCP1 4 Output Video HDMI2 0 and HDMI 1 4 Audio Format Supported DTS HD Dolby trueHD Maximum Transmission Distance 15m Power Consumption 30wtts Max Dimension...

Page 4: ...necting 1 Connect the HDMI input sources such as HD DVD PS3 STB etc into HDMI Matrix 2 Connect the HDMI outputs such as HD LCD HD DLP into HDMI Matrix 3 Power on the input source you want to show 4 Connect the power supply into HDMI Matrix and turn on the display you want to watch 5 Use remote or push the button to choose input source Attention Insert Extract cables gently ...

Page 5: ...t press an output number button to choose which output port to change the source the input digit above the output port number on LCD starts to be flash Second press an input number to change the source of the output port to the selected input IR In 1 In 2 In 3 In 4 Out 1 Out 2 Out 3 Out 4 ...

Page 6: ...er keys and two arrow keys Press number keys to select specific input port Left arrow button to backward the input port and right arrow to forward input port 3 IR extender control Use the IR receiver cable to change the IR receiver position If controlling the HDMI Matrix through the 1 8 3 5 mm input jack on the rear panel connect the IR cable directly to the matrix rear IR receiver extension socke...

Page 7: ...d holding button In3 for 3 seconds will select the EDID shown on LCD panel To copy EDID from out1 to input 3 pressing and holding In3 to recall the display of EDID setting for input3 click button In3 13 times Pressing and holding In3 for 3 seconds 4x4 matrix will try to read EDID data from output1 and save it to input3 Below is the list for EDID options 1 1080P_2CH PCM 2 1080P_ audio5 1 3 1080P_ a...

Page 8: ...ill be shown automatically after every 3 seconds 6 Turn on or turn off DHCP mode Pressing In1 and In3 simultaneously for 3 seconds to toggle the DHCP mode or 7 Turn on or turn off cascading mode When cascading is enabled the matrix will not read EDID data from sink device TV or hot plug status it will always output the signal to the sink device without doing any handshake This is only when a hands...

Page 9: ... 8 Software Control 1 Connecting a computer to the Matrix using a USB to RS232 cable open the software and click Search Machine 2 You can control HDMI Matrix as shown beow 3 Set the EDID of 4 HDMI inputs ...

Page 10: ...10 9 IP Control 1 Click DHCP then the switch will assign IP address automatically You can also set the IP address manually 2 If you set a static IP you need set the IP of the computer to ...

Page 11: ...11 3 Open web browser and enter the IP address you set 4 Turn on off the audio ...

Page 12: ...12 5 Set the EDID of 4 HDMI inputs 6 Network config ...

Page 13: ... Control 1 Open CommUart Assistant 2 Comport setting Baud Rate 57600 bps Parity None Data Bits 8 bit Stop Bits 1 bit 3 Enter Port Command in Send options 4 If you need to check the command enter RH and enter key then click Send ...

Page 14: ... specified by the manufacturer or parts that have the same characteristics as the original parts Unauthorized substitutes may result in fire electric shock or other Hazards 4 Safety check After repairs or service ask the servicer to perform safety checks to confirm that the unit is in proper working condition WARRANTY If your product does not work properly because of a defect in materials or workm...

Page 15: ...ot supplied by warrantor or failures which result from accidents misuse abuse neglect mishandling misapplication alteration faulty installation set up adjustments maladjustment of consumer controls improper maintenance power line surge lightning damage modification or service by anyone other than a Factory Service center or other Authorized Servicer or damage that is attributable to acts of God 2 ...

Page 16: ...Scion Tech Ltd Thatcham Berkshire RG18 3DL United Kingdom support scion tech co uk Tel 44 0 1635 862484 ...

Reviews: