1
I
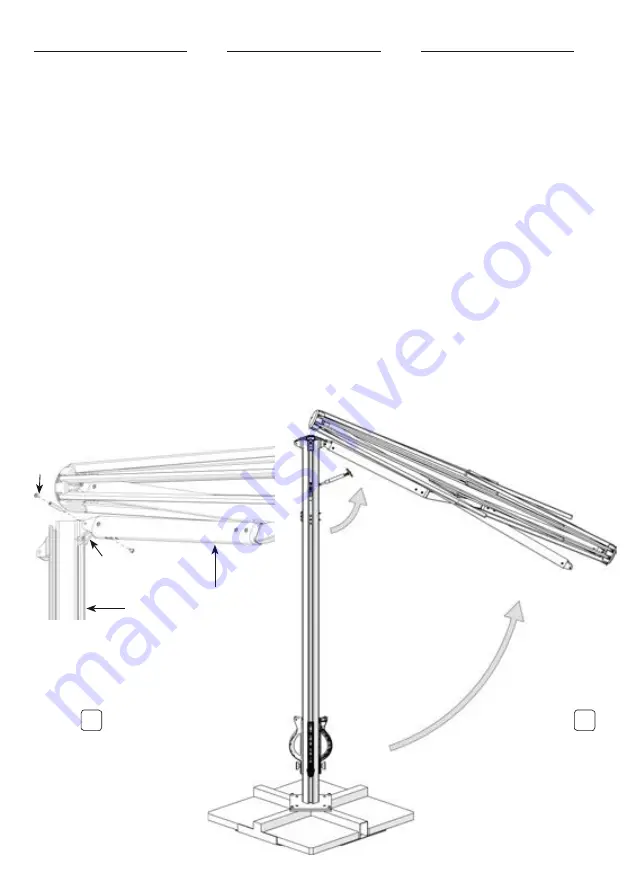
Fig. 3
III Agganciare il braccio superio-
re di uno degli ombrelloni (5)
sull’attacco superiore (7) pre-
sente sulla colonna (3) e fissare
utilizzando una boccola con le
viti (6).
Fig. 4 - Fig. 5
IV Sollevare l’ombrellone fino alla
posizione orizzontale (operazione
da eseguire in 2 persone), inseri-
re l’attacco della molla a gas (8)
nell’apposito foro di centraggio
e avvitare le viti (9) predisposte.
Fig. 6
V Agganciare il braccio inferiore
(10) al punto di fissaggio sul
carro scorrevole (11) e fissare
utilizzando l’altra boccola con le
viti (6).
VI Ripetere le stesse operazioni
per gli altri ombrelloni dove già
previsti gli attacchi superiori (7)
della colonna (3).
1
en
Fig. 3
III Hook the upper arm of one of
the umbrellas (5) on the upper
connection (7) on the column (3)
and fix it using a bushing with the
screws (6).
Fig. 4 - Fig. 5
IV Lift the sunshade up to the hori-
zontal position (operation to be
carried out in 2 persons), insert
the gas spring attachment (8)
into the proper centering hole
and tighten the screws (9) pro-
vided.
Fig. 6
V Hook the lower arm (10) to the
fixing point on the sliding car-
riage (11) and fix using the other
bushing with the screws (6).
VI Repeat the same operations for
the other sunshades where the
upper connections (7) of the col-
umn (3) are already provided.
1
D
Fig. 3
III Hängen Sie den oberen Arm ei-
nes der Schirme (5) am oberen
Anschluss (7) des Mastes (3) ein
und befestigen Sie ihn mit einer
Buchse mit den Schrauben (6).
Fig. 4 - Fig. 5
IV Heben Sie den Schirm in die
waagerechte Position (Vorgang
bei 2 Personen), stecken Sie den
Gasfederaufsatz (8) in die rich-
tige Zentrieröffnung und ziehen
Sie die mitgelieferten Schrauben
(9) an.
Fig. 6
V Hängen Sie den unteren Arm
(10) am Befestigungspunkt des
Wagens (11) ein und befestigen
Sie ihn mit der anderen Buchse
mit den Schrauben (6).
VI Wiederholen Sie die gleichen Vor-
gänge für die anderen Sonnen-
schirme, bei denen die oberen
Anschlüsse (7) des Mastes (3)
bereits vorhanden sind.
③
⑤
⑥
⑦
3
FIG.
4
FIG.


