Page 44
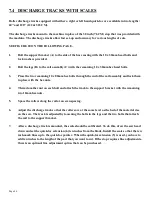
7.3 MATERIAL SUPPLY TRACKS
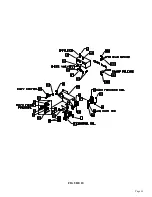
A ten foot roller supply track, that can be bolted to the input side of the saw to support longer pieces of
material, is an available option for this saw. The supply tracks can also be bolted end to end, to supply
longer tracks, if needed. The ten foot supply track bolts to the machine on the left side of the base casting.
SEE FIGURE 21 ON THE FOLLOWING PAGE.
1.
Attach the roller support bracket (N) to the left side of the base casting with the 10 x 30mm hex
head bolts and lock washers provided.
2.
Bolt the legs (B) to the rail assembly (A) with the remaining 10 x 30mm hex head bolts.
3.
Place the two remaining 10 x 80mm hex bolts through the end of the rail assembly and lock them
in place with the hex nuts.
4.
Thread another nut on each bolt and attach the track to the support bracket with the remaining
two 10mm hex nuts.
5.
Space the rollers along the rail at an even spacing.
6.
Adjust the supply track so that the rollers are at the same level as the bed of the material vise on
the saw. The track is adjusted by loosening the bolts in the legs and the bolts that attach the
support bracket to the track.
7.
The track may be anchored to the floor, using the mounting holes provided.
8.
The optional vertical guide assembly (F) can be used as a guide for materials that do not lay flat
on the feed roller.
Summary of Contents for CPO-275
Page 8: ...Page 7 FIGURE 1...
Page 10: ...Page 9 FIGURE 2...
Page 13: ...Page 12 MANUAL OR PK W TRIGGER SWITCH FIGURE 3 1...
Page 14: ...Page 13 PKPD W EMERGENCY STOP FIGURE 3 2...
Page 15: ...Page 14 1 PHASE MOTOR W TRIGGER SWITCH FIGURE 3 3...
Page 16: ...Page 15 1 PHASE MOTOR W E STOP SERIAL S B3431 UP FIGURE 3 4...
Page 22: ...Page 21 FIGURE 5A...
Page 28: ...Page 27 FIGURE 8 FIGURE 9...
Page 30: ...Page 29 FIGURE 10...
Page 36: ...FIGURE 14 Page 35 C A B D...
Page 38: ...Page 37 FIGURE 15...
Page 40: ...Page 39 FIGURE 16...
Page 42: ...Page 41 FIGURE 17...
Page 44: ...Page 43 FIGURE 18...
Page 46: ...Page 45 FIGURE 19...
Page 48: ...Page 47 FIGURE 20...
Page 50: ...Page 49 FIGURE 20A...
Page 58: ...Page 57 FIGURE 23...
Page 60: ...FIGURE 24 Page 59...
Page 62: ...Page 61 G 078000 60 RPM 230 Volt 1 Phase T S 078001 60 RPM 230 Volt 1 Phase E S FIGURE 25...
Page 66: ...Page 65 FIGURE 27...
Page 68: ...Page 67 FIGURE 28...
Page 70: ...Page 69 FIGURE 29...
Page 74: ...Page 73 FIGURE 31...
Page 76: ...Page 75 FIGURE 32...
Page 78: ...Page 77 FIGURE 33...
Page 80: ...FIGURE 34 Page 79...
Page 82: ...Page 81 FIGURE 35...
Page 84: ...Page 83 FIGURE 36...
Page 86: ...Page 85 FIGURE 37...
Page 88: ...Page 87 FIGURE 38...
Page 90: ...Page 89 FIGURE 39...


