Page 47
5. Have your blades re-sharpened by someone who has the right equipment for circular cold
saw blades. Improper re-sharpening is one of the most common problems encountered in cold
sawing.
6. Keep the blade flange, the face of the blade spindle and the blade clean and free from nicks.
Any contamination or nicks on the flange, spindle or the blade will cause the blade to run out
of alignment.
7. Always remove the back lash when installing a blade. For instructions,
REFER TO SECTION 6.2. Also, check the condition of the drive pins when replacing the
blade. If the drive pins are broken or worn, replace them.
8. Any of the above problems may cause a condition known as pick-up. Pick-up is caused when
small pieces of the material being cut adhere themselves to the blade. When pick-up is
present, you will notice a jerking or jumping motion in the saw head while cutting. This is
caused by the blade being pinched as it goes through the material where the pickup is present.
Pick-up can be removed by using a fine honing stone or a very fine file. When removing
pick-up, care must be taken not to remove any part of the blade. After the pick-up has been
removed, review the above items to determine what caused the problem.
1.
Check your air pressure. This machine requires a minimum of 90 pounds of pressure to
function properly. When cutting solid materials, the pressure may have to be set as high as
130 PSI to prevent the material from slipping in the jaws.
2.
The bolts in the adjustable stop may not be tight enough, allowing the stop to move.
3.
The main vise or shuttle vise may be adjusted too tight, causing the material to drag or bind
before the vise is seated against the stop.
4. Check for chip build-up between the main vise and the shuttle vise.
10.3 PART LENGTH NOT CONSISTENT
1.
IF THE COOLANT WILL NOT FLOW:
A.
Make sure that the coolant switch on the control panel is on.
B.
Check the wiring connections to the pump and make sure that the pump is running.
C.
Check the level of the coolant in the reservoir. If there is less than three inches of coolant in
the reservoir, the pump may not work.
D.
Check the reservoir for contamination or sludge buildup that may be blocking the inlet.
E.
Remove the coolant line from the guard and make sure that it is clear. Also, make sure that
the valve on the guard is open.
2.
IF THE COOLANT PUMP IS LEAKING:
A.
Check the connections on the coolant lines.
B.
If the pump itself is leaking, there is a seal kit available.
FOR PART NUMBERS, SEE SECTION 11.13.
10.4 FLOOD COOLANT SYSTEM (OPTIONAL)
Summary of Contents for CPO-315-HFA-5HP
Page 8: ...Page 7 FIGURE 1...
Page 10: ...Page 9 FIGURE 2...
Page 18: ...Page 17 THIS PAGE LEFT BLANK INTENTIONALLY...
Page 19: ...Page 18 6 2 BLADE INSTALLATION SEE FIGURE 4 BELOW FIGURE 4...
Page 23: ...Page 22 6 4 MATERIAL MAIN VISE SEE FIGURE 6 BELOW FIGURE 6...
Page 25: ...Page 24 FIGURE 7...
Page 27: ...Page 26 6 6 POWER DOWN FEED REFER TO FIGURE 8 BELOW FIGURE 8...
Page 30: ...Page 29 FIGURE 9...
Page 31: ...Page 30 6 9 COUNTER SET UP REFER TO FIGURE 10 BELOW FIGURE 10...
Page 37: ...Page 36 8 4 GEAR REPLACEMENT SAW HEAD REFER TO FIGURE 13 BELOW FIGURE 13...
Page 39: ...Page 38 8 5 SPINDLE REPLACEMENT MAIN VISE SEE FIGURE 14 BELOW FIGURE 14...
Page 41: ...Page 40 8 7 SHUTTLE VISE MAINTENANCE SEE FIGURE 15 BELOW FIGURE 15...
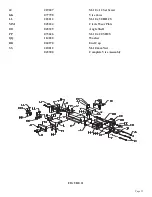
Page 46: ...Page 45 FIGURE 17...
Page 58: ......
Page 62: ...Page 61 FIGURE 24...
Page 64: ...Page 63 FIGURE 25...
Page 66: ...Page 65 FIGURE 26...
Page 68: ...Page 67 FIGURE 27...
Page 70: ...Page 69 FIGURE 28...
Page 72: ...Page 71 FIGURE 29...
Page 74: ...Page 73 FIGURE 30...
Page 76: ...Page 75 045345 Scotchman Inds PART NO FIGURE 31 A B D E F G C H I...
Page 77: ......
Page 78: ...Page 77 FIGURE 31B...
Page 80: ...Page 79 FIGURE 32...
Page 82: ...Page 81 FIGURE 33...
Page 83: ......
Page 84: ...Page 83 FIGURE 34...
Page 86: ...Page 85 FIGURE 35...
Page 88: ...Page 87 FIGURE 36...
Page 90: ...Page 89 FIGURE 36...
Page 92: ...Page 91 FIGURE 38...
Page 94: ...Page 93 045345 Scotchman Inds PART NO 14 0 WIRING DIAGRAMS...
Page 95: ...045345 Scotchman Inds PART NO 1 3 Page 94...
Page 97: ...Cont Prev Page Cont Prev Page 045345 Scotchman Inds PART NO 3 3 Page 96...

