Page 31
THE COUNTER ON THIS MACHINE CAN BE SET TO COUNT EITHER UP OR DOWN.
TO SET THE COUNTER, USE THE FOLLOWING STEPS:
1.
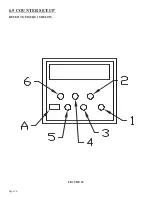
To enter the programming mode, depress the reset button (A), along with buttons 5 and 6. On the
lower line of the display, the message INIT appears with a down counter subtracting from five to
zero seconds.
2.
If the buttons are released when the counter is on five seconds, the display will enter an LCD test.
If the buttons are released between five and one second, the counter returns to the operating
mode.
3.
If the keys are released after the counter reaches zero, the counter will enter the programming
mode.
4.
Once you are in the programming mode, the display will read COUNT ADD or COUNT SUB.
Count Add will count up to the pre-set number. Count Sub will count down from the pre-set
number. To change from Count Add to Count Sub, press button number 1. When the choice you
want appears on the display, press button number 6 and the program will move to the next step.
5.
The next option will be Loop-on or Loop-off. For this machine, choose the Loop-off option by
pressing button number 1 until Loop-off appears on the display and then, depress button
number 6.
6.
The next option on the display is Relay-nc or Relay-no. For this machine, choose Relay-no by
pressing button number 1 until Relay-no appears on the display and then, depress button
number 6.
7.
The next option to appear is Delay 100-500. This is the output delay in milliseconds. This option is
normally set in the 100 millisecond mode. Press button number 1 until 100 appears on the display
and then, depress button number 6.
8.
The next option to appear is dp. This allows you to choose the decimal point from 0 to 0.000. On
this machine, there is no advantage to moving the decimal point. It is best to leave it set at 0 by
pressing button number 6.
9.
After you press button number 6 at the dp option, the program jumps to the beginning. You have
to go through the complete menu, pressing button number 6, without changing any of the options,
before the counter will return to the operation mode.
10.
To set the counter for an operation, depress button 1 until the number you want appears on the
display. Repeat this step for each button until the quantity you want appears on the display.
11.
No matter how the counter is programmed, there must be a quantity set before the machine will
operate in the automatic mode.
Summary of Contents for CPO-315-HFA-NF
Page 8: ...Page 7 FIGURE 1...
Page 10: ...Page 9 FIGURE 2...
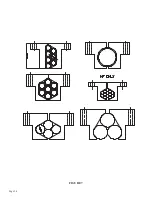
Page 14: ...Page 13 FIGURE 3...
Page 18: ...Page 17 THIS PAGE LEFT BLANK INTENTIONALLY...
Page 22: ...Page 21 THIS PAGE LEFT BLANK INTENTIONALLY...
Page 23: ...Page 22 6 3 MATERIAL MAIN VISE SEE FIGURE 6 BELOW FIGURE 6...
Page 25: ...Page 24 FIGURE 7...
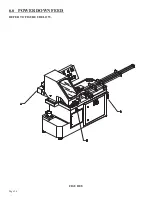
Page 27: ...Page 26 6 6 POWER DOWN FEED REFER TO FIGURE 8 BELOW FIGURE 8...
Page 30: ...Page 29 FIGURE 9...
Page 31: ...Page 30 6 9 COUNTER SET UP REFER TO FIGURE 10 BELOW FIGURE 10...
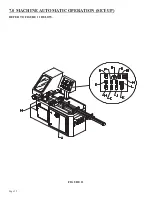
Page 33: ...Page 32 7 0 MACHINE AUTOMATIC OPERATION SET UP REFER TO FIGURE 11 BELOW FIGURE 11...
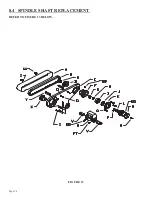
Page 37: ...Page 36 8 4 SPINDLE SHAFT REPLACEMENT REFER TO FIGURE 13 BELOW FIGURE 13...
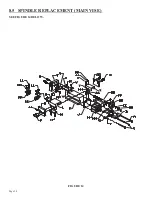
Page 39: ...Page 38 8 5 SPINDLE REPLACEMENT MAIN VISE SEE FIGURE 14 BELOW FIGURE 14...
Page 41: ...Page 40 8 7 SHUTTLE VISE MAINTENANCE SEE FIGURE 15 BELOW FIGURE 15...
Page 44: ...Page 43 FIGURE 16...
Page 50: ...Page 49 FIGURE 18...
Page 56: ......
Page 60: ...Page 59 FIGURE 23...
Page 62: ...Page 61 FIGURE 24...
Page 64: ...Page 63 FIGURE 25...
Page 66: ...Page 65 FIGURE 26...
Page 68: ...Page 67 FIGURE 27...
Page 70: ...Page 69 FIGURE 28...
Page 72: ...Page 71 FIGURE 29...
Page 75: ......
Page 76: ......
Page 78: ...Page 77 FIGURE 31...
Page 80: ...Page 79 FIGURE 32...
Page 82: ...Page 81 FIGURE 33...
Page 84: ...Page 83 FIGURE 34...
Page 86: ...Page 85 FIGURE 35...
Page 88: ...Page 87 FIGURE 36...
Page 90: ...Page 89 FIGURE 37...
Page 92: ...14 0 WIRING DIAGRAMS Page 91 045345 Scotchman Inds PART NO...
Page 93: ...3 5PB 1PL 045345 Scotchman Inds PART NO 1 3 Page 92 Ser s B1392HFANF0314 Up Part of Next Page...


