4.5 MACHINE START-UP
Before starting this machine, take the time to review the operator’s manual thoroughly, to familiarize
yourself with all of the functions of the machine.
We strongly urge you to follow OSHA directive CFR-1910.147 (effective 09-09-90) regarding lock-out,
tag-out procedures. Keep in mind that the directive refers to all hazardous energy sources, not just
electrical.
On machines equipped with either a power vise or a power down feed, the air supply must also be
disconnected and locked or tagged. Scotchman offers a lock-out switch for this machine as an option, if
your plant is not equipped with lock-out capabilities. If you are interested in this option, REFER TO
SECTION 7.7 or contact your local dealer or the factory.
Do not install a blade on the saw until after it has been powered and cycled several times.
To power manual and power vice machines, use the trigger switch mounted in the draw handle to start
the motor.
To power machines equipped with the power down feed option, turn the Motor switch to the ON position
and depress the foot switch to start the motor. The foot switch can be used to cycle the saw head without
starting the motor, by leaving the motor switch in the OFF position.
We do not recommend using the emergency stop switch to turn the machine off during normal operation.
If the emergency stop switch is used, it must be manually reset by pulling the switch back out.
Always turn the Motor switch to the OFF position when the saw is not in use.
Once the machine has been powered, check the rotation of the spindle. There is an arrow on the guard
showing the proper rotation. If the rotation is not correct, the electrician will have to switch two of the
three line wires.
If the saw is equipped with either the power vise or the power down feed options, SEE SECTIONS 7.1
THRU 7.2, for additional information on electrical and air connections.
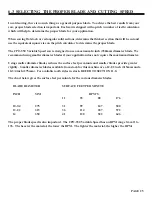
The Variable Speed Motor Control has an RPM range of 11 to 176 RPM’s.
PAGE 15
Summary of Contents for CPO 350
Page 1: ...CPO 350 VARIABLE SPEED COLD SAW PRINTED SEPTEMBER 2014...
Page 7: ...PAGE 7 FIGURE 1...
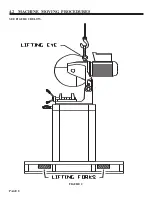
Page 8: ...4 2 MACHINE MOVING PROCEDURES SEE FIGURE 2 BELOW PAGE 8 FIGURE 2...
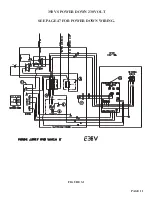
Page 11: ...PAGE 11 350 VS POWER DOWN 230 VOLT SEE PAGE 47 FOR POWER DOWN WIRING FIGURE 3 1...
Page 12: ...PAGE 12 350 VS MANUAL PK 230 VOLT FIGURE 3 2...
Page 13: ...PAGE 13 350 VS POWER DOWN 460 VOLT SEE PAGE 47 FOR POWER DOWN WIRING FIGURE 3 3...
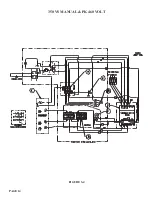
Page 14: ...PAGE 14 350 VS MANUAL PK 460 VOLT FIGURE 3 4...
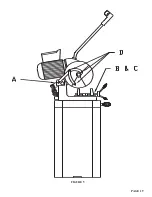
Page 17: ...PAGE 17 FIGURE 4...
Page 19: ...PAGE 19 FIGURE 5...
Page 27: ...PAGE 27 FIGURE 8 FIGURE 9...
Page 29: ...PAGE 29 FIGURE 10...
Page 33: ...PAGE 33 FIGURE 12...
Page 35: ...PAGE 35 FIGURE 13...
Page 37: ...PAGE 37 FIGURE 14...
Page 39: ...PAGE 39 FIGURE 15...
Page 41: ...PAGE 41 FIGURE 16...
Page 43: ...PAGE 43 FIGURE 17...
Page 45: ...7 2F POWER DOWN FEED WIRING DIAGRAM Ser s 6425 Up PAGE 45 FIGURE 19...
Page 46: ...7 2G PNEUMATIC SCHEMATIC POWER DOWN MACHINES PAGE 46 FIGURE 20...
Page 47: ...THIS PAGE LEFT BLANK INTENTIONALLY PAGE 47...
Page 49: ...PAGE 49 FIGURE 21...
Page 51: ...PAGE 51 FIGURE 22...
Page 55: ...PAGE 55 FIGURE 23...
Page 59: ...PAGE 59 FIGURE 25...
Page 61: ...PAGE 61 FIGURE 26...
Page 63: ...PAGE 63 FIGURE 27...
Page 65: ...PAGE 65 FIGURE 28...
Page 67: ...PAGE 67 FIGURE 29...
Page 69: ...PAGE 69 FIGURE 30...
Page 71: ...PAGE 71 FIGURE 31...
Page 73: ...PAGE 73 FIGURE 32...
Page 75: ...PAGE 75 FIGURE 33...
Page 77: ...PAGE 77 FIGURE 33...
Page 79: ...PAGE 79 FIGURE 34...
Page 81: ...PAGE 81 FIGURE 35...
Page 83: ...PAGE 83 FIGURE 36...
Page 85: ...PAGE 85 FIGURE 37...
Page 87: ...PAGE 87 FIGURE 38...
Page 89: ...PAGE 89 FIGURE 39...
Page 91: ...PAGE 91 FIGURE 40...
Page 93: ...PAGE 93 FIGURE 41...


