6.4 MATERIAL CLAMPING
All work pieces must be clamped securely in the vise. Any slippage of the material can result in broken
or damaged blades. The material should be clamped so that the contact surface between the material and
the blade is as small as possible. For this reason, when cutting flat stock material, we recommend
standing it up and cutting it through the thinnest section, whenever possible.
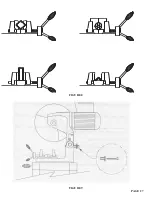
If the flat stock is too wide to clamp standing up, clamp it in the vise diagonally. We also recommend
cutting square tubing through the diagonal section and angle iron with the web up. For examples, SEE
FIGURE 8 ON THE FOLLOWING PAGE. This is not always possible when cutting materials at a
miter. Some thin walled round sections and profiles will require special jaws to hold them. When
trimming or cutting very short pieces that do not extend into both sides of the vise, place a piece of
material the same size in the unused side of the vise, to insure uniform clamping. When setting up the saw
to miter cut, pull the head down before making the first cut, to make sure that the blade clears the vise
jaws. The steel jaws have slotted mounting holes and can be adjusted for various miters. Always adjust
the steel jaws so that they clamp the material as close to the blade as possible, whether miter or straight
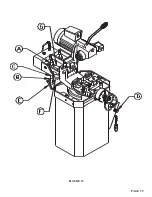
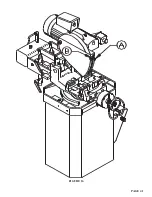
cutting. All models of the CPO-350 VS, except those fitted with the power down feed option, have a down
stroke or cutting depth adjustment. SEE FIGURE 9 ON THE FOLLOWING PAGE. This adjustment
is used to keep the saw blade from cutting into the vise spindle and must be adjusted when changing sizes
of materials or blades. If your saw is equipped with either the power vise or the power down feed options,
SEE SECTIONS 7.1 THRU 7.2, for additional information.
PAGE 26
Summary of Contents for CPO 350
Page 1: ...CPO 350 VARIABLE SPEED COLD SAW PRINTED SEPTEMBER 2014...
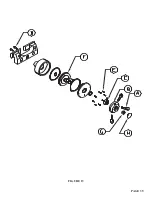
Page 7: ...PAGE 7 FIGURE 1...
Page 8: ...4 2 MACHINE MOVING PROCEDURES SEE FIGURE 2 BELOW PAGE 8 FIGURE 2...
Page 11: ...PAGE 11 350 VS POWER DOWN 230 VOLT SEE PAGE 47 FOR POWER DOWN WIRING FIGURE 3 1...
Page 12: ...PAGE 12 350 VS MANUAL PK 230 VOLT FIGURE 3 2...
Page 13: ...PAGE 13 350 VS POWER DOWN 460 VOLT SEE PAGE 47 FOR POWER DOWN WIRING FIGURE 3 3...
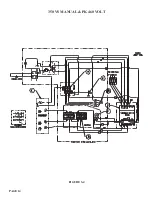
Page 14: ...PAGE 14 350 VS MANUAL PK 460 VOLT FIGURE 3 4...
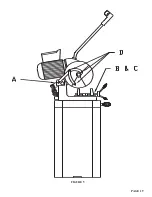
Page 17: ...PAGE 17 FIGURE 4...
Page 19: ...PAGE 19 FIGURE 5...
Page 27: ...PAGE 27 FIGURE 8 FIGURE 9...
Page 29: ...PAGE 29 FIGURE 10...
Page 33: ...PAGE 33 FIGURE 12...
Page 35: ...PAGE 35 FIGURE 13...
Page 37: ...PAGE 37 FIGURE 14...
Page 39: ...PAGE 39 FIGURE 15...
Page 41: ...PAGE 41 FIGURE 16...
Page 43: ...PAGE 43 FIGURE 17...
Page 45: ...7 2F POWER DOWN FEED WIRING DIAGRAM Ser s 6425 Up PAGE 45 FIGURE 19...
Page 46: ...7 2G PNEUMATIC SCHEMATIC POWER DOWN MACHINES PAGE 46 FIGURE 20...
Page 47: ...THIS PAGE LEFT BLANK INTENTIONALLY PAGE 47...
Page 49: ...PAGE 49 FIGURE 21...
Page 51: ...PAGE 51 FIGURE 22...
Page 55: ...PAGE 55 FIGURE 23...
Page 59: ...PAGE 59 FIGURE 25...
Page 61: ...PAGE 61 FIGURE 26...
Page 63: ...PAGE 63 FIGURE 27...
Page 65: ...PAGE 65 FIGURE 28...
Page 67: ...PAGE 67 FIGURE 29...
Page 69: ...PAGE 69 FIGURE 30...
Page 71: ...PAGE 71 FIGURE 31...
Page 73: ...PAGE 73 FIGURE 32...
Page 75: ...PAGE 75 FIGURE 33...
Page 77: ...PAGE 77 FIGURE 33...
Page 79: ...PAGE 79 FIGURE 34...
Page 81: ...PAGE 81 FIGURE 35...
Page 83: ...PAGE 83 FIGURE 36...
Page 85: ...PAGE 85 FIGURE 37...
Page 87: ...PAGE 87 FIGURE 38...
Page 89: ...PAGE 89 FIGURE 39...
Page 91: ...PAGE 91 FIGURE 40...
Page 93: ...PAGE 93 FIGURE 41...


