PAGE 31
►
PLEASE NOTE: THERE IS AN EMERGENCY STOP PALM BUTTON ON BOTH ENDS OF
THIS MACHINE.
►
NOTE: THIS SET-UP IS FOR THE STANDARD AND OVERSIZE DIE HOLDERS. IF YOU
ARE USING THE OFFSET DIE HOLDER, REFER TO SECTION 7.10A FOR INSTRUCTIONS.
1.
With the machine’s PUNCH/TOOL selector switch in the PUNCH position and the ram retracted,
turn off the power.
2.
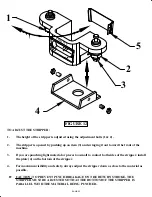
Push up on the bolt holding the stripper on the right hand side and pull the stripper forward and
to the side, out of the way of the punch ram and retaining nut.
3.
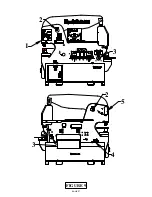
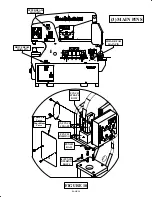
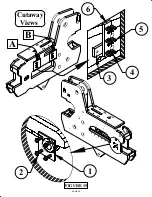
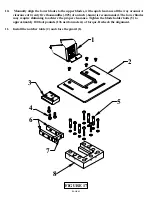
Remove the punch retaining nut (1) and set the punch retaining nut and punch aside
4.
Loosen the set screws (4) holding the die insert (3). Remove the die insert (3) and loosen the set
screw (5) and bolt (6) holding the die and remove the die.
5.
Clean the die holder cavity of any foreign material.
6.
Place the disconnect switch in the ON position and the selector switches in the START position.
Power the machine by pressing the green START button.
7.
Check to make sure that there are no objects (such as tools) under or on any of the moving parts.
8.
Place the selector switch in the TOOL position and allow the cylinder to completely extend.
9.
Turn the machine's power off.
10.
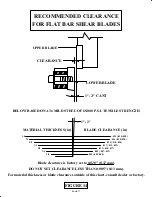
Select the proper punch and die. Make sure that there is proper clearance between the punch
and die. For recommended clearances, SEE PARAGRAPH I in this section.
11.
Clean both the punch and die of any foreign material.
12.
Insert the proper die in the die insert (3). (If the die has a flat spot on it, align this with the set
screw (5) or bolt (6) in the die insert.) Tighten bolt & the set screw firmly.
13.
Insert the punch into the punch retaining nut. Make sure that it seats properly. Place the punch
retaining nut assembly on the die insert (3) with the punch inserted in the die. Place the die insert
back in the die holder and tighten the two set screws (4).
►
NOTE: IF YOU ARE USING PUNCHES THAT REQUIRE A KEY, INSERT THE KEY IN THE
PUNCH AT THIS POINT.
14.
Raise the punch retaining nut and turn it on to the punch ram. (The die holder may have to be
moved slightly to align the punch retaining nut to the punch ram.) When using keyed punches,
after you start the nut on the ram, raise the punch and rotate it until the key seats in the punch
ram.
15.
Use the supplied wrench to tighten the punch retaining nut. Make sure that there is equal
clearance on all sides of the punch in the die.

