1275
210012
M10 Jam
219050
1163
073615
M6 x 20
073615
M6 x 20
073615
M6 x 20
073615
M6 x 20
FRONT
016328
1166
REMOVE TOOL WHEN NOT IN USE
AND/OR DAMAGE TO MACHINE
TO PREVENT SERIOUS BODILY INJURY
003145
221005
1/2
7/8
5/8
3/4
1173
220014
220014
221005
PAGE 64
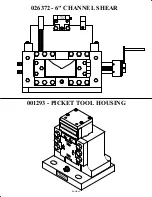
7.8 PICKET FENCE TOOL
The picket fence tool is designed to put picket fence points on square tubing from 1/2 to 1 inch (12 to 25
mm). This tool is mounted in the punch station and operated with the PUNCH/TOOL selector switch in
the PUNCH position.
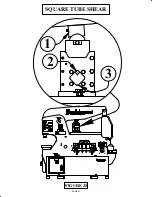
7.8A PICKET FENCE TOOL INSTALLATION
SEE FIGURE 27 ON THE NEXT PAGE.
1.
Remove the die holder, stripper and punch retaining nut.
2.
Install the punch pusher (2), using the #45 punch retaining nut (1).
3.
Install the tool so that the punch pusher (2) aligns with the ram on the picket tool.
4. Anchor the tool to the punch bed with the finger clamps (4) provided as shown.
7.8B PICKET FENCE TOOL OPERATION
►
CAUTION: THE DOWNSTROKE OF THE MACHINE MUST BE SET BEFORE OPERATING
THIS TOOL. FAILURE TO SET THE DOWNSTROKE OF THE MACHINE WILL RESULT
IN DAMAGE TO THE TOOL AND POSSIBLE INJURY TO PERSONNEL.
1.
Rotate the tube guide (3) on the front of the tool to the size of the tube you are using.
If you are using 1 inch tube, then remove it.
2.
Adjust the tube stop (5) just low enough to contact the upper edge of the tube when it's fed into
the tool.
3.
Adjust rest stop (6) so that it is approximately one half of the tube size below the lower die.
4.
Feed tube into tool until it reaches the tube stop (5) and cycle the machine.
5.
Make sure that the slugs eject from the tool as the next piece is fed into the tool.
6.
Lubricate dies every 10-15 cuts - grease picket ram daily.
7.
The maximum capacity is 1 inch 16 gauge tubing!!
►
CAUTION: ALWAYS REMOVE THIS TOOL WHEN IT IS NOT IN USE.
1275
210012
M10 Jam
219050
1163
073615
M6 x 20
073615
M6 x 20
073615
M6 x 20
073615
M6 x 20
FRONT
016328
1166
REMOVE TOOL WHEN NOT IN USE
AND/OR DAMAGE TO MACHINE
TO PREVENT SERIOUS BODILY INJURY
003145
221005
1/2
7/8
5/8
3/4
1173
220014
220014
221005


