PAGE 75
9. Clean both the punch and die of any foreign material.
10. Insert the proper die in the die insert (7). (If the die has a flat spot in it, align this with the bolt in the
die insert.) Tighten the bolt firmly with a wrench.
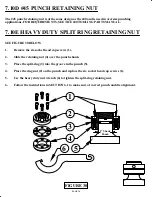
11. Insert the punch into the punch retaining nut. Make sure that it seats properly. Place the punch
retaining nut assembly on the die insert (7), with the punch inserted in the die.
►
NOTE: IF YOU ARE USING PUNCHES THAT REQUIRE A KEY, INSERT THE KEY IN THE
PUNCH AT THIS POINT.
12. Place the disconnect switch in the ON position and the selector switch in the START position.
Power the machine by pressing the green START button.
13. Check to make sure that there are no objects (such as tools) under or on any of the moving parts.
14.
Place the selector switch in the JOG position and carefully inch the cylinder ram to its set DOWN
position.
15. Turn the machine’s power OFF.
16. Lift the punch retaining nut and turn it onto the punch ram. (The die holder may have to be moved
slightly to align the punch retaining nut to the punch ram.) When using keyed punches, after you
start the nut on the ram, raise the punch and rotate it until the key seats in the punch ram.
17. Use a wrench to tighten the punch retaining nut. Make sure that there is equal clearance on all sides
of the punch in the die.
18. Re-tighten the bolts (6) in the die holder.
19. Check to be sure of proper alignment. Realign, if necessary.
20. Power the machine and raise the ram to the top of its stroke and turn the machine OFF.
21.
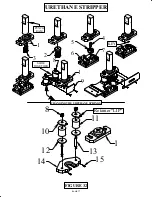
Slide the bottom half of the urethane stripper onto the stripper mounting plate (1) from the inside
of the machine. (See "SLIDE TOGETHER" in FIGURE 32)
22.
Make sure that the spring retainers (10) are positioned so that the lip on the retainer fits against
the machined area on the front of the mounting plate (1). Finger tighten the retaining nuts (8).
23.
Power the machine and jog the ram down until the urethane stripper contacts the top of the die.
Continue to jog the ram down, compressing the urethane springs until the retaining nuts
(8) can be tightened down to the shoulder of the stud.
24.
Install the stripper guard (9) on the front of the stripper.
►
CAUTION: REMEMBER THAT THE MAXIMUM CAPACITY OF THIS STRIPPER IS 1 INCH
MATERIAL. ALSO, REMEMBER THAT THE STRIPPER MOVES WITH THE PUNCH.

