background image

PAGE 88

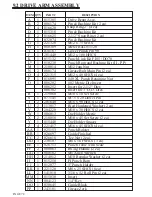
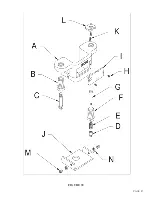
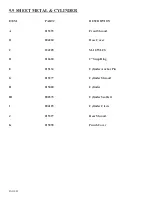
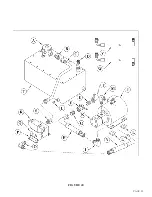
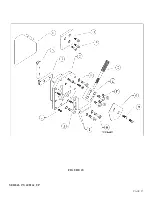
9.9 SHEET METAL & CYLINDER

ITEM

PART#

DESCRIPTION

A

015395

Front Shroud

B

004220

Hose Cover

C

224205

M-10 WLCS

D

016620

2" Snap Ring

E

015134

Cylinder Anchor Pin

G

015377

Cylinder Shroud

H

015000

Cylinder

H1

080375

Cylinder Seal Kit

I

004185

Cylinder Clevis

J

015397

Rear Shroud

K

015098

Punch Cover

Summary of Contents for FI-8510-20M

Page 1: ...unknown materials side load DO NOT REMOVE THIS SIGN FROM THIS MACHINE REV 0310 FOR MORE INFORMATION CONTACT SCOTCHMAN INDUSTRIES INC 1 800 843 8844 003100 proper instructions and without reading and...

Page 2: ...www scotchman com MODEL FI 8510 20M IRONWORKER SCOTCHMAN INDS 180 E US HWY 14 PO BOX 850 PHILIP SD 57567 Call 1 605 859 2542 SEPTEMBER 2021...

Page 3: ...nts 14 4 5 Machine Start Up 18 4 6 Machine Stroke Inspection and Adjustment 18 5 0 MAINTENANCE 20 23 5 1 Lubrication 20 5 2 Scheduled Maintenance 22 6 0 MACHINE OPERATION 24 42 6 1 Punch Operation 24...

Page 4: ...4 7 6 Picket Fence Tool 58 7 7 Square Tube Shear 60 7 8 Optional Die Holders and Punch Retaining Nuts 62 7 8A Offset Die Holder For Flange Punching 62 7 8B 2 1 2 x 3 Inch Die Inserts 62 7 8C 6 x 6 Die...

Page 5: ...Flat Bar Shear Assembly 76 9 4 6 Angle Shear Assembly 78 9 5 Rod Shear Assembly 80 9 6 Notcher Assembly 82 9 7 Upper Panel 84 9 8 Stripper Assembly 86 9 9 Sheet Metal Cylinder 88 9 10 Power Unit 90 9...

Page 6: ...The Hydraulic system operates at a maximum pressure of 2 700 PSI 185 BAR and is protected from overload by a relief valve The Scotchman FI 8510 20M is designed as a fully integrated tooled Ironworker...

Page 7: ...disconnect and lock out the power when performing maintenance work or setting up any tooling on the machine Follow the procedures outlined in the operator s manual for setting up changing or aligning...

Page 8: ...odified in any way or subjected to abuse and abnormal use inadequate maintenance and lubrication or subjected to use beyond the seller s recommended capacities and specifications In no event shall the...

Page 9: ...ING LABELS ITEM PART DESCRIPTION A 003110 PUNCH WARNING B 003100 MAIN WARNING LABEL C 003105 FINGERS BEYOND SHEAR D 003120 DANGER VOLTAGE E 003140 FINGERS BEYOND TOOL F 004349 NOTCHER NOTICE G 015380...

Page 10: ...PAGE 9 FIGURE 1...

Page 11: ...ter 79 4 Floor to Bar Shear 37 7 16 Floor to Notcher 37 3 8 Height 198 1 Length 66 1 4 168 3 Width 72 4 Floor to Top Of Shroud Floor to Bottom Of Base 3 7 6 INCHES CM DESCRIPTION ITEM Floor to Rod She...

Page 12: ...PAGE 11 FIGURE 2...

Page 13: ...IFTING DEVICE HAS ADEQUATE CAPACITY BEFORE ATTEMPTING TO MOVE THIS MACHINE THIS MODEL WEIGHS 4 500 LB 2 068 KG IT IS DESIGNED TO BE MOVED BY A FORKLIFT ONLY THERE ARE FORKLIFT SLOTS DESIGNED INTO THE...

Page 14: ...CK SPECIFICALLY THE FOLLOWING ITEMS A Stroke control handles and limit switches B Pump and motor assembly C Hydraulic hoses and fittings D Starter box and control box E Electrical connections F Contro...

Page 15: ...ll Load All machines are wired for three phase electrical power unless otherwise specified by customer The supply voltage should be or 10 of the motor voltage rating to insure satisfactory machine per...

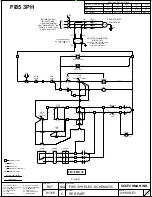
Page 16: ...RT 1SS SHEAR 1PL G 1M A2 GRN YEL X2 WHT 1FTS 4 2SS JOG PROBE RUN 5 6 OXO 4 WHT 10 10 XOO OOX 1 XOO 2 3PB 4 JOG 3 3 4 7 9 11 7 8 OOX SWITCH PROBE BLK TERMINAL BLOCK GRN YEL SOCKET PROBE GRN YEL RED 1 2...

Page 17: ...1FTS 4 2SS JOG PROBE RUN 5 6 OXO 4 WHT 10 10 XOO OOX 1 XOO 2 3PB 4 JOG 3 3 4 7 9 11 7 8 OOX SWITCH PROBE BLK TERMINAL BLOCK GRN YEL SOCKET PROBE GRN YEL RED 1 2 BLK 3 XO TERMINAL STRIP WIRE WIRE COLOR...

Page 18: ...OR OVERLOAD T3 6 T2 4 T1 2 A H RESET TEST A2 NC 22 14 NO NO NC 97 96 98 95 _OL_ ZB32 32 2 6 A 4 8 OVERLOAD L1 L2 A1 T1 T2 T3 A2 L3 13 NO 14 NO 1M CONTACTOR T3 6 T2 4 T1 2 A H RESET TEST A2 NC 22 14 NO...

Page 19: ...6 H5 H4 H3 H1 H2 250 KVA H7 H7 H2 H3 H4 H5 H6 FUSE FUSE PRIMARY SIDE WHITE GREEN SECONDARY SIDE RED RED 240 380 400 415 440 460 480 575 600 H1 H2 H1 H3 XF X2 120 130 110 115 120 85 91 100 110 FUSE FUS...

Page 20: ...01210 203217 203217 203217 243101 026350 Assy 203212 1309 1302 243101 243101 026350 SQUARE TUBE SHEAR 26500 026500 HEAVY DUTY RETAINING NUT punch not included VISIT WWW SCOTCHMAN COM FOR MORE INFORMAT...

Page 21: ...on of rotation Any time that the power to the machine has been turned off the selector switch 2 must be placed in the START position to restart the machine The stroke setting is important for the prop...

Page 22: ...ment and tightness Punch half holes punch or shear unknown materials side load DO NOT REMOVE THIS SIGN FROM THIS MACHINE REV 0310 FOR MORE INFORMATION CONTACT SCOTCHMAN INDUSTRIES INC 1 800 843 8844 0...

Page 23: ...more easily and increase tool life considerably We recommend cutting oil or motor oil swabbed on with a brush or applied with a squirt can or a spray applicator 5 1 LUBRICATION Grease the main pins D...

Page 24: ...PAGE 21 FIGURE 6...

Page 25: ...ounting bolts O in the punch ram bushing Make sure that they are tight Also check the bolt N through the punch ram straps to make sure that it s not so tight that the straps are binding on the arm or...

Page 26: ...PAGE 23 FIGURE 7...

Page 27: ...PAGE 24 6 0 MACHINE OPERATION 6 1 PUNCH OPERATION THE FIRST AND MOST IMPORTANT PROCEDURE IS THE PROPER METHOD OF CHANGING AND ALIGNING PUNCHES AND DIES ALWAYS WEAR SAFETY GLASSES FIGURE 8...

Page 28: ...st be lifted up to remove it 6 Place the disconnect in the ON position and the selector switch in the START position Power the machine by pressing the green START button CAUTION IF YOU ARE USING THE O...

Page 29: ...osition 24 Oil the punch and die every five to ten holes B KEYED PUNCHES This machine is equipped with a 1 4 inch 6 3mm keyed punch ram When punching holes other than rounds we recommend using keyed p...

Page 30: ...or maximum visibility and safety always adjust the stripper down as close to the material as possible 5 If the stripper is not adjusted down or the down stroke of the machine is not adjusted the punch...

Page 31: ...f the material being punched Any edge distance of less than this amount will result in a deformed workpiece I STAY WITHIN RATED PUNCHING CAPACITIES The FI 8510 20M Ironworker is designed to operate in...

Page 32: ...1 3 9 1 5 1 0 1 6 1 1 1 8 1 2 1 9 1 3 2 1 2 2 2 4 4 4 5 6 7 8 9 1 0 1 1 1 1 1 2 1 3 1 4 4 5 6 7 8 9 1 1 1 2 1 3 1 4 1 5 1 6 7 9 1 1 1 2 1 4 1 6 1 8 2 1 2 3 2 5 2 6 2 8 9 1 2 1 4 1 6 1 9 2 1 2 4 2 6 2...

Page 33: ...blades fitted to the machine comprise of an upper shaped moving blade and a bottom rectangular fixed blade The combination of these two blades offers absolute minimum distortion through all thickness...

Page 34: ...hine 5 DEPRESS THE FOOT PEDAL Lubricating oil should be applied to the blades every 10 to 15 cuts IN ADDITION TO THE FIVE BASIC STEPS OF OPERATION THE OPERATOR SHOULD ALSO BE FAMILIAR WITH THE FOLLOWI...

Page 35: ...ss beyond the hold down when shearing This may cause serious damage to the machine Always feed material from the hold down side Keep the blade area clean Do not allow buildup of mill scale Stay within...

Page 36: ...sure that the lower blade is adjusted with a slight cant or tilt of a few thousandths of an inch so that the cutting edge of the blade is closer to the top blade Lock the upper blade in position by ti...

Page 37: ...he pressure plate I at the pivot point This is adjusted by loosening the locking nuts S on the adjustment screws R Tighten the screws in a diagonal order Adjust the screws up snug DO NOT OVER TIGHTEN...

Page 38: ...PAGE 35 FIGURE 15...

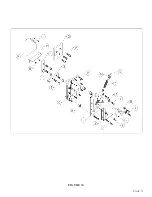
Page 39: ...PAGE 1 With the machine in the SHEAR position TURN THE POWER OFF 2 Remove the angle shear blade block C 3 Back the adjusting screws Q out until they retract into the holder 4 Remove the bolts K from t...

Page 40: ...PAGE 37 FIGURE 16...

Page 41: ...e blade 3 After removing the holder back the set screw adjustment bolts G off until they retract into the holder 4 It may be necessary to power the machine and jog the tooling beam to a position where...

Page 42: ...PAGE 39 FIGURE 17...

Page 43: ...ON THE FOLLOWING PAGE 1 Place the machine in the PUNCH position and allow the machine to retract to the end of the stroke TURN THE POWER TO THE MACHINE OFF 2 Raise the notcher guard M to its highest p...

Page 44: ...PAGE 41 11 Install the notcher table H and adjust the guard down to the proper height FIGURE 18...

Page 45: ...sses are required when using any of these tools 7 1 PIPE NOTCHER The pipe notcher is a component tool designed to saddle cut pipe and tubing for applications such as railings There are notchers availa...

Page 46: ...OTCHER MOUNTED IN THE MACHINE THE DOWN STROKE OF THE MACHINE MUST BE ADJUSTED TO PREVENT DAMAGE TO THE TOOL AND POSSIBLE INJURY TO THE OPERATOR THE UPPER DIE SHOULD NOT PASS THE LOWER DIE BY MORE THAN...

Page 47: ...g the die section in place Apply some high pressure lube all around the inside of the housing Then reassemble the unit reversing the above procedures CAUTION ALWAYS WEAR SAFETY GLASSES WHEN USING THIS...

Page 48: ...PAGE 45 FIGURE 20...

Page 49: ...that the pusher assembly is held in place by the spring tension of the tool The lower stroke must be set so that the upper blade just passes the lower blades at the point of the vee by no more than 1...

Page 50: ...PAGE 47 FIGURE 21...

Page 51: ...N IN FIGURE 22 THE TWENTY FOUR INCH BRAKE MOUNTS 180 DEGREES FROM THE INSTALLATION SHOWN IN FIGURE 22 3 After the tool is secured to the machine make sure that the punch ram is aligned directly over t...

Page 52: ...PAGE 49 FIGURE 22...

Page 53: ...ubrication complexity of the part being bent or bent guide pins Keep the guides well lubricated and replace them if they are damaged It is common practice to have the bottom die opening 8 times the th...

Page 54: ...16 0 12 3 45 2 35 0 28 0 24 0 17 0 14 6 11 1 47 9 39 0 33 1 24 0 19 0 15 6 12 7 69 5 58 0 42 2 32 4 26 0 23 0 16 5 92 0 69 0 52 2 42 2 36 0 27 0 21 0 104 80 0 63 0 52 5 39 4 31 2 112 90 0 76 0 56 2 4...

Page 55: ...ust be in the PUNCH position to operate this tool The die holder punch retaining nut and the stripper must be removed to install this tool Mount the tool so that it lines up directly under the punch r...

Page 56: ...PAGE 53 FIGURE 24...

Page 57: ...onary vertical blades These longer screws must be used when shearing smaller channel 5 Because of clearances it is necessary to mount the finger clamps C to the punch bed and start the bolts before in...

Page 58: ...PAGE 55 FIGURE 25...

Page 59: ...de contacts both legs which will center it in the tool 4 Adjust the movable vertical blades up to the flange of the channel Loosen the fixed vertical blade clamps four places and slide the fixed blade...

Page 60: ...020 5mm For efficient shearing blades must be kept sharp E A FEW SPECIAL PRECAUTIONS 1 The stationary blade adjustment on the tool must be made so that the point of the upper blade makes contact with...

Page 61: ...FAILURE TO SET THE DOWNSTROKE OF THE MACHINE WILL RESULT IN DAMAGE TO THE TOOL AND POSSIBLE INJURY TO PERSONNEL 1 Set the down stroke of the machine so that the upper die clears the lower die by twice...

Page 62: ...PAGE 59 FIGURE 26...

Page 63: ...t the up stroke of the machine so that the size of tube you want to shear will feed through the tool Make sure that the up stroke is set so that there is spring tension on the pressure block at all ti...

Page 64: ...PAGE 61 FIGURE 27...

Page 65: ...ffset die holder is forty 40 tons CAUTION THE OFFSET DIE HOLDER MUST BE REMOVED WHEN IT IS NOT IN USE 7 8B 2 1 2 AND 3 INCH 63 AND 76 MM DIE INSERTS Always follow the preferred method of aligning punc...

Page 66: ...SECTION 6 1 for proper punch and die alignment This retaining nut requires a pin wrench F which should be ordered when ordering the nut To use the heavy duty split ring retaining nut remove the six s...

Page 67: ...de of the machine It is an adjustable fifty four inch length gauge capable of reaching all work stations on this machine from one location For parts identification REFER TO FIGURE 29 ON THE FOLLOWING...

Page 68: ...PAGE 65 FIGURE 29...

Page 69: ...hase correspond to the machine voltage and phase 5 Check the line wiring connections at the starter For the wiring diagram SEE FIGURE 4 ON PAGE 15 6 Check the line voltage at the starter If the correc...

Page 70: ...5 10 and ground With the pedal up the voltage should read 110 to 120 volts between 5 and ground There should be no voltage reading between 10 and ground With the pedal depressed the voltage should re...

Page 71: ...ly The limit switch can be tested with an Ohm meter The limit switch wires must be disconnected from the terminal block The switch should read continuity with the plunger out and open with the plunger...

Page 72: ...R PUMP There is a pressure port for a pressure gauge provided on all machines The port will be on the manifold or the pressure line between the pump and the valve A gauge with a minimum capacity of 3...

Page 73: ...er the head has been removed anchor the cylinder to a floor anchor or something similar and hook a come along to the cylinder clevis and pull the head and ram out of the tube 6 Remove the locking nut...

Page 74: ...PAGE 71 FIGURE 30...

Page 75: ...Wear Plate E F 015173 Pin Bushing G 015382 Connecting Link Assembly H 004109 Frame Rub Plate I 004231 Pressure Plate J 006015 Tooling Arm Rub Block K 004015 Rub Plate Counter L 233435 M 12 x 90 FSHCS...

Page 76: ...PAGE 73 FIGURE 31...

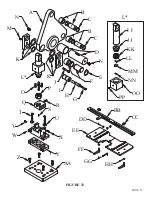
Page 77: ...219060 M10 x 50 Set Screw R 1 077145 M7 5 x 20 Dowel Pin S T 2 201640 M16 x 90 HHCS 2 ea U 2 113017 Ried Hardened Washer 2 ea 2 204220 M10 x 30 HHCS 2 ea V W X Y Z 1 006013 Die Holder Mertic 2 218058...

Page 78: ...2 201640 M16x90 201640 M16x90 016095 221315 M12x40 221315 M12x40 221315 M12x40 221315 M12x40 219060 210014 M12 Jam 080174 Grease Bolt 201610 243101 230107 230107 230107 077145 204220 M10x30 A B B C D...

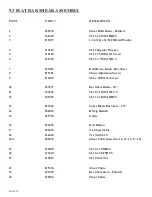
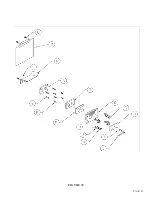
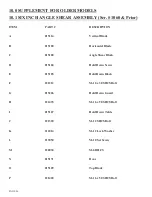
Page 79: ...381 Shear Adjustment Screw 9 218022 M 6 x 6MM Set Screw 10 025257 Bar Shear Blade 20 11 224205 M 10 x 16MM WLCS 12 205425 M 12 x 65MM HHCS 13 025260 Sabre Blade Bar Shear 20 14 080063 RS Jig Handle 15...

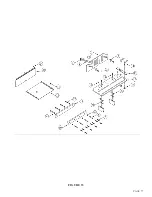
Page 80: ...PAGE 77 FIGURE 33...

Page 81: ...G 025083 Knob H 025183 Hold Down Stand off I 221315 M 12 x 40 SHCS J 025070 Angle Shear Guide Bracket K 060250 M 10 x 20 SHCS L 221317 M 12 x 45 SHCS M 015274 Pillar N 015171 Angle Shear Door O 015109...

Page 82: ...PAGE 79 FIGURE 34...

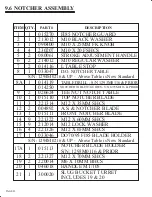
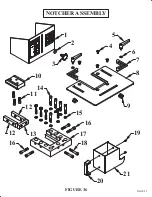
Page 83: ...004295 Fixed Blade Holder D 004758 Hold Down E 221212 M 10 x 30 SHCS Bolt F 221220 M 10 x 40 SHCS Bolt G 219050 M 10 x 25 Set Screw H 221220 M 10 x 40 SHCS Bolt J 080063 Handle K 015278 Spacer L 22003...

Page 84: ...PAGE 81 FIGURE 35...

Page 85: ...HCS 9 212014 M12 LOCK WASHER 4 221326 M12 X 65MM SHCS 1 033046 DO70 95 FI85 BLADE HOLDER 2 221327 M12 X 70MM SHCS 2 220014 M6 X 10MM BHCS 1 046018 HANDLE MT 105 SLUG BUCKET TURRET 1 300020 ITEM QTY PA...

Page 86: ...2x35 221314 M12x35 221322 M12x60 221322 M12x60 221322 M12x60 221322 M12x60 221322 M12x60 221322 M12x60 221322 M12x60 221322 M12x60 221322 M12x60 221327 M12x70 221327 M12x70 221326 M12x65 221326 M12x65...

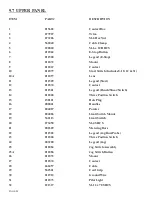
Page 87: ...874 Contact 13 011501 Legend Punch Shear Switch 14 011868 Three Position Switch 15 158101 Hole Plug 16 080061 Handles 17 004087 Pointer 18 004086 Limit Switch Mount 19 562113 Limit Switch 20 073450 M...

Page 88: ...PAGE 85 FIGURE 37...

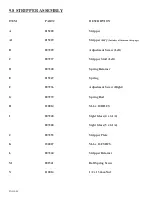
Page 89: ...t Screw Left C 007237 Stripper Stud Left D 007240 Spring Retainer E 015247 Spring F 007236 Adjustment Screw Right G 007239 Spring Rod H 220014 M 6 x 10 BHCS I 007248 Sight Glass 4 x 2 1 4 007268 Sight...

Page 90: ...PAGE 87 FIGURE 38...

Page 91: ...ON A 015395 Front Shroud B 004220 Hose Cover C 224205 M 10 WLCS D 016620 2 Snap Ring E 015134 Cylinder Anchor Pin G 015377 Cylinder Shroud H 015000 Cylinder H1 080375 Cylinder Seal Kit I 004185 Cylind...

Page 92: ...PAGE 89 FIGURE 39...

Page 93: ...ther Cap Fitting Ball Valve Fitting Suction Hose Fitting Motor Must Specify Pump Motor Pads Fitting Pressure Hose Fitting Manifold Mounts 006870 006872 006865 552180 552181 552135 Manifold w Valve Man...

Page 94: ...PAGE 91 FIGURE 40...

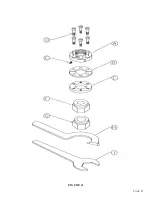
Page 95: ...26501 Ring Nut B 026502 Split Ring 2 Required C 026503 Retaining Ring D 221212 M 10 SHCS Bolt E 026504 M 8 Brass Set Screw F 016095 40 Jam Nut G 016096 45 Jam Nut H 018507 Wrench For A I 019099 Wrench...

Page 96: ...PAGE 93 FIGURE 41...

Page 97: ...Emergency Stop Button D2 004414 Emergency Stop Box D3 004216 Emergency Stop Switch E N A 011975 Contactor DIL Less Coil DILM W Coil G 011846 N A Coil I 562453 Foot Switch 011753 Cord Foot Switch 5624...

Page 98: ...RT 1SS SHEAR 1PL G 1M A2 GRN YEL X2 WHT 1FTS 4 2SS JOG PROBE RUN 5 6 OXO 4 WHT 10 10 XOO OOX 1 XOO 2 3PB 4 JOG 3 3 4 7 9 11 7 8 OOX SWITCH PROBE BLK TERMINAL BLOCK GRN YEL SOCKET PROBE GRN YEL RED 1 2...

Page 99: ...ontal Blade C 015100 Angle Shear Block D 015104 Hold Down Screw E 015105 Hold Down Block F 221212 M 10 x 30 SHCS Bolt G 015206 Hold Down Guard H 221435 M 16 x 90 SHCS Bolt I 015107 Hold Down Table J 2...

Page 100: ...PAGE 97 FIGURE 43 SERIAL S 4481 UP...

Reviews: