background image

off; 

9.  If  metal  objects  or  liquid  fall  into  rework  station  during  working,  you 

should power off immediately, unplug power plug, until it cooled, then 

eradicate  litter  and  dirt;  it  will  be  influenced  if  grease  on  the  heating 

panels  and  accompanied  by  odor  when  rebooting.  Please  keep  the 

machine clean and timely maintenance; 

10. When  appears  abnormal  warming  or  smoke  on  the  machine, 

immediately disconnect power  and  notify  technical  service  personnel 

to repair it; Remove the connections data line between computer and 

devices,  hold  the  plug  to  unplug  the  data  line,  to  avoid  damaging 

internal connection. 


Normal BGA welding and de-soldering parameters 

(for reference)   

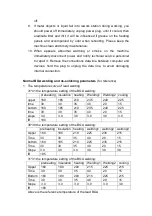
1.  The temperature curve of lead welding


41*41 the temperature setting of the BGA welding: 


preheating  insulation  heating  Welding1  Welding2  cooling 

upper 

160 

185 

210 

235 

240 

225 

time 

30 

30 

35 

40 

20 

15 

bottom 

160 

185 

210 

235 

240 

225 

time 

30 

30 

35 

40 

20 

15 

slope 

3.0 

3.0 

3.0 

3.0 

3.0 

3.0 

IR 

180 


38*38 the temperature setting of the BGA welding: 


preheating  insulation  heating  welding1  welding2  welding3 

Upper 

160 

185 

210 

225 

235 

215 

Time 

30 

30 

35 

40 

20 

15 

bottom    160 

185 

210 

225 

235 

215 

Time 

30 

30 

35 

40 

20 

15 

Slope 

3.0 

3.0 

3.0 

3.0 

3.0 

3.0 

IR 

185 


31*31 the temperature setting of the BGA welding: 


preheating  insulation  heating  Welding1  Welding2  cooling 

Upper 

160 

180 

200 

215 

225 

215 

Time 

30 

30 

35 

40 

20 

15 

Bottom  160 

180 

200 

215 

225 

215 

Time 

30 

30 

35 

40 

20 

15 

Slope 

3.0 

3.0 

3.0 

3.0 

3.0 

3.0 

IR 

180 


Above is the reference temperature of the lead BGA 

Summary of Contents for ACHI-HR15000

Page 1: ...ACHI HR15000 Rework Station NO ACHI HR 15000 Instruction Manual Shenzhen Scotle Technology Co Ltd...

Page 2: ...echnology Co Ltd Office Address 038 068 2F Handmade Culture Street Phase III Shuiku Road Bantian Longgang Shenzhen China Tel 86 755 83692414 Email easybga gmail com Factory Address 801 A The Zhongheng...

Page 3: ...ers 5 4 Introduction of the main structure 6 5 Program settings and operation 8 6 Operation Basic Introduction 13 7 The use of external thermocouple wires 15 8 Reballing process 18 9 Repair and Mainte...

Page 4: ...with a flexible fixture for PCB positioning to protect the PCB 3 Use a powerful cross flow fan to cool PCB rapidly to prevent it from deformation and ensure the welding effect 4 When the temperature g...

Page 5: ...rs Top hot air heater 1200W Bottom hot air heater 1200W Bottom IR heater 2700W 4 Electrical materials Intelligent programmable temperature control system have connected computer device 5 Temperature c...

Page 6: ...4 Introduction of the main structure...

Page 7: ...kwise rotation 8 PCB board micro adjust X axis BGA and PCB board when the X axis direction of the bit of fine adjustment PCB to the left rotating clockwise counter clockwise 9 Emergency stop button Ab...

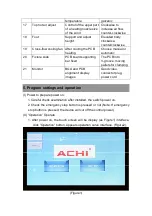
Page 8: ...The PCB into V groove moving pallets for clamping 21 Monitor BGA and PCB alignment display images Good video connector plug power cord 5 Program settings and operation I Power to prepare power on 1 C...

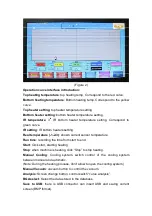
Page 9: ...etting Real temperature 1 2 3 shown current sensor temperature Run time recording the time from start to end Start Click start starting heating Stop when machine is heating click Stop to stop heating...

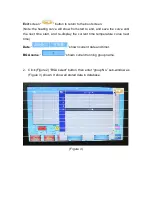
Page 10: ...ave the curve until the next time start and re display the current time temperature curve next time Date shown current date and timer BGA name shown current running group name 2 Click Figure 2 BGA sel...

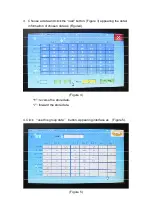
Page 11: ...click the load button Figure 3 appearing the detail information of chosen data as Figure4 Figure 4 reverse the store data forward the store data 4 Click use this group data button Appearing interface...

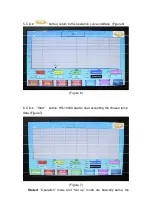
Page 12: ...on return to the operation curve interface Figure6 Figure 6 6 Click Start button HR 15000 start to heat according the chosen temp data Figure7 Figure 7 Stated Operation mode and Set up mode are basica...

Page 13: ...perature setting of preheating section keep this temperature for 30 seconds the time setting of preheating section till now the preheating section is finished then the top heater will enter the next w...

Page 14: ...ng the sucker point to proper position take out BGA after cooling II Soldering process 1 work flow Power on Place PCB on PCB supporter adjust position by laser Front forward Joystick Fixed the splint...

Page 15: ...th BGA to rising up proper position 5 Drag out optical alignment to proper position BGA center 6 Adjust image operating joystick from left to right as zoom in and zoom out micro control X Y axis and R...

Page 16: ...e PCB board 2 Adjust the height of the probe with the probe galvanic head located in the top 1 2mm of the test site 3 Adjust the related mechanical adjustment knob so that the heating part just below...

Page 17: ...green curve and red curve the closer between the actual temperature and set temperature of the heating parts more standard of the upper heating process On the contrary the greater the gap between the...

Page 18: ...creen so you have to adjust the process of the lower part of the heaters by visual 9 Fixed the galvanic line with foil stickers on the bottom of PCB board as opposed to the upper heater set back on th...

Page 19: ...remove the BGA chip and coated with a thin layer of solder flux card the chip into the base again covered with lid make sure the right direction 5 Put into solder ball clench hands and gently swaying...

Page 20: ...then take off the heating wire to replace Noted It must be use high temperature insulation tape to wrap heating wire when replace it III Bottom 3rd heating area heater replacement 1 Remove the heating...

Page 21: ...the equipment an d even endanger the safety of the operator Therefore must strictly abide the following 2 The power supplier for this machine is 220V the total power is 4700W so before you use it you...

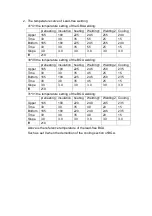
Page 22: ...ference 1 The temperature curve of lead welding 41 41 the temperature setting of the BGA welding preheating insulation heating Welding1 Welding2 cooling upper 160 185 210 235 240 225 time 30 30 35 40...

Page 23: ...sulation heating Welding1 Welding2 Cooling Upper 165 190 225 245 250 235 Time 30 30 35 45 25 15 Bottom 165 190 225 245 250 235 Time 30 30 35 45 25 15 Slope 3 0 3 0 3 0 3 0 3 0 3 0 IR 210 31 31 the tem...

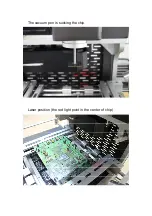
Page 24: ...The vacuum pen is sucking the chip Laser position the red light point in the center of chip...

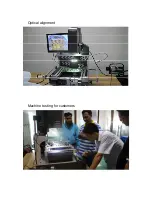
Page 25: ...Optical alignment Machine testing for customers...

Page 26: ......

Reviews:

Related manuals for ACHI-HR15000