Initial Start Up - 2000 Only
Pre Start
A soak-out period of four hours is optional for this
system. If desired, powering the compressor unit
for four hours prior to start up allows the crankcase
heater to warm up the oil in the compressor.
Start Up
1. Connect power to the condensing unit and move
its toggle switch to Run or On.
2. Open the water supply valve.
3. Connect power to the ice making section.
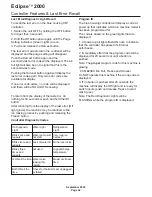
4. Observe the lights on the controller:
·
All flash on as the power supply is reconnected.
·
The two red lights blink for 20 seconds while
some green lights are on. See page 45.
Note: If the light pattern does NOT match – do not
start the machine. Install a replacement controller
set to the correct program.
·
The red lights and harvest lights go out.
·
The Off light turns on.
·
The Bin Full light will be on for a few seconds.
At this point the machine is ready for start up.
5. Push and Release the Freeze button to start the
machine.
·
The Freeze light will begin to blink.
·
The Purge valve will open for a few seconds
and then close.
·
The Inlet water valve will open and fill the
reservoir with water.
·
The Water pump will begin to circulate water
over the evaporators.
When the reservoir is full, the Freeze light will stop
blinking and the controller will close a circuit to the
compressor contactor to start the first freeze cycle.
Note: Because the condensing unit is external to
the ice making section, no visible signs of
operation will be noticeable until the water begins
to cool and frost forms on the evaporator tubing.
6. Go to the condensing unit and confirm that the
compressor and fan motor are operating. Warm air
will be discharged from the condenser.
Note: Three Phase Units (Scroll Compressor). If at
start up the compressor makes a louder than
expected noise and does not begin to cool the
evaporators or suction line, the compressor motor
is likely running backwards. See next page.
After a few minutes ice will begin to form on the
evaporators. When enough ice has formed to
nearly empty the water reservoir, the controller will
refill the reservoir. The next time the water level
drops that far, the ice is ready for release and the
Controller will initiate a Harvest cycle.
·
The Freeze light goes out and the Harvest light
switches on.
·
The vapor inlet valve in the ice maker opens.
·
In the CP unit, the condenser by-pass valve
opens and the liquid inlet valve closes
·
The water pump stops.
·
The purge valve opens.
Refrigerant vapor flows into the evaporators where
it condenses, discharging its latent heat.
The evaporators warm up and melt the bond
between the cube surface and the evaporator cells.
After about 20 seconds the water pump re-starts to
purge water out of the reservoir.
After a few more seconds the purge valve closes
and the inlet water valve opens for a few seconds
to add some water to the reservoir. The water
pump circulates this water over the evaporators,
and ice begins to fall.
Falling ice passes through two infrared light
beams. Interruptions of the beams signal to the
Controller that ice is harvesting. The interruptions
are shown by the blinking of the Bin Full light.
The first Harvest cycle continues for about 5
minutes. The controller will use the ice release time
measured during this time to compute the next
harvest cycle.
At the end of the Harvest cycle the ice machine will
switch back into a Freeze cycle.
The inlet water valve will open to re-fill the
reservoir with water, and the cycle repeats.
Note: Machines are shipped from the factory with
the purge level set to accommodate average water
conditions. To achieve optimal machine
performance, set the purge level to the minimum
setting. See page 30.
7. Attach the front panel to the ice making section.
Eclipse
ä
2000
September 2003
Page 29


