background image

Page 23

Page 23

E.

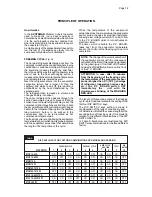
PUSH BUTTON OPERATION

DURING WATER FILLING PHASE
•  Push for more then 2” but less then 5” the
machine enters in Cleaning Mode
•  Push for more then 5” the machine by-pass
the Water Filling Phase

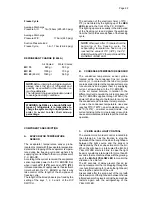
DURING FREEZING/HARVEST CYCLE
•  Push for more then 5” during the Freezing
cycle the machine goes immediately into Harvest
•  Push for more then 5” during the Harvest cycle
the machine enters immediately in the Freezing
cycle

The length of Harvest is equal to:
• 35” if Push Button is activated before -15

°

C

evaporating temperature LED activation

• As per Harvest cycle chart,  if Push Button
is activated after -15

°

C evaporating

temperature LED activation (Red LED inside
PC Board ON steady)

D.

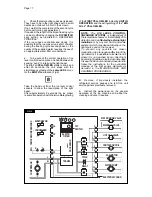
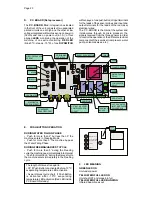
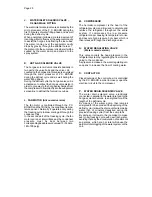
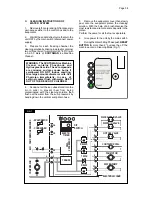
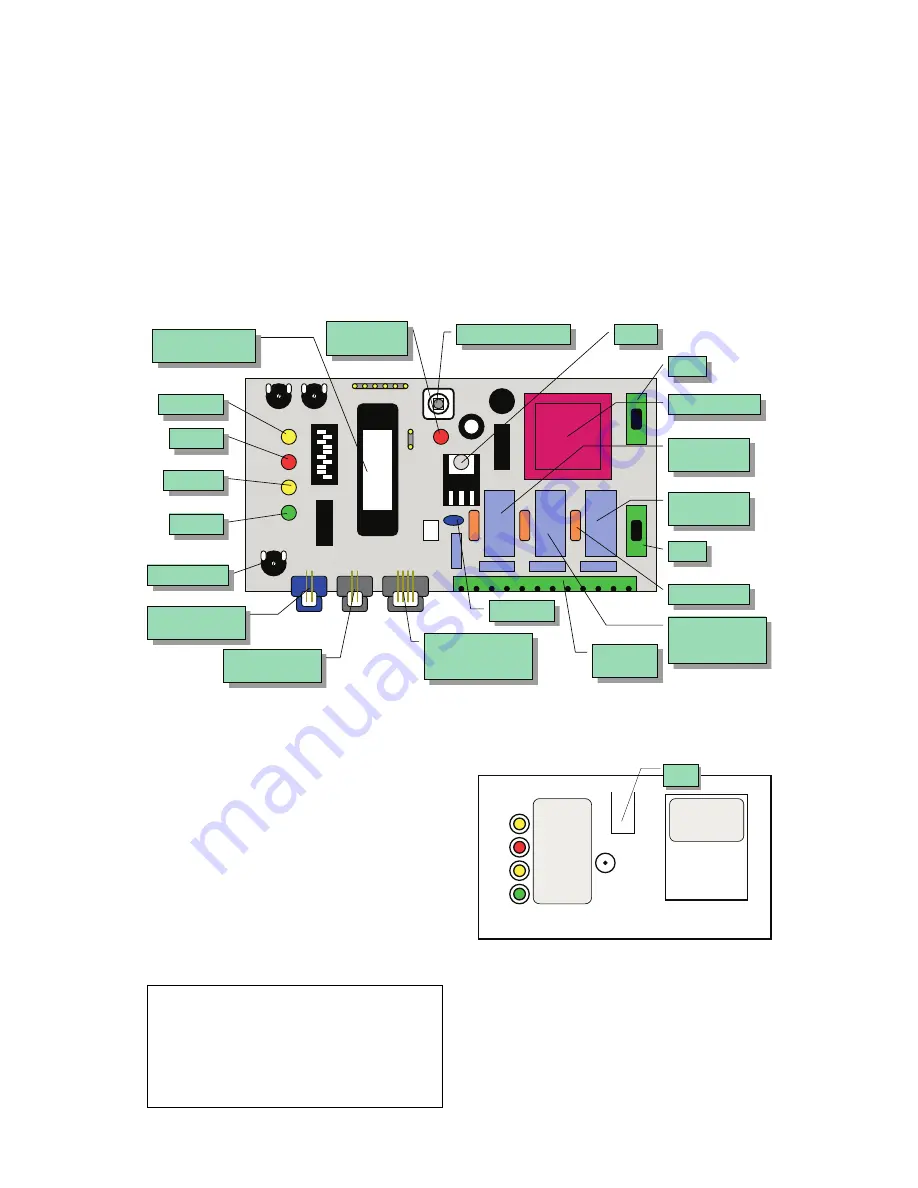
P.C. BOARD (Data processor)

The P.C. BOARD, fitted in its plastic box located
in the front of the unit, consists of two separated
printed circuits one at high and the other at low
voltage integrated with two fuses one on power in
(32mA) and one on power out (6.3 A), of four
aligned LEDS monitoring the operation of the
machine, of one extra monitoring  RED LED
(blink 0

°

C - steady - 15

°

C), of one DIP SWITCH

with ten keys, of one push button, of input terminals
for the leads of the sensor probes and input and
output terminals for the leads of the ice maker
electrical wires.
The P.C. BOARD is the brain of the system and
it elaborates, through its micro processor, the
signals received from the three sensors in order
to control the operation of the different electrical
components of the ice maker (compressor, water
pump, solenoid valves, etc.).

TERMINAL
BOARD

TERMINAL
BOARD

CONDENSER

CONDENSER
SENSOR SOCKET

OPTICAL ICE LEVEL
CONTROLSENSOR
SOCKET

OPTICAL ICE LEVEL
CONTROLSENSOR
SOCKET

EPROM

MICROPROCESSOR

EPROM

TRANSFORMER

TRANSFORMER

VARISTOR

VARISTOR

RELAY

COMPRESSOR
RELAY

WATER PUMP
RELAY

WATER PUMP
RELAY

VALVES RELAY

HOT GAS, WATER
INLET AND PURGE
VALVES RELAY

EVAPORATOR

SENSOR SOCKET

TRIAC

TRIAC

RESET PUSH BUTTON

POWER

POWER

BIN FULL

BIN FULL

ALARM

ALARM

FREEZING

FUSE

FUSE

FUSE

FUSE

0

°

C-BLINKING

-13

°

C-STEADY

I/R ADJUSTER

RESISTANCE

RESISTANCE

FREEZING CYCLE

BIN FULL

POWER

TOO HI EVAP TEMP

TOO HI COND TEMP

PUSH
BUTTON

PUSH
BUTTON

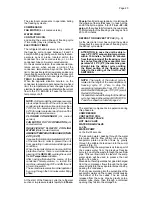
F.

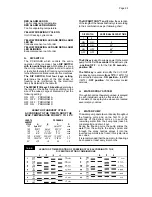
LED MEANING

GREEN LED ON
Unit under power

YELLOW BIN FULL LED ON
Unit shut-OFF at storage bin full
YELLOW BIN FULL LED BLINKING
Infrared beam break out

Summary of Contents for MC 15

Page 1: ...Page 1 Page 1 SERVICE MANUAL MC 15 MC 45 R 404 A VERSION Electronic modular cubers MS 1000 10 REV 06 2003 ...

Page 2: ...porator temperature sensor Remplacement of condenser temperature sensor Remplacement of ice level light control Remplacement of P C Board Remplacement of the water pump Remplacement of water inlet solenoid valve Removal of the flow control Remplacement of hot gas valve coil Remplacement of water drain solenoid valve Optional Remplacement of fan motor Remplacement of spray bar Remplacement of drier...

Page 3: ...RE DE L EAU TEMPÉRATURE AMBIANTE PRODUCTION DE GLACE EN 24 H 10 21 32 38 C ice making capacity MAX 40 C 100 F 35 C 90 F 5 bars 70 psi 10 NOTE The daily ice making capacity is directly related to the condenser air inlet temperature water temperature and age of the machine To keep your SCOTSMAN MODULAR CUBER at peak performance levels periodic maintenance checks must be carried out as indicated on p...

Page 4: ...ONS DIMENSIONS HEIGHT 499 mm WIDTH 1073 mm DEPTH 534 mm WEIGHT 117 Kgs ACCESSORIES KSC 11 Cube stacking kit 220 230 50 1 7 1250 25 7 3 x Starts Electric power cons amps Kwh x 24 HR Basic electr Amps Watts N of wires Amps fuse 230 50 1N 5 5 32 3 x 1 5 m m2 20 400 50 3N 5 x 1 5 m m2 10 Cubes per harvest MCL 15 72 large MCM 15 102 medium MCS 15 198 small At 15 C 60 F water temperature ...

Page 5: ...E PRODUCED PER 24 HRS WATER COOLED MODELS SPECIFICATIONS ELECTRONIC CUBER MODEL MC 45 Important operating requirements MIN Air temperature 10 C 50 F Water temperature 5 C 40 C Water pressure 1 bar 14 psi Electr voltage variations from voltage rating specified on nameplate 10 MAX 40 C 100 F 35 C 90 F 5 bars 70 psi 10 NOTE The daily ice making capacity is directly related to the condenser air inlet ...

Page 6: ...S DIMENSIONS HEIGHT 860 mm WIDTH 1073 mm DEPTH 554 mm WEIGHT 185 Kgs ACCESSORIES KSC 11 Cube stacking kit 220 230 50 1 7 2400 50 3 x Basic electr Amps Watts N of wires Amps fuse 230 50 1N 10 66 3 x 1 5 m m2 20 400 50 3N 5 5 14 5 x 1 5 m m2 10 Starts Electric power cons amps Kwh x 24 HR Cubes per harvest MCL 45 144 large MCM 45 204 medium MCS 45 396 small At 15 C 60 F water temperature ...

Page 7: ...es panels of the unit and inspect for any concealed damage Notify carrier of your claim for the concealed damage as stated in step 2 above GENERAL INFORMATION AND INSTALLATION 5 Loose two nuts on left and rights side of the unit base and remove it from the skid Save the two bolts and nuts to mount the machine on storage bin or on top of another Modular Cuber 6 Remove all internal support packing a...

Page 8: ... of the evaporator of the Modular Cuber and direct it down through the round hole into the Storage Bin 8 Fasten the ice level control assy on its bracket by means of the two screws found in the hardware package supplied with the unit 9 Make a cut shear in the PVC plastic plug that goes from its edge to the center insert the ice level control cable in the center of the plastic plug so to prevent it...

Page 9: ...he two ice chutes and finally re fit all the service panels previously removed 5 Put the Electronic Modular cuber on top of the Electromechanical unit securing them by meansoftheboltsandnutsfoundinthehardware package supplied with the machine 6 Removetheicechutefromboththeunitand insert through the ice discharge opening of the upper unit the plastic reinforced Ice Chute Connection 7 Disconnect the...

Page 10: ...the TRIMMER setting screw located on the front center of P C Board of the ice level control of the secondary unit clockwise to its maximum power Only on Syen type Electronic units installation 1 Unloose the four screws and remove the top panel 2 Remove the two plastic plugs from the upper edges of the two side frames of the bottom unit 3 Put the second Electronic Modular Cuber onto the bottom one ...

Page 11: ...nter months 2 Is there at least a 15 cm 6 clearance around the unit for proper air circulation 3 Is the unit level IMPORTANT 11 The interface P C Board is now ready to stop simultaneously the operation of the two units when the infrared beam of the ice level control is interrupted by the stored ice cubes ATTENTION After removal of the ice cubes both units resume their operation starting from the b...

Page 12: ...al and been instructed on the importance of periodic maintenance checks 11 Has the Manufacturer s registration card been filled in properly Check for correct model and serial number against the serial plate and mail the registration card to the factory 12 Has the owner been given the name and thephonenumberoftheauthorizedSCOTSMAN Service Agency serving him G INSTALLATION PRACTICE 1 Hand shut off v...

Page 13: ...into the drain line During the water filling phase the components energized are THE WATER INLET SOLENOID VALVE THE HOT GAS SOLENOID VALVE THE WATER DRAIN SOLENOID VALVE S for the first 15 20 seconds NOTE If in the 5 minutes length of the water filling phase the machine sump reservoir does not get filled with water up to the rim of the overflow pipe it is advisable to check 1 The water pressure of ...

Page 14: ...nser the condenser temperature rises and when it reaches 70 C 160 F for air cooled version or 60 C 140 F for water cooled version the condenser temperature sensor shuts off the ice maker with the consequent light up of the RED WARNING LED Fig 3 After having diagnosed the reason of the rise of temperature and removed its cause it is necessary to unplug wait few seconds and plug in again the unit th...

Page 15: ...takes over the control of the freezing cycle up to the complete formation of the ice cubes Fig 4 16 15 14 13 2 1 7 8 9 10 3 4 5 6 11 12 Rx Tx WATER IN VALVE HOT GAS VALVE CONTACTOR COIL FAN MOTOR WATER PUMP EVAPORATOR AMBIENT CONDENSER TEMPERATURE SENSORS BIN COMPRESSOR TRANSF DATA PROCESSOR ELECTR TIMER DIP SWITCH ELECTRONIC CARD L N RELAYS RELAY TRIAC WATER DRAIN VALVE FIG 4 16 15 14 13 2 1 7 8 ...

Page 16: ...he hot gas and the water inlet valves being simoultaneously activated Fig 5 The electrical components in operation are COMPRESSOR WATER PUMP WATER INLET SOLENOID VALVE HOT GAS VALVE WATER DRAIN SOLENOID VALVE S for the first 15 20 seconds NOTE The length of the defrost cycle is related to the length of the second phase of freezing cycle T2 Time to drop the evaporating temperature from 0 C 32 F sma...

Page 17: ...wing of the FIRST YELLOW LED indicating UNIT IN OPERATION and the extinguishing of the BIN FULL YELLOW LED NOTE The ICE LEVEL CONTROL INFRARED SYSTEM is independent of the temperature however the reliability of its detection can be affected by external light radiations or by any sort of dirt and scale sediment which may deposit directly on the light source and on the receiver To prevent any possib...

Page 18: ...sprayed water freezes into ice the rest of it cascades by gravity into the sump assembly below for recirculation FREEZING CYCLE Fig A The hot gas refrigerant discharged out from the compressorreachesthecondenserwhere being cooled down condenses into liquid Flowing into the liquid line it passes through the drier filter then it goes all the way through the capillary tube where due to the heat excha...

Page 19: ...Page 19 Page 19 ...

Page 20: ...ycle the refrigerant suction or lo pressure lowers rapidly to 2 5 bars 35psigthenitdeclinesgradually inrelationwith the growing of the ice thickness to reach at the end of the cycle approx 1 6 1 7 bar 22 24 psigwiththecubesfullyformedinthecupmolds The total length of the freezing cycle ranges f rom 20 to 25 minutes DEFROST OR HARVEST CYCLE Fig D As the electronic timer has carried the system throu...

Page 21: ...g cycle OPERATION ELECTRICAL SEQUENCE The following charts illustrate which switches and which components are ON or OFF during a partÌcular phase of the icemaking cycle BEGINNIING FREEZE Electrical components Loads ON OFF Compressor Fan Motor Air cooled only and TRIAC Hot Gas Valve Inlet Water Valve P C Board Relay 1 Coil P C Board Relay 2 3 Coil Water Pump Contactor Coil Electronic Timer Electron...

Page 22: ...e NOTE Whenever after 15 minutes from the beginning of the freezing cycle the evaporating temperature have not yet reached the value of 0 C 32 F the P C BOARD switches OFF the machine with the BLINKING of RED LED B CONDENSER TEMPERATURE SENSOR The condenser temperature sensor probe located within the condenser fins air cooled version or in contact with the tube coil water cooled version detects th...

Page 23: ...RED LED blink 0 C steady 15 C of one DIP SWITCH withtenkeys ofonepushbutton ofinputterminals for the leads of the sensor probes and input and output terminals for the leads of the ice maker electrical wires The P C BOARD is the brain of the system and it elaborates through its micro processor the signals received from the three sensors in order to control the operation of the different electrical ...

Page 24: ... 30 11 12 xxxx 120 9 10 30 3 30 4 30 12 13 30 3 105 10 30 12 4 30 6 13 30 15 3 4 90 12 6 15 4 The DIP SWITCH N 7 and 8 allow the extention ofthelengthoftheharvest defrostcycleaccording to their combination as per following chart DIP SWITCH ADDITIONAL DEFROST TIME 7 8 ON ON 0 OFF ON 30 ON OFF 60 OFF OFF 90 The 9th key is used to supply power to the water pump for the first 15 seconds of the defrost...

Page 25: ...zing cycle the fan motor can run at intermittance as the condenser pressure must be kept between two correspondingheadpressurevalues 13 14bars 180 195 psig M COMPRESSOR The hermetic compressor is the heart of the refrigerant system and it is used to circulate and retrieve the refrigerant throughout the entire system It compresses the low pressure refrigerant vapor causing its temperature to rise a...

Page 26: ...kthecorrisponding length of freezing cycle 2nd phase on Table B 3 Change the same DIP SWITCH KEYS settingsothatitwillcorrespondtothecombination on table B pre ceding the one remarked at step 2 This will allow an extension of the freezing cycle of two more minutes 4 Observe the ice cubes in the next two harvests and eventually repeat steps 2 and 3 above until proper ice cubes size is achieved See f...

Page 27: ...e 5 To instali the replacement ice level light control follow the above steps in reverse NOTE Slipintheicelevelcontrolcableinthe center of the plastic plug so to avoid any sort of contact with the unit frame E REPLACEMENT OF P C BOARD 1 Remove front and left side panel 2 Remove all sensor terminal plugs located on the rear side of P C Board by carefully releasing them out from their sockets clips ...

Page 28: ...center and lift it up off the jet bearing hub together with its race washer then draw it out through the ice opening 5 To install the replacement spray bar follow above steps in reverse L REPLACEMENT OF DRIER 1 Remove left side panel 2 Recover the refrigerant from the system and transfer it in a container so to reclaim or recycle it 3 Unsolder the refrigerant lines from the two ends of the drier 4...

Page 29: ...e the system to removemoistureandnoncondensablesafter condenser replacement P REPLACEMENT OF WATER COOLED CONDENSER 1 Remove front and left panel 2 Remove the condenser and the ambient temperature sensor probes from condenser 3 Remove bolts which secure the condenser to the unit base 4 Remove the corbin clamps and disconnect the plastic hoses from the water cooled condenser 5 Recover the refrigera...

Page 30: ...sor junction box 3 Recover the refrigerant from the system and transfer it in a container so to reclaim or recycle it 4 Unsolder and disconnect both the suction line and the discharge line from the compressor 5 Removethefourcompressormountingbolts and the compressor from the unit base NOTE Always install a replacement drier whenever the sealed refrigeration system is open Do not replace the drier ...

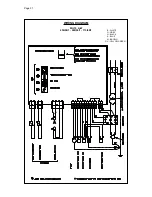
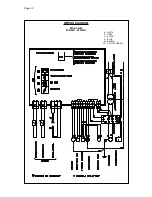
Page 31: ...Page 31 Page 31 WIRING DIAGRAM MC 15 A W 230 50 1 240 50 1 115 60 1 B WHITE G GREY N BLACK A BLUE M BROWN GV YELLOW GREEN ...

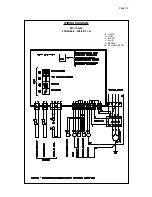
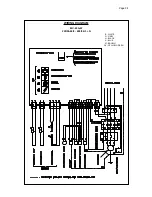
Page 32: ...Page 32 Page 32 WIRING DIAGRAM MC 15 A W 220 50 60 3 400 50 3 N B WHITE G GREY N BLACK A BLUE M BROWN GV YELLOW GREEN ...

Page 33: ...Page 33 Page 33 WIRING DIAGRAM MC 45 A W 230 50 1 240 50 1 B WHITE G GREY N BLACK A BLUE M BROWN GV YELLOW GREEN ...

Page 34: ...Page 34 Page 34 WIRING DIAGRAM MC 45 A W 220 50 60 3 400 50 3 N B WHITE G GREY N BLACK A BLUE M BROWN GV YELLOW GREEN ...

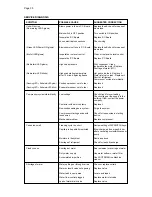
Page 35: ...t Freezing LED Red alarm LED blink Evaporator sensor out of order Replace it Compressor cycles intermittently Low voltage Check circuit for overloading Check voltage at the supply to the building If low contact the power company Contactor with burnt contacts Replace it Non condensable gas in system Purge the system Compressor starting device with Check for loose wires in starting loose wires devic...

Page 36: ...ump Hot gas solenoid valve leaking Replace valve Short of refrigerant Charge to data plate indication Discharge head pressure too high See incorrect discharge pressure Poor harvest Restriction in incoming water line Check water valve strainer and flow control If necessary enlarge the flow control orifice Water inlet valve not opening Valve coil with open winding Replace valve Hot gas valve orifice...

Page 37: ... individual useroperation Continuouscheckoftheclarity of ice cubes and visual inspection of the watersprayingpartsbeforeandaftercleaning will indicate frequency and procedure to be followed in local areas 5 With the ice machine and fan motor OFF on aircooledmodels cleancondenserusingvacuum cleaner whiskbroomornonmetallicbrushtaking care to do not damage both the condenser and ambient temperature s...

Page 38: ...UT OF THE REACH OF CHILDREN 4 Scoop out all the ice cubes stored into the bin in order to prevent them from being contaminated with the cleaning solution then flush out the water from the sump reservoir by bending down the vertical sump drain hose 5 Remove the evaporator cover then slowly pour onto the evaporator piaten the cleaning solution With the help of a brush dissolve the most resistant and...

Page 39: ...s then turn the main switch to OFF disconnect unit from POWER 14 Flush out the rinsing solution from the sump reservoirs 15 Place again the evaporator cover and the unit service panels 16 Give POWER to the unit 17 At completion of the freezing and harvest cycle make sure of proper texture and clearness of the ice cubes and that they do not have any acid taste ATTENTION in case the ice cubes are cl...

Reviews: