Page 8
Page 8
C.
LOCATION AND LEVELLING
WARNING. This Ice Cuber is designed for
indoor installation only. Extended periods
of operation at temperature exceeding
the following limitations will constitute
misuse under the terms of the SCOTSMAN
Manufacturer’s Limited Warranty resulting
in LOSS of warranty coverage.
1.
Position the Bin in the selected permanent
location.
Criteria for selection of location include:
a) Minimum room temperature 10
°
C (50
°
F)
and maximum room temperature 40
°
C (100
°
F).
b) Water inlet temperatures: minimum 5
°
C
(40
°
F) and maximum 35
°
C (90
°
F).
c) Well ventilated location for air cooled
models.
d) Service access: adequate space must be
left for all service connections through the rear of
the ice maker. A minimum clearance of 15 cm
(6") must be left at the sides of the unit for routing
cooling air drawn into and exhausted out of the
compartment to maintain proper condensing
operation of air cooled models.
2.
Level the Storage Bin Assy in both the left
to right and front to rear directions by means of
the adjustable legs.
3.
Inspect the Storage Bin top mounting gasket
which should be flat with no wrinkles, to provide
a good sealing when the Modular Cuber is
installed on top of it.
4.
Place the Modular Cuber on top of Storage
bin using care not to wrinkle or tear the gasket.
5.
Lift a little bit the Modular Cuber right side in
order to be able to mount the ice level control
bracket taking care to align the hole located on
unit base to mate with the one on the top of the
Bin.
6.
Remove the PVC plastic plug closing the
round hole located on the right side of the ice
chute opening.
7.
Trace the ice level control assy, secured for
the transport on top of the evaporator of the
Modular Cuber, and direct it down through the
round hole into the Storage Bin.
8.
Fasten the ice level control assy on its
bracket by means of the two screws found in the
hardware package supplied with the unit.
9.
Make a cut (shear) in the PVC plastic plug
that goes from its edge to the center; insert the
ice level control cable in the center of the plastic
plug so to prevent it from any sort of contact with
the unit frame, then place again the PVC plug in
the round hole keeping the cable exceeding
portion inside the unit.
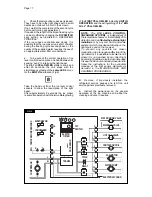
10. Install the plastic ice cube deflector by
hooking it on the flange of the ice chute opening
in unit base (see illustration).
11. Secure the Modular Cuber on the top of the
Storage Bin using the two bolts and diber washer
found in the hardware package supplied with the
unit.
D.
ISTACKING INSTALLATION
A Stacking Kit KSC 11 is available as an
accessory on request to allow the installation of
two Modular Cubers one on top of the other.
The Stacking Kit is consisting of:
a) a plastic reinforced Ice Chute Connection
b) an Interface P.C. Board
c) an Extension Cable
d) an adhesive Rubber Stripe
enabling to cover any stacking installation
combination as:
a) When stacking an Electronic Modular
Cuber on an Electromechanical type (Earlier
series).
b) When stacking two Electronic Modular
Cubers.
Mixed units installation
1.
Unloose the four screws and remove the
top panel.
2.
Remove the two plastic plugs from the
upper edges of the two side frames of the bottom
unit.
3.
Trace and remove from the top of the
evaporator of Electronic Cuber the metal bracket
used to secure the ice level control assy inside
the storage bin.
4.
Lift a little bit the Modular Cuber right side
in order to be able to mount the ice level control
bracket taking care to align the hole located on
unit base to mate with the one on the top of the
Bin.
Summary of Contents for MC 15
Page 19: ...Page 19 Page 19 ...


