background image

1

ASSEMBLY INSTRUCTIONS

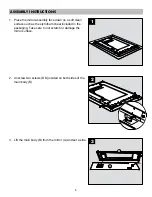
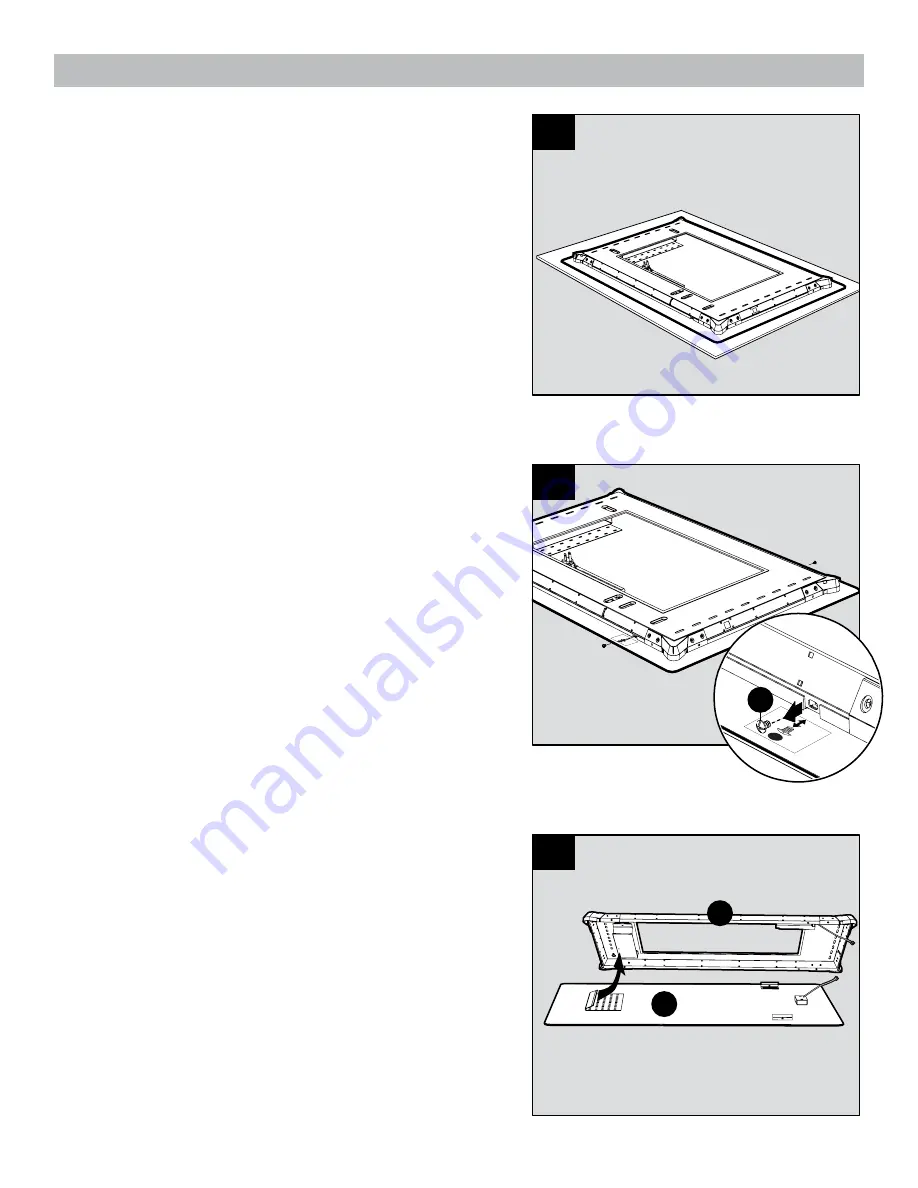
Place the mirror assembly face down on a soft clean 

surface such as the styrofoam sheet included in the 

packaging. Take care to not scratch or damage the 

mirror surface. 

1.

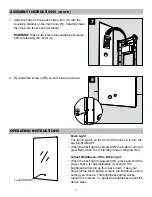
Unscrew two screws (DD) located on both sides of the 

main body (B). 

2.

6

DD

3

A

B

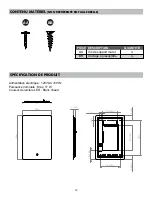
Lift the main body (B) from the mirror (A) and set a side.

3.

2

DD

DD

Summary of Contents for 1022MR-24-V01

Page 1: ...etailer call our customer service department at 1 855 571 1044 8 a m 8 p m EST Monday Friday www greentouchchinaltd com Fran ais p 10 Espa ol p 19 Date Purchased _______________________ Mirror MODEL 1...

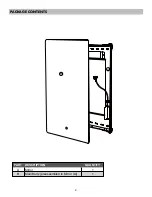
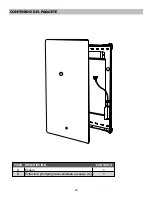
Page 2: ...PACKAGE CONTENTS 2 PART DESCRIPTION QUANTITY A Mirror 1 B Main Body preassembled to Mirror A 1 A B...

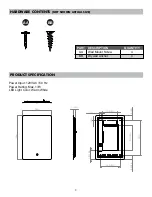
Page 3: ...SPECIFICATION 3 PART DESCRIPTION QUANTITY AA Wall Mount Screw 4 BB Drywall Anchor 4 AA BB Power Input 120VAC 60 Hz Power Rating Max 17W LED Light Color Warm White 20 7 8in 12 3 4in 29in 3 3 8in 3 3 8i...

Page 4: ...e like 9 Do not operate where aerosol spray products are being used or where oxygen is being administered Please read and understand this entire manual before attempting to assemble operate or install...

Page 5: ...be used if a three slot grounded receptacle is available WARNING Before beginning assembly of product make sure all parts are present Compare parts with package contents list and hardware contents lis...

Page 6: ...ft clean surface such as the styrofoam sheet included in the packaging Take care to not scratch or damage the mirror surface 1 Unscrew two screws DD located on both sides of the main body B 2 6 DD 3 A...

Page 7: ...ain body B as shown 4 Secure the main body B to the wall using screws AA or the hardware best suited for your wall type Refer to Mounting Options on page 5 Be careful to not drill into hidden electric...

Page 8: ...wered ON the button color will glow Blue when it is in standby mode it will glow Red Adjust Brightness of the Back Light When the back light is powered ON press and hold the power button for approxima...

Page 9: ...er The manufacturer is not accountable whatsoever for product installation during the warranty period There is no further expressed warranty The manufacturer shall not be legally responsible for incid...

Page 10: ...t appelez notre service la client le au 1 855 571 1044 entre 8 h et 20 h HNE du lundi au vendredi www greentouchchinaltd com English p 1 Espa ol p 19 Date d achat _______________________ Miroir MOD LE...

Page 11: ...CONTENU DE L EMBALLAGE 11 PI CE DESCRIPTION QUANTIT A Miroir 1 B Corps principal pr assembl au miroir A 1 A B...

Page 12: ...T 12 PI CE DESCRIPTION QUANTIT AA Vis de support mural 4 BB Ancrage placopl tre 4 AA BB Alimentation lectrique 120VAC 60 Hz Puissance nominale Max 17 W Couleur de lumi re LED Blanc chaud 20 7 8in 12 3...

Page 13: ...r sont bloqu es Garder les ouvertures d air libres de peluche de cheveux et autres Assurez vous de lire et de comprendre l int gralit du pr sent manuel avant de tenter d assembler d installer ou d uti...

Page 14: ...ctement L adaptateur ne devrait pas tre utilis si un r ceptacle trois m ches est disponible AVERTISSEMENT Avant de commencer l assemblage du produit assurez vous que toutes les pi ces sont pr sentes C...

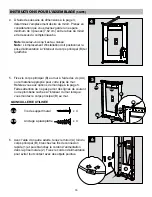
Page 15: ...ropre et douce comme la feuille de styromousse incluse dans le paquet Faites attention de ne pas gratigner ou endommager la surface du miroir 1 D vissez les deux vis DD situ es des deux c t s du corps...

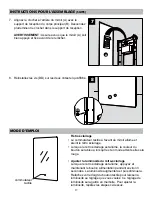
Page 16: ...mur l aide des vis AA ou le mat riel appropri pour votre type de mur R f rez vous aux options de montage la page 5 Faites attention de ne pas percer des lignes de courant ou de plomberie cach s l int...

Page 17: ...est allum la couleur du bouton sera bleue lorsqu il est en mode attente elle sera rouge Ajuster la luminosit du r tro clairage Lorsque le r tro clairage est allum appuyez et maintenant le bouton alim...

Page 18: ...its par le manufacturier Le manufacturier n est pas responsable de l installation du produit durant la p riode de la garantie Il n y a aucune garantie suppl mentaire Le fabricant n est pas l galement...

Page 19: ...to de Servicio al Cliente al 1 855 571 1044 de lunes a viernes de 8 00 a m a 8 00 p m hora est ndar del Este www greentouchchinaltd com English p 1 Fran ais p 10 Fecha de compra ______________________...

Page 20: ...CONTENIDO DEL PAQUETE 20 PIEZA DESCRIPCI N CANTIDAD A Espejo 1 B Estructura principal preensamblado al espejo A 1 A B...

Page 21: ...TO 21 PIEZA DESCRIPCI N CANTIDAD AA Tornillo de montaje en pared 4 BB Taco para tablaroca 4 AA BB Entrada de alimentaci n 120 VCA 60 Hz Potencial nominal Max 17 W Color de luz LED Blanco c lido 20 7 8...

Page 22: ...donde se est administrando ox geno 10 Para desconectar este aparato gire todos los controles a la posici n de apagado luego retire el enchufe del tomacorriente Lea y comprenda completamente este manu...

Page 23: ...producto aseg rese de que todas las piezas est n presentes Compare las piezas con la lista de contenido del paquete y la lista de contenido de herrajes Si falta alguna pieza o est da ada no intente e...

Page 24: ...pia y suave como la hoja de poliestireno incluida en el embalaje Tenga cuidado de no rayar o da ar la superficie del espejo 1 Retire dos tornillos DD situados a ambos lados de la estructura principal...

Page 25: ...mo se muestra 4 Fije la estructura principal B a la pared con los tornillos AA o el herraje m s adecuado para su tipo de pared Consulte las opciones de montaje en la p gina 5 Tenga cuidado de no perfo...

Page 26: ...t ENCENDIDA el bot n se ilumina de color azul cuando se encuentra en modo de espera se ilumina de color rojo Ajuste del brillo de retroiluminaci n Cuando la retroiluminaci n est ENCENDIDA mantenga pre...

Page 27: ...el producto durante el per odo de garant a No hay ninguna otra garant a expl cita El fabricante no ser legalmente responsable por da os incidentales consecuentes o especiales que surjan en relaci n co...

Reviews: