background image

AA

BB

CC

DD

EE

FF

3

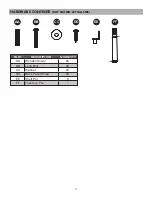
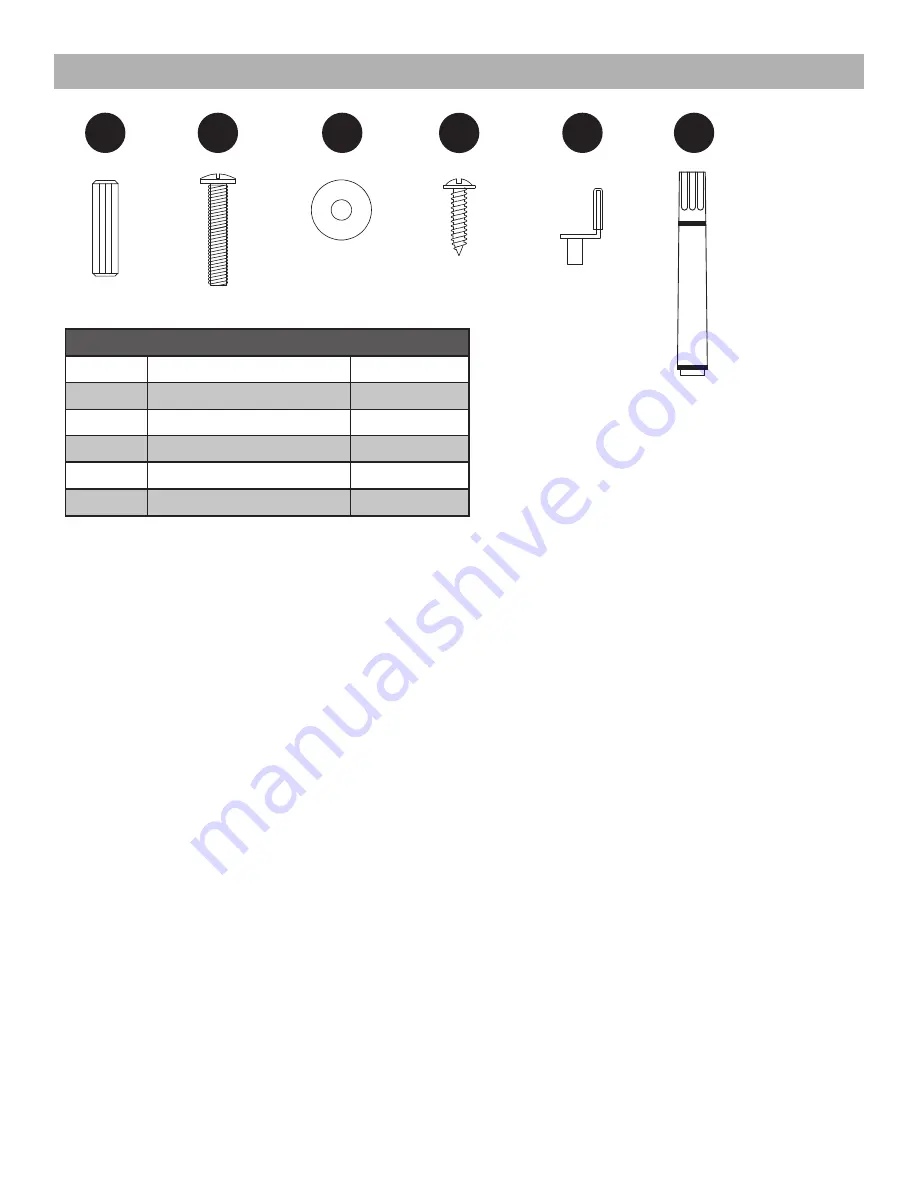
HARDWARE CONTENTS 

(NOT SHOWN ACTUAL SIZE)

PART

DESCRIPTION

QUANTITY

AA

Wooden Dowel

20

BB

Long Bolt

20

CC

Washer

20

DD

Back Panel Screw

28

EE

Shelf Pin

8

FF

Touch-up Pen

1

Summary of Contents for 1051FM-28-247

Page 1: ...ASSEMBLY CARE USE INSTRUCTIONS MODEL 1051FM 28 247 Fran ais p 11 Espa ol p 21 70 Fireplace Media Console Date Purchased _______________________ www greentouchhome com...

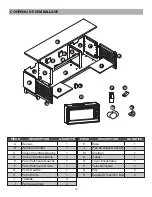
Page 2: ...iddle Wall 1 E Left Outer Wall 1 F Right Outer Wall 1 G Left Door 1 H Right Door 1 I Shelf 2 J Back Panel 2 PART DESCRIPTION QUANTITY K Base 1 L Center Support Leg 1 M Crystals 1 Pebbles 1 N Insert 1...

Page 3: ...AA BB CC DD EE FF 3 HARDWARE CONTENTS NOT SHOWN ACTUAL SIZE PART DESCRIPTION QUANTITY AA Wooden Dowel 20 BB Long Bolt 20 CC Washer 20 DD Back Panel Screw 28 EE Shelf Pin 8 FF Touch up Pen 1...

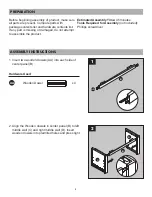
Page 4: ...aged do not attempt to assemble the product Estimated Assembly Time 45 minutes Tools Required for Assembly not included Phillips screwdriver 2 Align the Wooden dowels in center panel B to left middle...

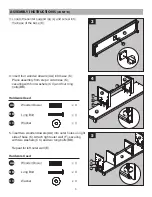
Page 5: ...four washers CC and four long bolts BB 5 Insert two wooden dowels AA into outer holes on right side of base K Attach right outer wall F securing with two washers CC and two long bolts BB Repeat for le...

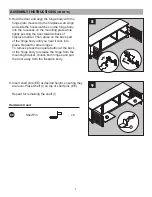
Page 6: ...outer wall E left middle wall C right middle wall D and right outer wall F Attach top A securing from underneath with ten washers CC and long bolts BB 7 From behind the assembly attach back panel J to...

Page 7: ...ireplace wall Align and slide the hooks catches on the hinge body into the recesses on the mounting plate while lightly pushing the door towards back of fireplace mantel Then press on the back part of...

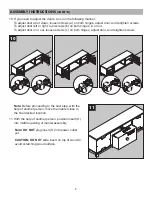
Page 8: ...adjust door in or out loosen screws c on both hinges adjust door and retighten screws 11 With the help of another person position insert O into middle opening of mantel assembly Note DO NOT plug inse...

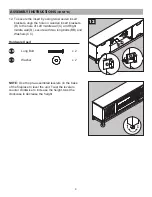
Page 9: ...ts R to the hole of Left middle wall C and Right middle wall D secure with two long bolts BB and Washers CC NOTE Use the pre assembled levelers on the base of the fireplace to level the unit Twist the...

Page 10: ...All other warranties expressed or implied with respect to the product its components and accessories or any obligations liabilities on the part of the manufacturer are hereby expressly excluded The ow...

Page 11: ...le m dia de 177 8 cm 70 po pour foyer www greentouchhome com English p 1 Espa ol p 21 INSTRUCTIONS D UTILISATION D ASSEMBLAGE ET DE MAINTENANCE MOD LE 1051FM 28 247 Date d achat ______________________...

Page 12: ...te 1 E Paroi Ext rieure Gauche 1 F Paroi Ext rieure Droite 1 G Porte Gauche 1 H Porte Droite 1 I Tablette 2 J Panneau Arri re 2 PI CE DESCRIPTION QUANTIT K Base 1 L Pied de Support Central 1 M Cristau...

Page 13: ...D EE FF 13 HARDWARE CONTENTS NOT SHOWN ACTUAL SIZE PI CE DESCRIPTION QUANTIT AA Groujon En Bois 20 BB Boulon Long 20 CC Rondelle 20 DD Vis Pour Le Panneau Arri re 28 EE Goupille Tablette 8 FF Crayon R...

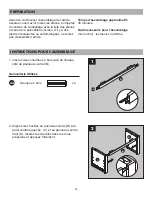
Page 14: ...s rez deux chevilles en bois AA de chaque c t du panneau central B 2 C B D PR PARATION Avant de commencer l assemblage de l article assurez vous d avoir toutes les pi ces Comparez le contenu de l emba...

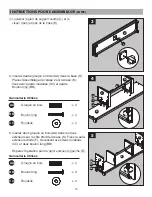
Page 15: ...lon long BB 5 Ins rez deux groujon en bois AA dans les trous ext rieurs sur le c t droit de la base K Fixez la paroi ext rieure droite F S curisant avec deux rondelles CC et deux boulon long BB R p te...

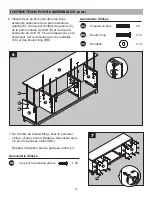
Page 16: ...e gauche C de la paroi centrale de droit D et de la paroi ext rieure de droit F Fixez le dessus A en le s curisant par le dessous avec dix rondelles CC et des boulon long BB 7 De I arri re de l assemb...

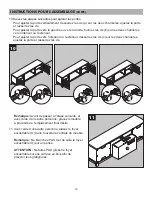
Page 17: ...du foyer Alignez et glissez les crochets prises sur le corps de la penture dans les niches de la plaque d assemblage tout en poussant l g rement la porte vers l arri re de la chemin e du foyer Ensuite...

Page 18: ...ante et avec l aide d une autre personne placez lemeuble proximit de l emplacement final d sir 2 2 2 2 2 2 10 1 3 1 1 1 3 O 11 10 Suivez les tapes suivantes pour ajuster les portes Pour ajuster la por...

Page 19: ...e la cloison centrale gauche C et de la cloison centrale droite D fixer avec deux boulon longues BB et des rondelles CC NOTE Utilisez les niveleurs pr assembl s sur la base du foyer pour niveler l app...

Page 20: ...origine tant que l achat a t effectu chez un fournisseur ou un revendeur autoris de l article La pr sente garantie est limit e la r paration ou au remplacement des pi ces qui pr sentent des d fauts de...

Page 21: ...Chimenea con consola multimedia de 70 www greentouchhome com English p 1 Fran ais p 11 INSTRUCCIONES DE ENSAMBLAJE CUIDADO Y USO MODELO 1051FM 28 247 Fecha de compra _______________________ 21...

Page 22: ...anel Exterior Izquierdo 1 F Panel Exterior Derecho 1 G Puerta Izquierda 1 H Puerta Derecha 1 I Estante 2 J Panel Posterior 2 PIEZA DESCRIPCI N CANTIDAD K Base 1 L Pata De Apoyo Central 1 M Ya Sean Cri...

Page 23: ...CONTENIDO DE HARDWARE NO SE MUESTRAN EN TAMA O REAL PIEZA DESCRIPCI N CANTIDAD AA Espiga De Madera 20 BB Perno Largo 20 CC Arandela 20 DD Tornillo Del Panel Posterior 28 EE Perno Para Estantes 8 FF Ap...

Page 24: ...x 4 AA 1 Inserte dos taquetes AA en cada lado del panel central B 2 C B D PREPARACI N Tiempo Estimado De Ensamblaje 45 minutos Herramientas necesarias para el ensamblaje no se incluyen Destornillador...

Page 25: ...go BB 5 Inserte dos espigas de madera AA en los orificios exteriores en el lado derecho de la base K Fije la pared exterior derecha F asegur ndola con dos arandelas CC y dos pernos largos BB Repita lo...

Page 26: ...izquierda C la Pared central derecha D y la Pared exterior derecha F Fije la parte superior A asegur ndola desde abajo con diez arandelas CC y pernos largos BB 7 Desde la parte posterior del ensamblaj...

Page 27: ...linee y deslice los ganchos pestillos en el cuerpo de la bisagra en los huecos en la placa de montaje mientras empuja ligeramente la puerta hacia la parte posterior de la placa de la chimenea A contin...

Page 28: ...ia afuera Para ajustar la puerta hacia adentro o afuera afloje los tornillos c de ambas bisagras ajuste la puerta y apriete nuevamente los tornillos 2 2 2 2 2 2 10 1 3 1 1 1 3 O 11 11 Con ayuda de otr...

Page 29: ...ed central izquierda C y la pared central derecha D y aseg relos con dos perno largos BB y arandelas CC NOTA Utilice los niveladores pre ensamblados sobre la base de la chimenea para nivelar la unidad...

Page 30: ...ja de la reparaci n reemplazo piezas defectuosas u otra situaci n y el fabricante no asume ninguna responsabilidad por las mismas El fabricante podr bajo su criterio eximirse de toda obligaci n respec...

Reviews: