background image


CALIBRATION INSTRUCTIONS 


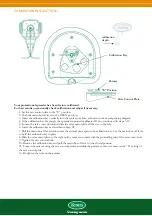
calibration 
depth 


Calibration Key


Pointer 


“E” Position 


Rate Control Plate

 
Your professional spreader has been factory calibrated.  
For best results, occasionally check calibration and adjust if necessary. 

1. Set the rate control plate to the “E” position. 
2. Push the main shutoff lever to the OPEN position. 
3. Insert the calibration key vertically into the center port hole, as shown in the accompanying diagram. 
4. If the calibration key fits snugly, the spreader is properly calibrated. If not, continue with steps 5-12. 
5. Loosen the rate control knob and slide the rate control plate all the way to the left. 
6. Insert the calibration key as described in Step #3. 
7. Pull the main shutoff lever back to ease the shutoff plate against the calibration key. Use the main shut off lever 
to hold the calibration key in place. 
8. Slide the rate control plate to the right until it comes in contact with the protruding end of the rate control rod. 
9. Tighten the rate control knob. 
10. Remove the calibration key and pull the main shut off lever to the closed position. 
11. Loosen the nuts securing the rate control pointer and slide the pointer so that it centers on the “E” setting of 
the rate control plate. 

12. Re-tighten the nuts on the pointer.


Summary of Contents for AccuPro 2000

Page 1: ... R S T Sportsmaster 4 3 7 L M N O P Q R S T U Sportsmaster CRF 3 5 0 Q R Y Sportsmaster Organic 3 5 5 V X R x2 Sierraform GT 6 3 7 I K L M M Greenmaster Pro Lite 6 3 7 M N Greenmaster Organic 9 4 0 O P P Fairwaymaster Mini 4 4 8 O P R S T H2Pro granules 5 4 0 J K M STEP Hi Mag 7 4 3 H I K Settings for DOUBLE PASS application at half rate Spreader setting at half label rates Amount of product g m2 ...

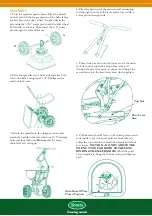
Page 2: ...m as shown and thread the second nut up to the pivot lever arm do not tighten 2 Place the spreader on its front side and attach the rest to the frame using four 2 1 2 Phillips screws and four lock nuts Top Nut Pivot Lever Arm 3 Return the spreader to the upright position and attach the handle to the rest with four 11 2 carriage bolts and four lock nuts Be sure that the main shutoff lever is facing...

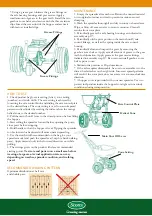
Page 3: ...atterns will result if the rotor plate does not rotate in a counter clockwise direction Grease Fittings 7 A hopper cover is provided with your new spreader Use it to protect turf product inside the hopper from light rain or windy conditions during transportation HOW TO USE 1 Check product bag for rate setting letter cone setting number and swath width The rate setting is achieved by loosening the ...

Page 4: ...th steps 5 12 5 Loosen the rate control knob and slide the rate control plate all the way to the left 6 Insert the calibration key as described in Step 3 7 Pull the main shutoff lever back to ease the shutoff plate against the calibration key Use the main shut off lever to hold the calibration key in place 8 Slide the rate control plate to the right until it comes in contact with the protruding en...

Reviews: