background image

5 — English

OPERATION

WALL-MOUNTED CHARGING STATION

See Figure 3, page 7.

The charger can be mounted on the wall, which allows you to 
recharge the battery pack while it is still installed in the tool. 

Charger should be mounted on a wall stud using the
screws provided.

Position the charger close enough to an outlet so an
extension cord is not required. Wrap any excess cord
remaining after plugging in the charger around the charger
body.

Make sure to mount the charger high enough to prevent
unauthorized activation of the tool during charging.

With the battery installed and the tool turned off, place

the tool in the charger by aligning the raised ribs on the

tool housing with the grooves in the charger as shown.

Slide the tool down until it is fully seated on the charger.

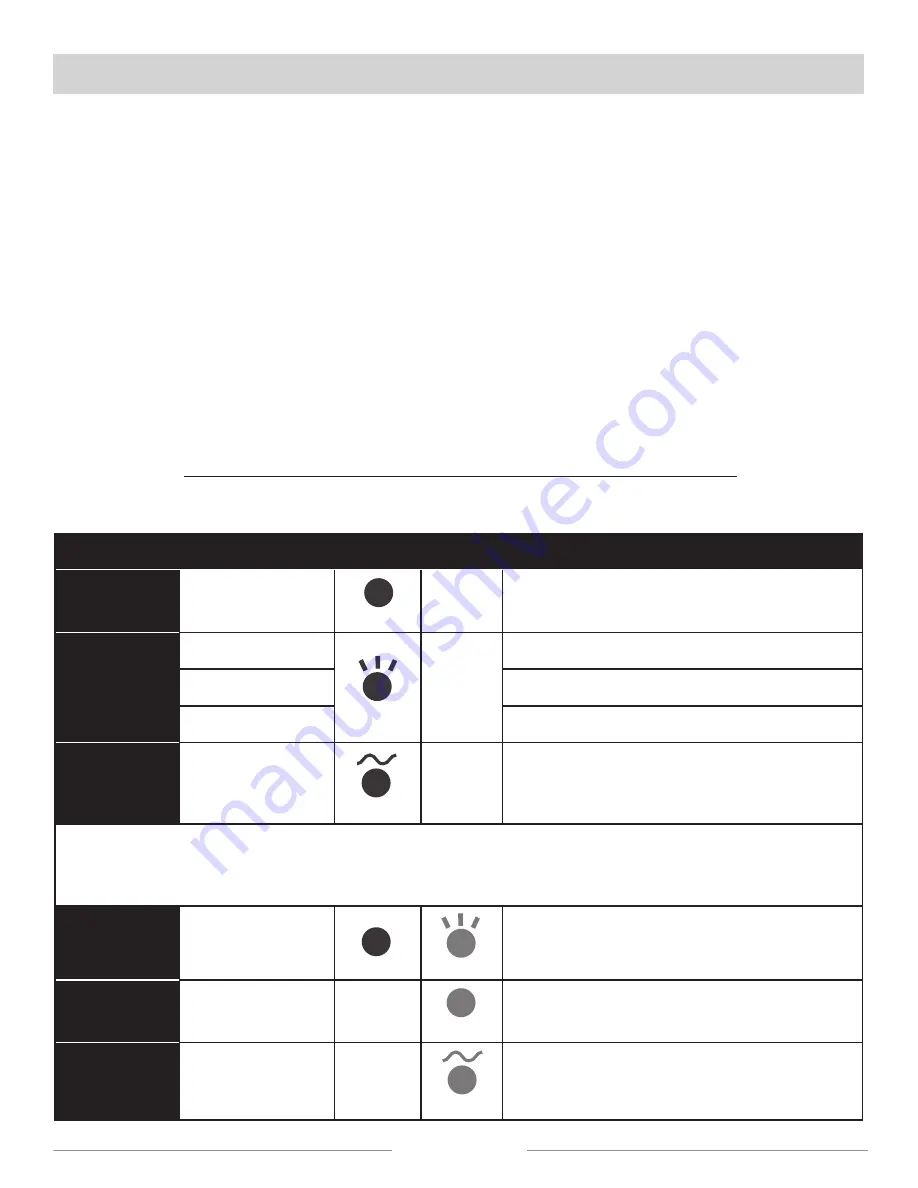
CHARGING A HOT BATTERY PACK

When using a tool continuously, the battery pack may 
become hot.  A hot battery pack may be placed directly 
onto the charger port but charging will not begin until the 
battery temperature cools to within acceptable temperature 
range.  When a hot battery pack is placed on the charger, 
the red LED will begin flashing and the green LED will be off.  
When the battery pack cools, the charger will automatically 
begin charging.

CHARGING A COLD BATTERY PACK

A cold battery pack may be placed directly onto the charger 
port but charging will not begin until the battery temperature 
warms to within acceptable temperature range.  When a cold 
battery pack is placed on the charger, the red LED will begin 
flashing and the green LED will be off.  When the battery 
pack warms, the charger will automatically begin charging.

MODE

BATTERY PACK

RED

LED

GREEN

LED

ACTION

Power

Without 
battery pack

ON

OFF

Ready to charge battery pack.

Testing

Hot battery pack

Flashing

OFF

When battery pack reaches cooled temperature, charger 
begins charge mode.

Cold battery pack

When battery pack reaches warmed temperature, char-
ger begins charge mode.

Deeply discharged

Charger pre-charges battery until normal voltage is 
reached, then begins charge mode.

Defective

Defective

Fading

OFF

Battery pack or charger is defective.

• If defective, try to repeat the conditions a second time by removing and reinstalling the battery pack. If the LED status repeats a

second time, try charging a different battery.

• If a different battery charges normally, dispose of the defective pack (see 

Maintenance

 section).

• If a different battery also indicates “Defective,” the charger may be defective.

Charging

Charging

ON

Flashing

Battery is being charged.

Charged

Battery is charged

OFF

ON

Battery is charged; charger is in Maintenance Mode.

Energy 
Save Mode

Battery full / 
Energy Save mode

OFF

Fading

Battery is charged and charger is in Energy Save mode.

LED FUNCTION OF CHARGER

Summary of Contents for S200

Page 1: ...OPERATOR S MANUAL 20 Volt Lithium Ion Battery Pack 2 20 Volt Lithium Ion Battery Charger 4 20 Volt Lithium Ion String Trimmer 12 ...

Page 2: ...perly dispose of a dropped or damaged battery immediately Batteries can explode in the presence of a source of ignition such as a pilot light To reduce the risk of serious personal injury never use any cordless product in the presence of open flame An exploded battery can propel debris and chemicals If exposed flush with water immediately Do not charge battery tool in a damp or wet location Follow...

Page 3: ...arms the charger will automatically begin charging OWT INDUSTRIES INC P O Box 35 Highway 8 Pickens SC 29671 USA 1 877 243 2774 www scotts com MAINTENANCE BATTERIES These batteries have been designed to provide maximum trouble freelife However likeallbatteries theywilleventually wear out Do not disassemble battery pack and attempt to replace the batteries Handling of these batteries especially when...

Page 4: ...anueld utilisationavant d employer ce produit TABLE OF CONTENTS Safety Rules for Charger 2 Symbols 3 Assembly 4 Operation 4 5 Maintenance 6 Illustrations 7 Parts Ordering and Service Back Page TABLE DES MATIÈRES Règles de sécurité concernant le chargeur 2 Symboles 3 Assemblage 4 Utilisation 4 5 Entretien 6 Illustrations 7 Commande de pièces et réparation Page arrière ÍNDICE DE CONTENIDO Reglas de ...

Page 5: ...w all instructions listed below may result in electric shock fire and or serious personal injury Before using charger read all instructions and cautionary markings in this manual on charger battery and product using battery to prevent misuse of the products and possible injury or damage WARNING Charge only one lithium ion rechargeable battery at a time Other types of batteries may burst causing pe...

Page 6: ...characteristic of current SYMBOL NAME DESIGNATION EXPLANATION The following signal words and meanings are intended to explain the levels of risk associated with this product SYMBOL SIGNAL MEANING DANGER Indicates an imminently hazardous situation which if not avoided will result in death or serious injury WARNING Indicates a potentially hazardous situation which if not avoided could result in deat...

Page 7: ... This allows the charger to conserve energy by charging batteries only as needed and alsoprotectsthecellsandmaximizesthelifeofyourbatteries n If any parts are damaged or missing please call 1 877 243 2774 for assistance OPERATION CHARGING See Figures 1 2 page 7 Battery packs are shipped in a low charge condition to prevent possible problems Therefore you should charge them before first use If the ...

Page 8: ...d battery pack may be placed directly onto the charger port but charging will not begin until the battery temperature warms to within acceptable temperature range When a cold battery pack is placed on the charger the red LED will begin flashing and the green LED will be off When the battery pack warms the charger will automatically begin charging MODE BATTERY PACK RED LED GREEN LED ACTION Power Wi...

Page 9: ...commercial solvents and may be damaged by their use Use clean cloths to remove dirt dust oil grease etc NOTE FIGURES ILLUSTRATIONS START ON PAGE 7 AFTER FRENCH AND SPANISH LANGUAGE SECTIONS WARNING Do not at any time let brake fluids gasoline petroleum based products penetrating oils etc come in contact with plastic parts Chemicals can damage weaken or destroy plastic which can result in serious p...

Page 10: ...e C Depress latches to remove battery pack enfoncer les attaches pour retirer le bloc pile para extraer el paquete de baterías oprima los pestillos B A Fig 3 CHARGER SHOWN WITH S20200 STRING TRIMMER EDGER CHARGEUR ILLUSTRÉ AVEC UN TAILLE BORDURES COUPE BORDURES À FIL S20200 SE MUESTRA EL CARGADOR CON RECORTADORA DE HILO BORDEADORA S20200 A Raised ribs on tool nervures élevées sur l outil costillas...

Page 11: ...s en ligne au www scotts com ou en téléphonant au 1 877 243 2774 Pour obtenir de l aide en contactant le service à la clientèle Pour contacter le service à la clientèle pour une question technique ou pour tout autre renseignement veuillez nous téléphoner au 1 877 243 2774 PIEZAS DE REPUESTO Y SERVICIO Antes de solicitar servicio técnico o comprar piezas de repuesto obtenga su modelo y número de se...

Page 12: ...Assembly 6 Operation 7 8 Maintenance 9 10 Troubleshooting 10 Warranty 11 Parts Ordering and Service Back Page TABLE DES MATIÈRES Instructions importantes concernant la securite 2 3 Symboles 4 Caractéristiques 5 Assemblage 6 Utilisation 7 8 Entretien 9 10 Dépannage 10 Garantie 11 Commande de pièces et réparation Page arrière ÍNDICE DE CONTENIDO Instrucciones de seguidad importantes 2 3 Símbolos 4 C...

Page 13: ...scopique brazo telescópico G Line cut off blade lame de sectionnement de ligne cuchilla de corte del hilo H Grass defector déflecteur d herbe deflector de hierba A Fig 2 B E D F A Trigger lock out verrouillage de la gâchette seguro del gatillo B Switch trigger gâchette gatillo del interruptor Fig 5 H B A Fig 4 A Latches loquets pestillos C A Grass deflector déflecteur d herbe deflector de hierba B...

Page 14: ... Fig 16 A B Fig 14 Fig 9 Fig 12 D A B E PROPER OPERATING POSITION POSITION D UTILISATION CORRECTE POSICIÓN CORRECTA PROPER EDGING OPERATING POSITION POSITION D UTILISATION CORRECTE POUR COUPE BORDURES POSICIÓN CORRECTA PARA EL MANEJO DE LA CORTAR BORDES A A Screw vis tornillo B Line cut off blade lame coupe ligne cuchilla de corte C A A Rotating rear handle poignée arrière rotative mango delantero...

Page 15: ... radiators ranges and refrigerators There is an increased risk of electric shock if your body is grounded AvoidDangerousEnvironments Don texposeappliance or string trimmer to rain or wet conditions Water enter ing an appliance or string trimmer will increase the risk of electric shock Use Right Appliance Do not force tool Use the correct tool for your application The correct tool will do the job b...

Page 16: ...tool If you loan someone this power tool loan them these instructions also Make sure all guards straps deflectors and handles are properly and securely attached Use only the manufacturer s replacement line in the cutting head Do not use any other cutting attachment for example metal wire rope or the like To install any other brand of cutting head to this string trimmer can result in serious person...

Page 17: ...ATION Safety Alert Indicates a potential personal injury hazard Read Operator s Manual To reduce the risk of injury user must read and understand operator s manual before using this product Eye Protection Always wear eye protection with side shields marked to comply with ANSI Z87 1 Wet Conditions Alert Do not expose to rain or use in damp locations Keep Bystanders Away Keep all bystanders at least...

Page 18: ...ff blade ADJUSTABLE FRONT HANDLE The front handle assembly can be adjusted for ease of operation and to help prevent loss of control BATTERY FUEL GAUGE The battery fuel gauge shows the amount of charge in the battery when the trigger is depressed GRASS DEFLECTOR The trimmer includes a grass deflector that helps protect from flying debris LOCK OUT LEVER Engaging the lock out lever prevents accident...

Page 19: ...d or missing parts could result in serious personal injury WARNING Do not attempt to modify this product or create accessories not recommended for use with this product Any such alteration or modification is misuse and could result in a hazardous condition leading to possible serious personal injury WARNING To prevent accidental starting that could cause serious personal injury always remove the b...

Page 20: ...hen charging the battery while installed on the tool always make sure to engage the lock out lever to prevent accidental starting Failure to do so could result in serious personal injury WARNING To avoid serious personal injury always remove the bat tery pack and keep hands clear of the trigger lock out when carrying or transporting the tool STARTING STOPPING THE STRING TRIMMER See Figure 6 To sta...

Page 21: ... and start of the switch trigger until the line reaches the length of the grass deflector cut off blade Resume trimming OPERATION ADVANCING THE LINE MANUALLY See Figure 11 Remove the battery pack Push the black button located on the string head while pulling on line to manually advance the line LINE CUT OFF BLADE See Figures 12 Thistrimmerisequippedwithalinecut offbladeonthegrass deflector For bes...

Page 22: ...ACEMENT See Figure 15 Use only 0 065 in or 0 080 in twisted monofilament line Use original manufacturer s replacement spool for best performance Remove the battery pack Push in tabs on side of spool retainer Pull spool retainer up to remove Remove the old spool To install the new spool make sure the line is captured in the slot on the new spool Make sure the end of the line is extended approximate...

Page 23: ...ile pressing button Remove line from spool and rewind Refer to Line Replacement earlier in this manual Grass wraps around shaft housing and string head Cutting tall grass at ground level Cuttallgrassfromthetopdowntopreventwrapping Motor fails to start when switch trigger is depressed Battery is not secure Battery is not charged To secure the battery pack make sure the latches on each side of the b...

Page 24: ...rts or accessories which are incompatible with the Scotts brand outdoor product or adversely affect its operation performance or durability In addition this warranty does not cover A Tune ups Spark Plugs Carburetor Carburetor Adjustments Ignition Filters B Wear items Bump Knobs Outer Spools Cutting Lines Inner Reels Starter Pulleys Starter Ropes Drive Belts Tines Felt Washers Hitch Pins Mulching B...

Page 25: ...ón Número de modelo___________________Número de serie_______________________ Para obtener piezas de repuesto Las piezas de repuesto se pueden comprar en nuestro sitio en la red mundial en la dirección www scotts com o llamando al 1 877 243 2774 Las piezas de repuesto también se pueden obtener en uno de nuestros Centros de Servicio Autorizados Para localizar un centro de servicio autorizado Puede e...

Reviews: